Installation and Dashboard
Updated on Mar 7, 2024
Finally, it is time to discuss the star of this tutorial: the LiteSpeed Cache plugin for WordPress. We are super excited to tell you about it because we have had it integrated into our services for a very long time, and our customers have loved it. To start, we must discuss its prerequisites.
- WordPress 4.0 or higher;
- PHP 5.3 or higher;
- Either a LiteSpeed Web Server or LiteSpeed-powered Hosting.
Our hosting services cover all three of those requirements and are always kept up to date, including the latest PHP versions. The FastCloud Extra hosting plan uses LiteSpeed as its web server, and the WordPress version is up to our customers to keep updated. As always, we strongly recommend you keep your software as up-to-date as possible. That keeps it as secure as possible.
Installation
Fortunately, installing the LSCache plugin for WordPress is just as easy as installing any other plugin. Our hosting services offer two general ways to install plugins: via your website’s dashboard or through the WPToolkit.
It does not matter which method you use; both will install the plugin regardless. Once the plugin is installed and activated, you should see this dashboard when you go to the menu in WordPress.
The Dashboard
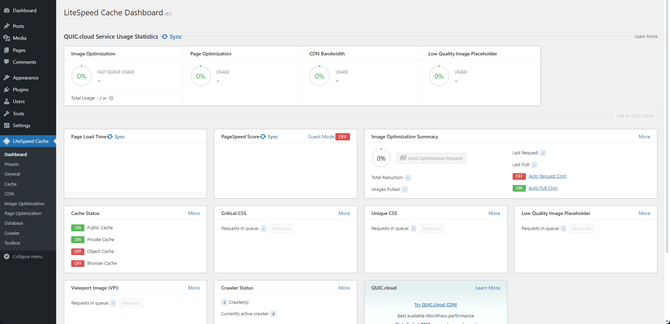
The first page of the LiteSpeed Cache plugin. It offers plenty of information about what the plugin does. It allows you to see the status of the plugin, its services, and QUIC.cloud. To briefly sum up each section:
- QUIC.cloud Service Usage Statistics - As the name suggests, you will find all the usage statistics if you have connected your website to QUIC.cloud. If you are unfamiliar with it, it is a CDN service, like CloudFlare. QUIC was explicitly created for WordPress by the LiteSpeed team, so it is vastly more optimized for the CMS than CloudFlare is. This section is a simplified version of QUIC’s dashboard;
- Page Load Time - The name says it all. Here, you will find all the stats for the loading time of your homepage. The Before and After sections show the homepage’s performance without and with the LiteSpeed optimizations, respectively;
- Page Speed Score - This section will show how much your page speed has improved while the plugin was installed. Like the previous section, there is a Before and After;
- Image Optimization Summary - The LSCache plugin also has image optimization functionalities, and you will find a summary of what they have achieved here;
- Cache Status - Shows which cache options are enabled;
- Critical and Unique CSS - Both of these fields will show you what optimizations have been performed to the CSS of your website;
- Low Quality Image Placeholder - Also known as LQIP, this technique optimizes the loading of images on your websites. Here, you can see all the pending requests and if they are being processed;
- View Port Image - A part of the QUIC services, VPIs enhance the loading speeds of images on your website;
- Crawler Status - This section shows the number of defined crawlers and if any of them are currently running. You will also see crawler statistics, such as what was most recently crawled, how long that lasted, and why it ended;
- QUIC.cloud - You can do so from this field if you have not connected to the CDN.
As you can see, this addon uses many technologies, not just caching. This tutorial will break down each one. We will go down each section of the plugin, beginning with Presets and General.

WordPress Hosting
- Free WordPress Installation
- 24/7 WordPress Support
- Free Domain Transfer
- Hack-free Protection
- Fast SSD Storage
- Free WordPress Transfer
- Free CloudFlare CDN
- Immediate Activation