Page Optimization
Updated on Mar 7, 2024
It is time to explore another considerable functionality of the LiteSpeed Cache plugin for WordPress: page optimization. This plugin can cache your website’s content and optimize its images, as well as optimize various elements and code of your pages! As you can imagine, this can significantly benefit your website.
However, we strongly recommend you test these settings in a staging environment and not on your live website. Changes here can potentially cause website issues, and additional tweaking will be required. Of course, as always, we will provide you with what we think is the most optimal arrangement that should also work on most websites. Please keep in mind, though, that there is no guarantee these settings will work on all websites.
You Will Read About These Tabs:
CSS Settings
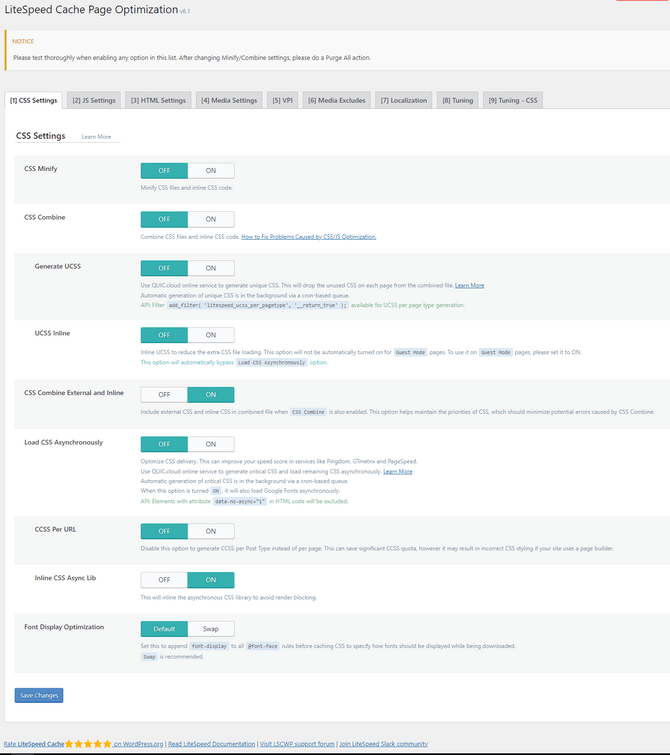
The first tab in this section, CSS Settings, is where you can control how the plugin optimizes CSS on your website. There are a lot of options, so let’s get started.
- CSS Minify - Turning this ON will remove any unnecessary characters from the CSS code. This optimized code should be generally beneficial for your website’s speed;
- CSS Combine - This setting will combine all your CSS files into one, potentially saving disk space. We recommend thoroughly testing this setting before leaving it enabled, as it typically varies from website to website if it will be beneficial;
- Generate UCSS - Only enable this if the above is also active. Generating Unique CSS is a QUIC.cloud service that can create a single streamlined CSS file for each site page. Each page’s combined file will be unique because it will only include the CSS needed to render that page. Each file’s size should remain small; therefore, processing times will be reduced;
- UCSS Inline - Typically, we suggest keeping this OFF, even if you are using UCSS. This setting stores generated UCSS inline with the HTML rather than as its own separate CSS file. However, we recommend keeping the files separate, as that will be more beneficial for actual users. The only benefit you will see from this is when it comes to PageSpeed insights;
- CSS Combine External and Inline - Enable if CSS Combine is also on. Otherwise, keep it set to OFF. If you enable it, not only will local files be combined, but external CSS and CSS found inline with HTML will also be combined;
- Load CSS Asynchronously - Test this option thoroughly before enabling it. Typically, web pages load the usual way, where the browser loads the CSS from the HTML header before displaying the content in the HTML body. If you enable this option, CSS and HTML will be loaded at the same time. Pages can load more quickly by processing CSS and HTML asynchronously, but they may initially load without formatting. To avoid that problem, LiteSpeed automatically generates Critical CSS when Load CSS Asynchronously is enabled. Critical CSS is a collection of styles necessary for correctly displaying above-the-fold content, and are inserted inline into and processed with the HTML code, eliminating the above problem. If that is something you want for your website, and it won’t break it, feel free to enable this option;
- CCSS Per URL - Only enable if the previous setting is on. We also recommend avoiding this setting if you are using a page builder of any sort. Enabling it will generate CCSS per Post Type instead of per individual page. That can save a lot of disk space but may result in incorrect CSS styling. Test thoroughly;
- Inline CSS Async Lib - If you enable this setting, it will inline the asynchronous CSS library to avoid render blocking. If that is something you are concerned about, turn it on. Otherwise, we recommend keeping it OFF;
- Font Display Optimization - The DEFAULT setting is just fine for most websites. Still, if you notice any issues displaying fonts while being downloaded, you can change it.
As you can see, we didn’t tell you a specific setting for every option here. That is because you must test your website thoroughly before deciding whether to use any of them. Be careful, and always do it in a staging environment first.
JS Settings

Fortunately, the JS Settings tab is much shorter and has fewer options. That is not to say these options are not as impactful as the rest, though!
- JS Minify - Turn this ON. It will strip any unnecessary characters from your website’s JavaScript;
- JS Combine - All individual JS files will be combined into a single JS file. We recommend keeping this OFF, as it may cause issues;
- JS Combine External and Inline - Like the same option in the CSS Settings, the plugin will combine local JavaScript and external and inline. Only enable if the previous option also is;
- Load JS Deferred - You will have to perform a few tests. Whether you choose Deferred or Delayed, all JavaScript loading will be held until HTML loads first. Deferred will run the JavaScript as soon as the HTML is done loading. In contrast, Delayed will run only when the application detects user activity. Both can substantially improve your website’s loading speed, but it depends from website to website.
That is it for the JS Settings tab. It is short and sweet, with a lot of optimization potential.
HTML Settings
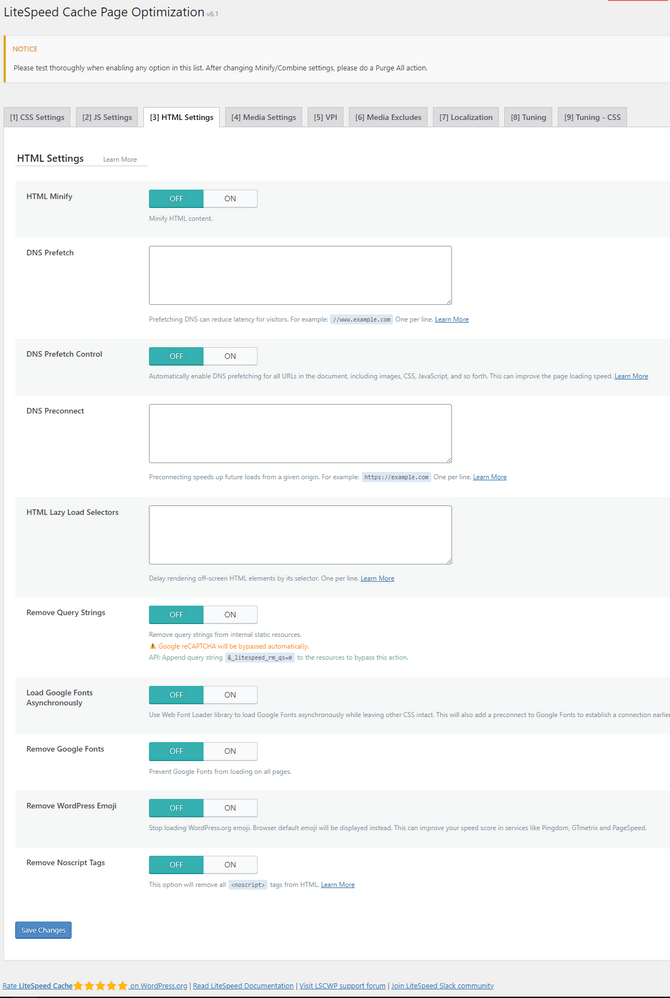
Much like the previous two tabs, HTML Settings offers various ways to optimize the functionality of your website’s HTML code. Since HTML is used on most websites nowadays, testing the options in this tab is something you should definitely consider. Here they are.
- HTML Minify - Turn this ON. There should be no downsides, and it will clear out your HTML code of unnecessary characters;
- DNS Prefetch - You can specify domains for DNS resolution before it is requested. By prefetching DNS results, visitors’ latency can be significantly reduced as they click external links, particularly on mobile networks. Only one domain per line, and each must begin with //. Example: //www.domain.com;
- DNS Prefetch Control - This will enable DNS Prefetch for your entire website instead of adding the URLs one by one in the previous option. Turn it ON, and it will improve your website’s performance;
- DNS Preconnect - Similar to the above. While DNS Prefetch will stop after performing the DNS resolution, DNS Preconnect will actually perform the connection handshake. There is no option to enable this for your entire website, though, so you must add the URLs that should benefit from this. Like with the previous field, domains must be one per line, with two slashes in front of them: //www.domain.com;
- HTML Lazy Load Selectors - Place any HTML selectors in this field to lazyload them;
- Remove Query Strings - Enabling this will strip the query strings from static resources. You can choose to turn it ON or OFF. The effects should be marginal in either case;
- Load Google Fonts Asynchronously - You must test this one with a website tester like GTMetrix. Keep an eye on the Waterfall fonts tab and the differences in your load times there. Varies from website to website;
- Remove Google Fonts - Only enable if you are hosting fonts locally and want to make sure any third-party fonts aren’t being loaded on your website;
- Remove WordPress Emoji - Removes a JavaScript setting that introduces emoji support for older browsers. Most newer browsers have their own support for emojis, so turn this OFF. It will improve performance;
- Remove Noscript Tags - <noscript> tags are used for compatibility with older browsers that don’t support JavaScript or modern browsers where JS is turned off for security reasons. We recommend keeping this setting OFF for compatibility reasons. The tags will not impact your website’s performance in any significant way.
Media Settings
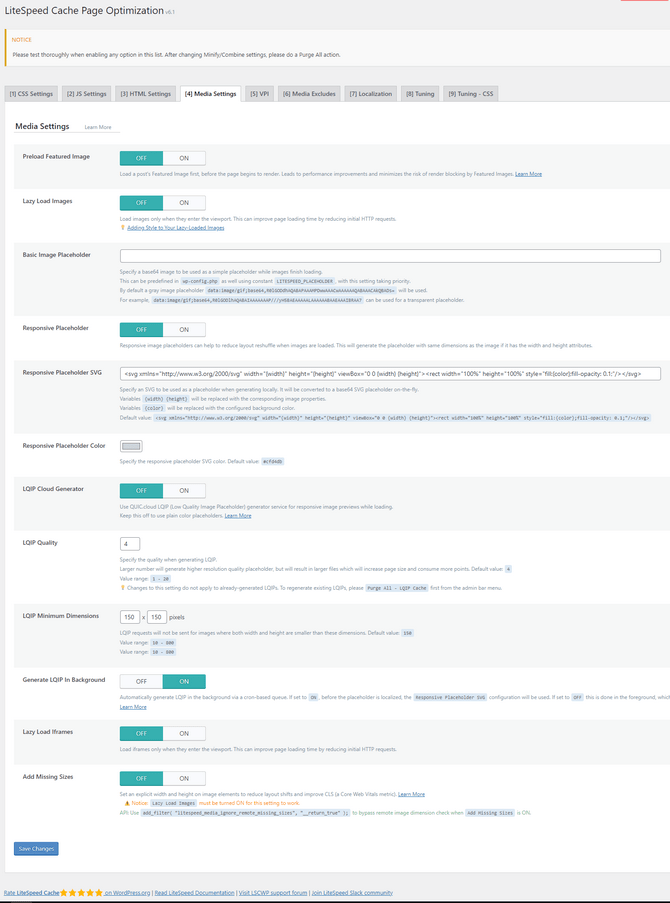
This is another extensive tab of optimization options, but this time for your website’s media files. The available options revolve mainly around how images are loaded, and there are many different ways you can affect that.
- Preload Featured Image - Turn this ON. It will allow browsers with preload support to do precisely that: preload your posts’ featured images before the page begins to render. That way, the image should never be a blocking element;
- Lazy Load Images - Set this option to ON as well. Enabling it will only load images once they are on your screen (in the “viewport”). Images that have yet to be scrolled to will not be loaded in. As you can imagine, that can conserve server resources and improve performance. If you would like images to not “pop in” when scrolled to, you can add a fade-in effect;
- Basic Image Placeholder - You can assign a custom placeholder image to be served while the actual image itself is loading. By default, the placeholder is a gray box, but you can specify any base64 image you want;
- Responsive Placeholder - If you are using the Basic Image Placeholder, you can enable this. That way, image shuffling should be reduced to a minimum as images are loaded, as long as said image has the width and height attributes;
- Responsive Placeholder SVG - Here, you can specify the SVG image to be used as a placeholder. It will be converted to the appropriate format on the fly, and width and height attributes will be replaced with the proper values of the image;
- Responsive Placeholder Color - The responsive placeholder’s color;
- LQIP Cloud Generator - Turn this ON so that a Low Quality Image Placeholder (LQIP) will be generated while the actual image loads. The LQIP will be minified and blurred, but it will be better than just a solid color placeholder;
- LQIP Quality - You can assign any number between 1 and 20. 4 is the default, and higher numbers will result in higher quality LQIP but also larger file sizes. Old LQIPs will not be converted if this value is changed. Test it out and see which number you like the most;
- Generate LQIP In Background - We recommend turning this ON if you use LQIP for your website. If you keep it off, it may actually slow down the loading speed of pages since the generation will happen while the user waits;
- Lazy Load Iframes - This is exactly the same as Lazy Load Images, but for iframes, like videos. Turn it ON.
- Add Missing Sizes - Set this option to ON. It must be used in conjunction with Lazy Load Images. This option will add the width and height attributes to images lacking them. Setting such explicit attributes will reduce layout shifting while loading and therefore improve user experience.
All of these optimization options are bound to help your website speed up significantly. As always, please make sure to test them first to ensure they work for your website before applying them.
VPI
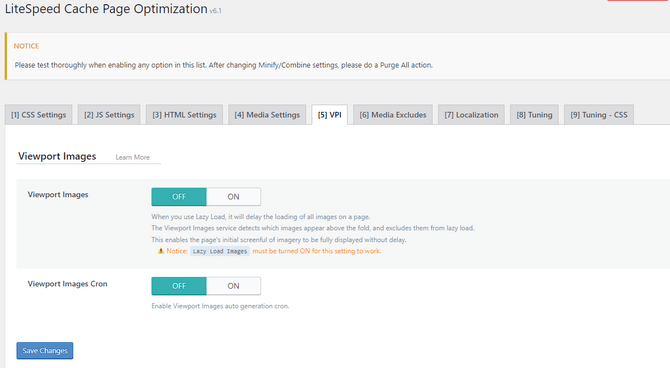
The VPI (Viewport Images) tab has only two options, and they deal with excluding images from lazy loading. Specifically, images that load above the fold (the visible part of the webpage). That is a service provided by QUIC.cloud, and each time a URL is submitted, it detects which images will appear on the user’s screen (above the fold) and which won’t. Those immediately on the screen will load alongside the page, while the rest will lazy load instead.
- Viewport Images - Turn this ON. Lazy Load Images must be enabled first. These viewport images will be generated in the background while the page is loading for best user experience;
- Viewport Images Cron - Turn this ON as well. This will enable a cron job for generating these VPIs automatically.
Media Exclude
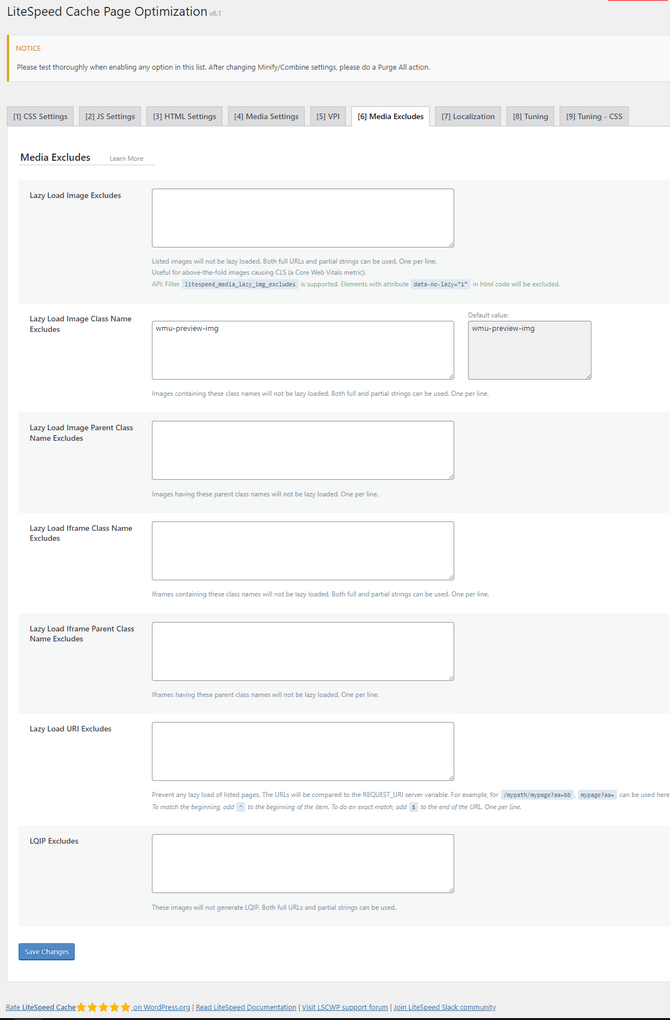
The Media Exclude tab allows you to manually add exceptions for images and other related elements from lazy loading.
For example, the Viewport Images option tries to exclude viewport images from lazy loading. Still, you can also add them here, just to be sure. We recommend adding images that will always be above the fold and viewport images to the lazy load exception field: logos, header and sidebar images, featured images, etc.
The fields aren’t all for just images, though, so feel free to test them out and set them up as per your website’s needs.
Localization
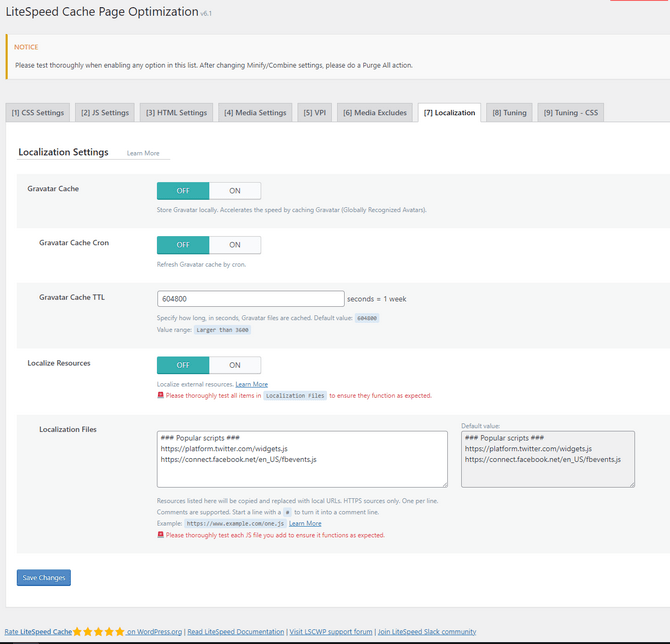
Next up, the Localization tab allows you to store external resources in the local cache for faster serving and performance. Those resources are Gravatars (Globally Recognized Avatars) and external JavaScript you have no control over.
- Gravatar Cache - Turn this ON. That way, any Gravatars will be cached locally at a minimal resource cost. Websites that receive a lot of comments from users with Gravatars will benefit the most from this;
- Gravatar Cache Cron - If you have enabled the previous option, then set this to ON as well. That way, the Gravatar cache can be refreshed automatically via a cron job;
- Gravatar Cache TTL - How long the Gravatar cache persists before it needs to be refreshed. The default value of one week (604800 seconds) is perfectly fine;
- Localize Resources - We recommend turning this ON. That way, your website will download any external JavaScript and optimize it locally. For instance, JavaScript resources hosted on external sources like Google or Facebook are the perfect candidates for this localization. Add URLs to them below;
- Localization Files - Write the URLs of the JavaScript external resources you want to be localized here. That only works via HTTPS; each URL should be on a new line. You can typically find such resources by running a Lighthouse audit. If you have Chrome, you can open the console with CTRL+Shift+J and then go to Lighthouse. Select your preferred options and run the audit on the website you are currently visiting. The resources might appear in the Reduce JavaScript Execution Time and Avoid Erroneous Network Payloads tabs.
While storing Gravatars and JavaScript resources locally may take up a marginal amount of space, it is definitely worth it. Below, you will find an example list of resources to localize.
Resources
- CDNs
- https://ajax.aspnetcdn.com
- https://ajax.cloudflare.com/
- https://ajax.googleapis.com/ajax/
- https://cdn.jsdelivr.net/
- https://cdnjs.com/
- https://cdnjs.cloudflare.com/
- https://code.jquery.com/
- https://maxcdn.bootstrapcdn.com/
- https://netdna.bootstrapcdn.com/
- https://oss.maxcdn.com/
- https://stackpath.bootstrapcdn.com/
- Popular Scripts
- https://maps.google.com/maps/api/js
- https://maps.googleapis.com/maps/api/js
- https://pagead2.googlesyndication.com/pagead/js
- https://platform.twitter.com/widgets.js
- https://platform-api.sharethis.com/js/
- https://s7.addthis.com/js/
- https://stats.wp.com/
- https://ws.sharethis.com/button/
- https://www.google.com/recaptcha/api.js
- https://www.google-analytics.com/analytics.js
- https://www.googletagmanager.com/gtag/js
- https://www.googletagmanager.com/gtm.js
- https://www.googletagservices.com/tag/js/gpt.js
- https://connect.facebook.net/en_US/fbevents.js
- https://connect.facebook.net/signals/config/
Tuning and Tuning-CSS
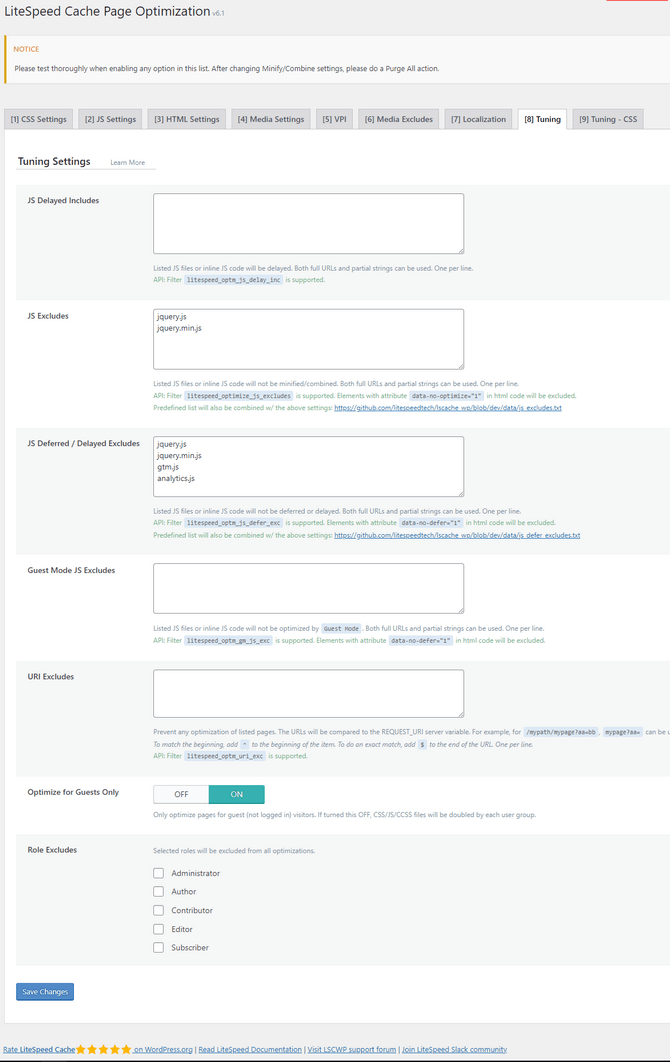
The Tuning and Tuning - CSS tabs offer various fields and options for excluding specific things from being optimized. Things like CSS, JS, Guest Mode JS, deferred JS, URLs, etc. Typically, leaving things as they are in this tab is sufficient.
If a specific setting breaks your website, though, like combining or minifying CSS/JS, you can try adding the file that causes the issue here. Most users won’t use this tab at all, as it definitely requires a higher level of expertise. Just don’t forget to save your changes, or you might wonder why it is not working!
Those tabs are the end of the Page Optimization section. We know there are many options, but we hope our explanations and suggestions have clarified things for you. Use them wisely, and always test before you commit!

WordPress Hosting
- Free WordPress Installation
- 24/7 WordPress Support
- Free Domain Transfer
- Hack-free Protection
- Fast SSD Storage
- Free WordPress Transfer
- Free CloudFlare CDN
- Immediate Activation