WordPress Dashboard Overview
Updated on Jul 9, 2025
WordPress is famous for its ease of use and its dashboard contributes immensely to that fame. In case you are unfamiliar with a dashboard, it is the control panel for the entire WordPress website. Through it, users can manage all aspects of their website, from creating new pages and posts to editing the site's appearance and managing its settings and plugins. The dashboard is laid out in a simple but effective way that is intuitive to navigate and use. All the options are labeled clearly, and if anything is unclear, in-depth documentation is available for each of them.
In this section of our WordPress tutorial, we will review all of the available options in the WordPress dashboard and show you how to use them! This article will provide a quick overview of the options before we discuss each individually.
That said, read along for a general overview of the options in the WordPress administrative dashboard.
This post includes:
Dashboard Overview
After installing WordPress, you should have an administrative account name and password. With those credentials, you can log into your WordPress site's dashboard. To do so, simply append /wp-admin to the end of your website's URL. Like this: https://example.com/wp-admin.
Once you have opened the dashboard, it will look something like this.
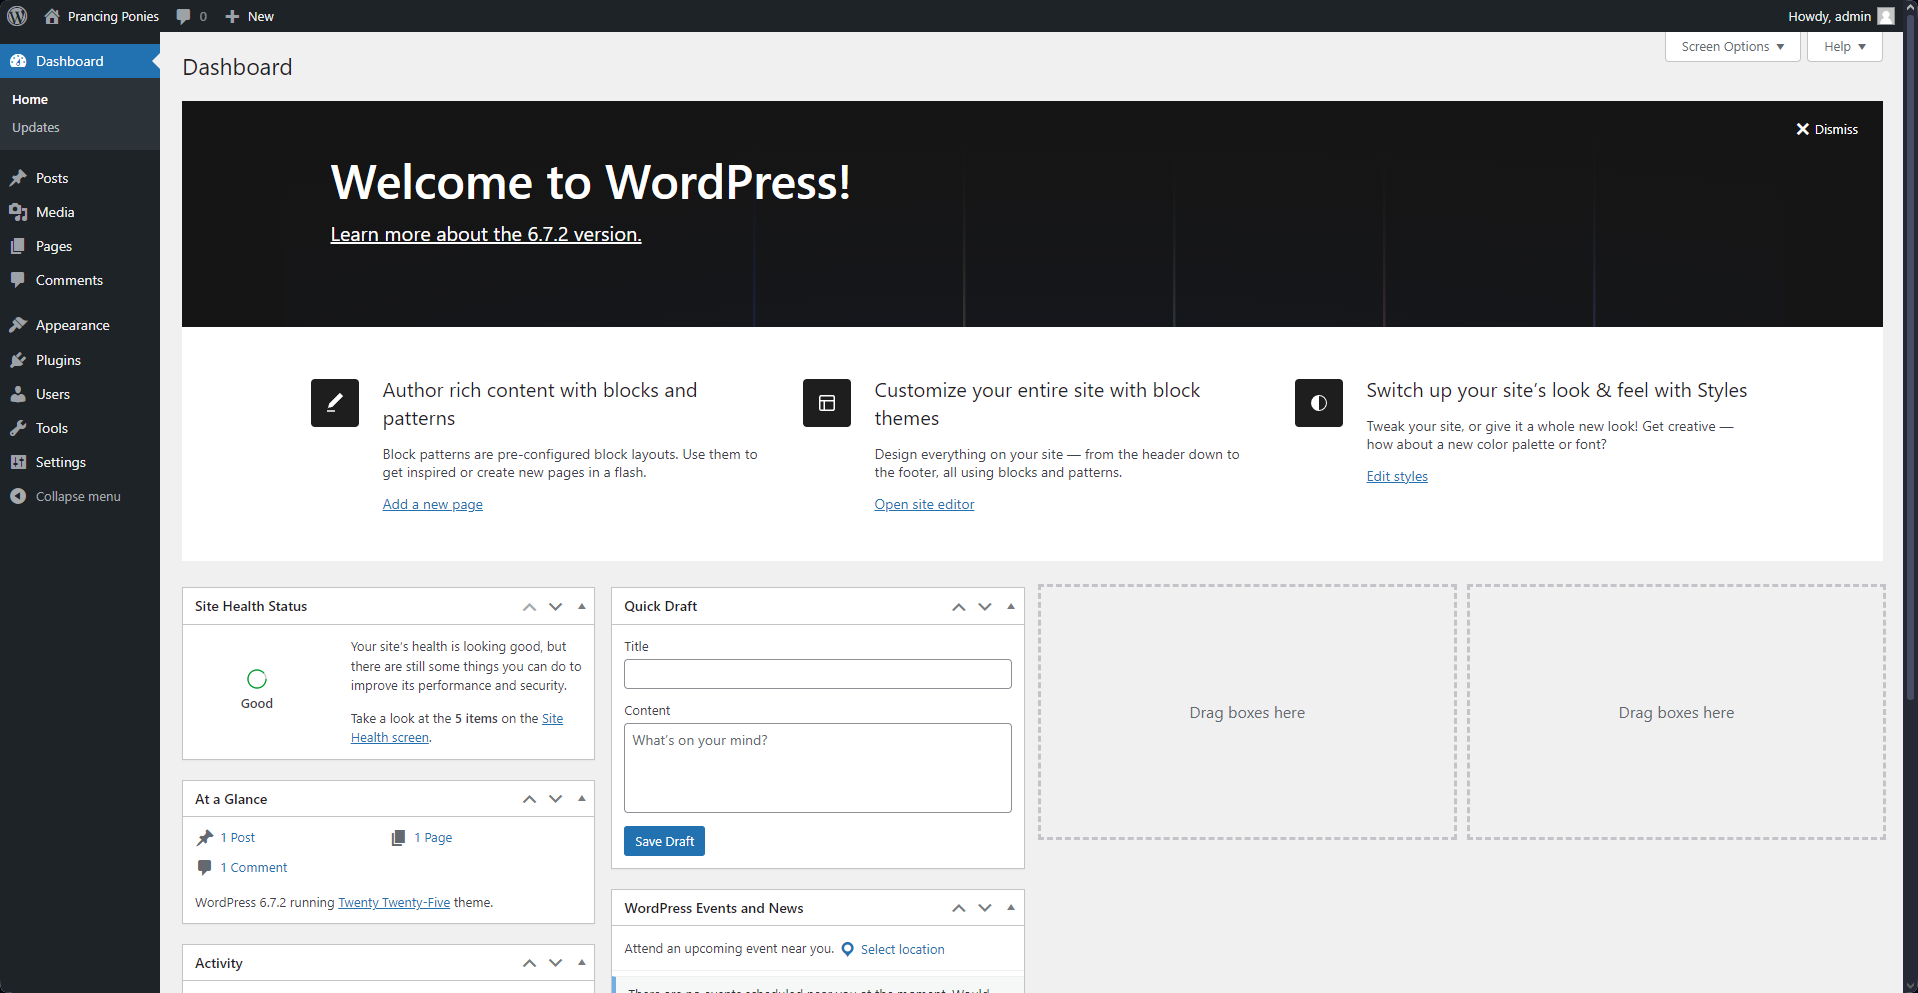
That is what the dashboard of a brand-new WordPress installation looks like. If yours looks differently, you most likely have plugins or themes that change its appearance. As you can see, the main part of the screen is taken up by a banner showing the site's version and multiple quick-access options. You have buttons for creating a new page, opening the site editor, editing styles, the Site Health screen, quick drafting, and more. At the top of the page, you will see two drop-down menus: Screen Options and Help. The former will let you customize this home page, while the latter will be your trusty companion throughout this dashboard. Click it on any dashboard page and find a link to that section's official documentation.
The WordPress dashboard's next major section is the left vertical menu. That is the primary method of navigating through the dashboard, and it is also where you will find any options added by plugins or themes. More on those will be discussed in the later sections of this tutorial. For now, though, let us briefly examine each section and briefly explain their purpose.
Dashboard
This is the primary section of the WordPress dashboard. It consists of two parts: Home and Updates.
Posts
All available options for creating and managing Posts are within this section.
- All Posts - Here, you will find a table of all your current posts. This includes published and drafted ones. The table shows information such as Author, Categories, Tags, and Publish Date. Additionally, you can create or manage posts directly from this page;
- Add New Post - This option will take you directly to the Post Editor. In it, you can create any post you desire, save it as a draft, publish it, or set a publish date when WordPress will do it automatically;
- Categories - You can create post categories through this interface. Categories allow you to sort your posts not only for easier organization, but your visitors can also look for posts in only a specific category;
- Tags - Tags are similar to categories that allow for even further organization and convenience when users search for a specific post type. You and your visitors can sort through the posts using a particular tag and will see only the ones that have it.
Media
The Media section is where you will find all your media files. These can include images, video, audio, documents, or even spreadsheets;
- Library - All your media files will appear in the table on this page. You can sort them by type and also perform bulk actions such as removing multiple ones at once;
- Add New Media File - Users can drag and drop or click Select Files to upload their media files to the WordPress dashboard. However, remember that all files uploaded in such a way are stored on your website's hosting server. We do not recommend hosting large files as that can eat up your available space and use a lot of bandwidth when accessed. Such files are better off embedded in your posts or pages.
Pages
Similar to the Posts section, you will find all your pages here. Pages are different from posts because they form the structure of your website. A good way to think about this difference is that pages are static and are what display your posts.
- All Pages - Again, similar to the Posts table–intentionally so, this page will show you all of the pages on your website. A typical WordPress website starts with a Privacy Policy and Sample Page as an example of what pages look like. You can add or edit your pages from here;
- Add New Page - This will take you directly to the page editor screen after asking you to choose a pattern. More on those later. From there, you can edit your page in any way you want.
Comments
Users can leave comments on your posts, and this is where you can see them all neatly arranged in a table. You can manage these comments with ease from here. Furthermore, you can also moderate how comments appear on your posts, what words are disallowed, and even block IPs or users you don't want leaving comments.
Appearance
This is one of the WordPress dashboard's most essential and valuable sections. It holds the tools for changing the appearance of your website and making it truly yours.
- Themes - As you may already know, WordPress uses pre-made themes to dictate the appearance of a website. You can add, remove, and activate themes from this section.
- Editor - This is where the magic truly happens. From here, you can edit your theme, its patterns, and everything else associated with it to make a unique website. You can create any layout you want, and make it look precisely the way you imagine it. Working with it is extremely simple and we recommend you start with editing the header or footer of your site.
Plugins
The other half of what makes WordPress an immensely flexible and appealing application, plugins are how you can add almost any type of functionality to your website.
Users
WordPress offers support for multiple users and roles. This part is where you can manage them all with ease.
Tools
Containing a variety of options, this section lets you import or export data from your website, manage personal data, and directly edit theme or plugin files without having to pull up a file manager or browser. The most important section of Tools is, however, Site Health. Here, WordPress itself will give you advice on what to change and implement to ensure its optimal functionality.
Settings
Last but not least, this section of the WordPress dashboard contains options for managing the behavior of other parts of the website itself. You can change the website's primary language, how time and date are displayed, specify what happens when someone posts a comment, the maximum file sizes allowed for upload, and many more. We will go into detail about each option in the part of this tutorial dedicated to Settings.
As you can see, WordPress offers a plethora of tools to manage and customize your website. That is even before adding themes or plugins: the dashboard can change significantly depending on the themes and plugins you are using. Then, it gets even more customizable! With this, our general overview of the WordPress dashboard is concluded. Next, you will find a dedicated article for each section we mentioned. Read on to learn more!

WordPress Hosting
- Free WordPress Installation
- 24/7 WordPress Support
- Free Domain Transfer
- Hack-free Protection
- Fast SSD Storage
- Free WordPress Transfer
- Free CloudFlare CDN
- Immediate Activation