Create a Staging Website and Push it to Live
Updated on Apr 27, 2023
If you have ever tried to develop a website, having a staging website alongside the live one is a good idea. If you didn't, then we suggest you consider it! Having that staging website will allow you a safe environment where you can test any changes before pushing them to live. This way, you can avoid breaking your live website if any changes don't work well with it. An alternative to a staging environment is to create a backup of your website before you make any changes. Our services come with free daily backups, but you have to restore the website each time something breaks, which is not the most convenient thing.
Fortunately, our hosting services also utilize cPanel, and cPanel offers the WP Toolkit, making creating a staging website a breeze. It can even handle pushing changes to your live website as well! Please read on; we will explain exactly how those two functionalities work.
This post includes:
Creating a Staging Website
Cloning a website via the WP Toolkit is much more straightforward than doing it manually. To give you some perspective, here are the most basic steps you would have to take to clone a website manually:
- Create a subdomain
- Copy the live website's files to the subdomain's directory
- Create a new database for the new, cloned website
- Export the contents of the live website's database
- Import the exported database to the cloned website's database
- Change the database details in the wp-config.php file
- Manually change the URL for the cloned website in its database
It is not the most challenging thing in the world, but the WP Toolkit can automate most, if not all, of those steps.
To begin creating a staging website via the WP Toolkit, you must have a WordPress website attached to the Toolkit. If you still need to install one, you can check out our tutorial about that; or if you already have a WordPress website on your hosting plan with us, you can instead scan for it. Then, find your website in the Toolkit (available in the Domains section of your cPanel) and click Clone.
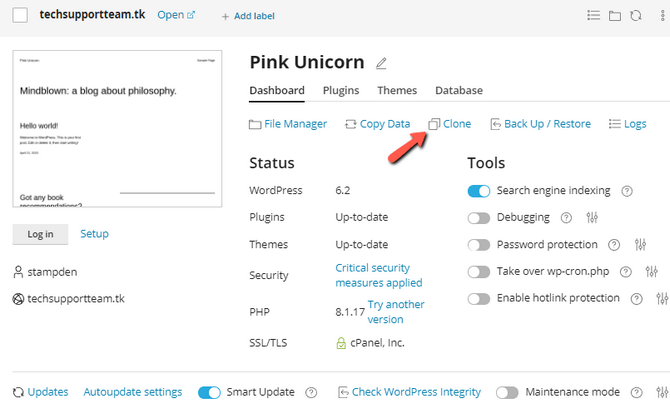
A page will appear on the left side of the screen, where you can choose where you want the website to be cloned and what the database's name should be.
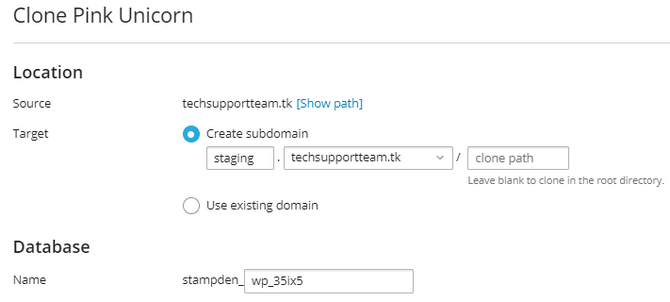
Regarding the destination, you have two options: create a new subdomain, or use an existing domain. You can also assign the staging website to a specific directory under that subdomain or domain. Our recommendation here would be to create a subdomain and leave the directory field blank. This way, the WP Toolkit will create a subdomain for you, then clone the website directly into that subdomain's root directory. Having the clone in the root directory makes navigation and management more convenient and straightforward. It will also create a new database, import the necessary content, and edit any URLs requiring changing.
Warning
Before you click on Start, please ensure that your hosting plan has enough disk space. For instance, if your website is 2GB in size, then please make sure you have at least 3GB of free disk space because you are not cloning just the files of the website but also the database. It is better to have free space left over than to run out during the cloning process.
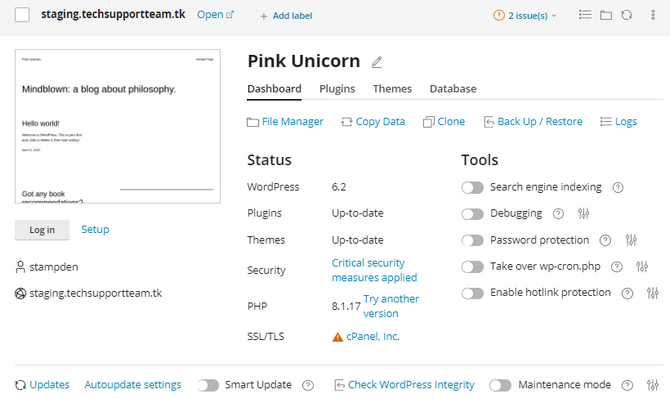
All that is left after that is to click Start. The process will begin, and you will see a list of tasks that the WP Toolkit is performing alongside a progress bar in the background. When done, you can click on Close and return to the WP Toolkit dashboard, where you will see your brand new staging website and a message that the cloning has concluded.
It is vital to mention that the WP Toolkit's cloning function will not clone the environment from the original website. For instance, if the other website has an SSL certificate, the WP Toolkit will not automatically assign one for the cloned website. If the live website uses HTTPS, then the clone will also use HTTPS, regardless of the presence of an SSL certificate. Another example is the cloning process will not check if the PHP version for the cloned website is the same as the PHP version for the live website. While it automates a lot of things, the WP Toolkit's cloning function will need a bit of intervention from you to finalize things.
With this said, you have a staging website set up and ready to be worked on. You can make any changes you want because they will not affect the live website in any way: the staging site uses a different directory and database, which are not connected to the live ones. Feel free to break the staging website all you want!
Pushing Staging Changes to Live
Creating a staging website is only half of the process, though! The changes you make to your staging website won't automatically push themselves to your live website. Fortunately, the WP Toolkit can help with that as well! The Copy Data button is what you are looking for, and when you click it, several options will appear on the left.
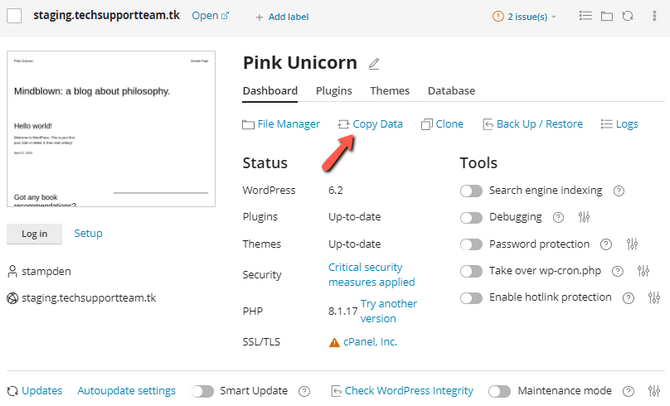
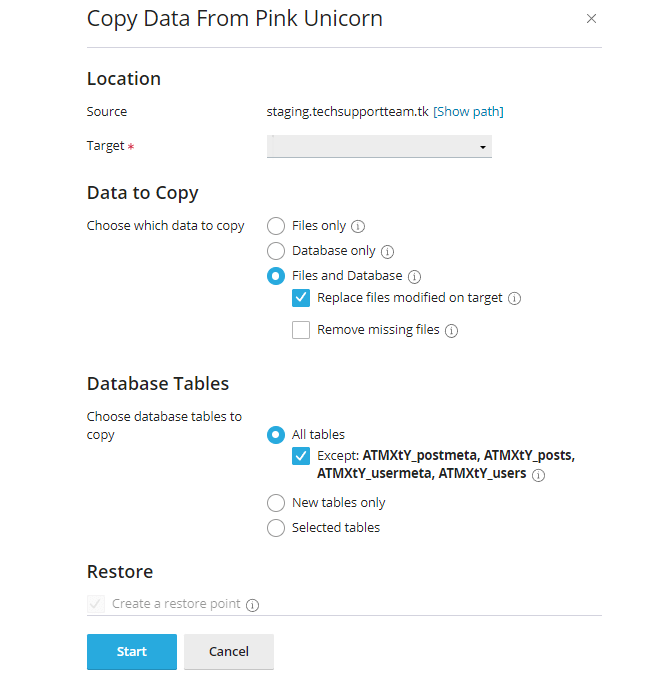
At the top, you see Location, where you have to select the live website to which you wish to push your changes. Below Location is the Data to Copy field, and here you can choose what gets pushed to the live website. You can push only the files or database, or both! You can also decide if the process should replace any files which are present on both the live and staging websites. That is important to understand. Ticking Replace files modified on target will replace files modified on the target with files from the source, even if the source files are older.
Next, you have the Database Tables portion. Here you can choose what tables to copy over: all tables, new tables, or a hand-picked selection of tables. The WP Toolkit has a cool feature here. If you select to copy all tables, you can exclude the tables that handle posts and users. This way, any new posts or users which might have been created on your live website won't be lost. That's very helpful and saves you the headache of manually fixing that.
Finally, the Toolkit will tick the Create a restore point box by default, and we suggest you leave it like that. If something goes wrong during the copying process, you can quickly restore your live website to that restore point. The restore point is created only for the live website, but remember that you will need free disk space for it.
Our screenshot from above uses the default settings for the copying process, but feel free to adjust them to your needs.
Note
Each option has a small i symbol next to it, which contains short explanations of what each option does.
Click on Start to begin copying your staging website to live. You will see a list of tasks that the Toolkit is performing, as well as a progress bar in the background. Once the process is complete, you can click the Done button, which will take you back to the WP Toolkit dashboard. You will also see a message of completion.
And that is it! You have successfully pushed any changes you have made to your staging website to your live one instead. Please continue to the next part of our tutorial to learn how to recover your live website from the restore point created during the copying process.
Reverting to a Restore Point
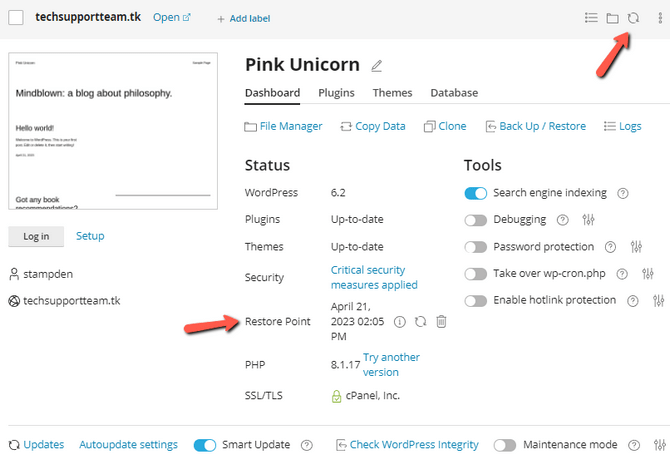
Sometimes pushing changes to live does not go according to plan, which can be very frustrating if you don't have a backup available. Fortunately, the WP Toolkit is prepared for that as well. If you have used its Copy Data functionality to push changes from your staging website to live, you likely created a restore point before you began the pushing process. It is a tick box, which you can select before starting. If you have created one, you should see a restore point in the website's dashboard within the WP Toolkit. If you can't but are sure you have ticked the restore point during the pushing process, then please use the Refresh button in the top right corner of the website’s dashboard.
Once you have located your restore point, you have three options:
- The i symbol will show you more information about it;
- The Restore button will allow you to restore your website from the saved point;
- The Delete button will erase the restore point.
If you wish to restore your website from the available point, click the Restore button and confirm your choice. A progress bar will appear in the bottom right corner of the screen. After a few moments, your website will be restored to how it was at the time the restore point was created.
At this point, feel free to delete the restore point. If you want to download and store it locally, you can find all restore points in the .wp-toolkit/snapshots directory of your cPanel. You should easily find it if you use the File Manager tool. You can also download it from there. With that said, though, the restore point function is convenient, as you can see for yourself, but we do hope you never have to use it!

WordPress Hosting
- Free WordPress Installation
- 24/7 WordPress Support
- Free Domain Transfer
- Hack-free Protection
- Fast SSD Storage
- Free WordPress Transfer
- Free CloudFlare CDN
- Immediate Activation