How to Manage Images in WordPress
Updated on Dec 6, 2022
Since WordPress enables you to use the media manager to upload a sizable number of files, you will need a mechanism to handle those files outside of your Posts and Pages pages. In this lesson, we'll walk you through the process of managing that content simply and independently of other WordPress capabilities.
To manage the media content in your WordPress-based website, you will need to know how to:
How to Add Media Content
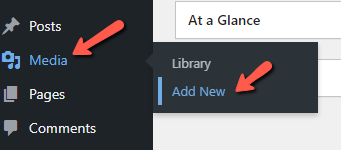
We'll start by discussing how to include media material on your website. You must log in to your WordPress Admin Area and go to Media → Add New in order to add media material.
Then you will be taken to a page where you can directly upload media files by dragging and dropping them in the box or using the Select Files option to choose the ones you want to post.
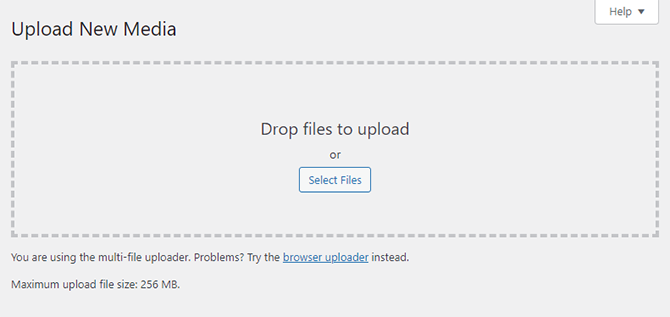
When you choose a file or drag and drop it, the file will be posted instantly.
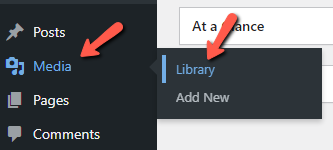
Now you can go to Media → Library if you want to browse through all of the uploaded files or edit them.
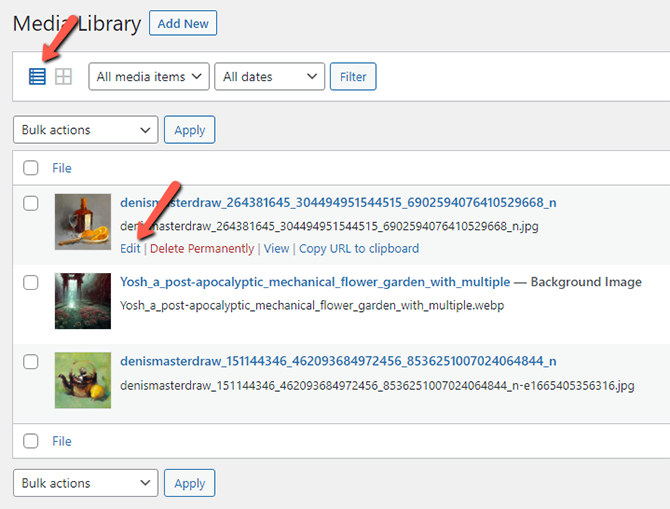
You will see the previously uploaded media content on that page in a table layout that fills the entire page.
How to Edit and Delete Media content
Hovering your cursor over a media item's name when in List mode and selecting the Edit link are both necessary to make changes. Alternatively, under grid mode, you need to click on the file to explore those options.
The Edit link will take you to a single page that has all of the details for the specific item you are updating. You can change the following elements:
- The media item itself;
- Caption;
- Alternative Text;
- Description.
When you're through editing the component, just click the Update button on the right-hand block of that page.
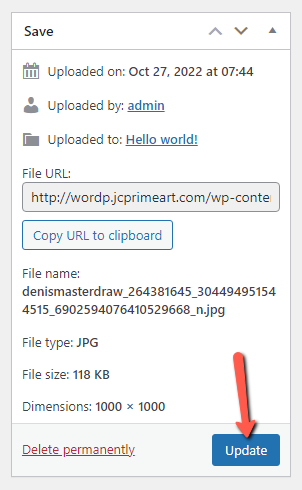
And the changes will be saved successfully.
Last, you must return to the Material Library page (Media → Library) if you need to delete a piece of media. Once there, it would be best if you found the media material that you want to remove and hover your mouse over it for the Delete Permanently link to appear.
If you click on that link, the content will be removed forever.
It would be best if you ticked the boxes next to each media component you want to remove from the website to delete multiple items at once. Then, you must choose the Delete Permanently menu option from one of the drop-down "Bulk actions" choices at the bottom or top of the page.
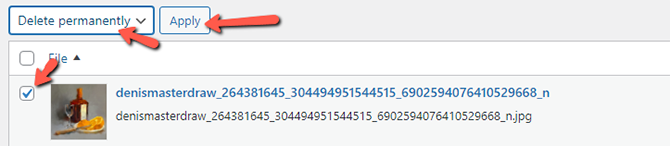
All elements you have ticked will be permanently removed once you press the Apply button.
Congratulations, managing the media content of your website is now successful!

WordPress Hosting
- Free WordPress Installation
- 24/7 WordPress Support
- Free Domain Transfer
- Hack-free Protection
- Fast SSD Storage
- Free WordPress Transfer
- Free CloudFlare CDN
- Immediate Activation