Cache
Updated on Mar 7, 2024
The soul of this plugin, the Cache page, contains many options that allow you to customize what type of cache is stored, how it is stored, purging it, and so on. There are a lot of options here, as this is one of the bigger sections of the plugin. It is also the most impactful, as it will substantially improve the performance of your website.
You Will Read About
Cache, Object Cache, and Browser Cache
It is finally time to learn how to turn on caching for this plugin. Three tabs primarily affect that functionality: Cache, Object Cache, and Browser Cache. Each of them is a different type of caching that the plugin offers and each of them will benefit your website.
Cache
On the Cache tab itself, you will find all of your general caching options.
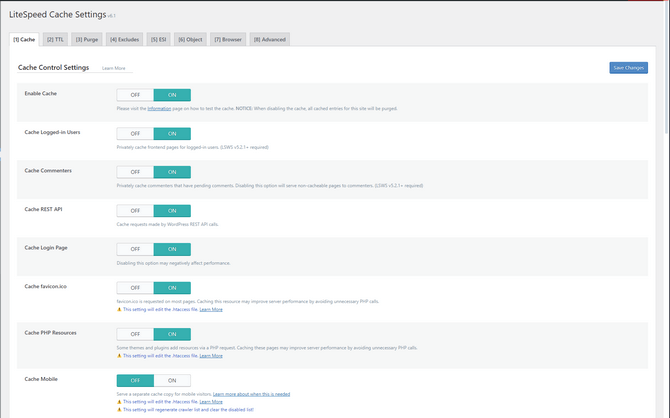
- Enable Cache - For LSCache to work on your website, this option must be turned ON;
- Cache Logged-in Users - This caches pages for logged-in users. Keep this OFF unless you are running a membership website, as each cached page will take up server resources;
- Cache Commenters - This option creates a separate cache for user comments that are still pending. We recommend you keep it OFF if your blog is commented on often;
- Cache REST API - Turn this ON as it will cache requests from the WordPress REST API. That will speed up the requests that third-party applications integrated with WordPress make;
- Cache Login Page - This one is self-explanatory. It caches the login page, as it is a very common landing point for many users. Turn it ON;
- Cache favicon.ico - Turn this ON. The favicon.ico is the small logo shown in the browser tab. Saves a few PHP requests each time a page is opened;
- Cache PHP Resources - This option caches the static elements of your website, including CSS and JS from themes. Keep it ON to save on unnecessary PHP requests;
- Cache Mobile - We recommend turning this ON so that you can serve the relevant cache content for desktop or mobile. It will increase your website’s resource usage slightly, but our hosting services can handle it;
- Cached URIs - In these three fields, you can place specific content to be cached in the field’s specific way. That is usually unnecessary, as most websites don’t utilize such functionalities. If yours does, feel free to place the content in each of the respective fields;
- Drop Query String - Input any query strings that should be ignored during caching. The default list is typically sufficient, but if you have more, place them here.
Object Cache
Next, the Object Cache tab can further enhance your website’s performance. Object cache is available on our FastCloud Extra and private server solutions. It requires either Redis or Memcached on the hosting server: the FastCloud Extra plan uses Memcached, while our private servers can support either Redis or Memcached.
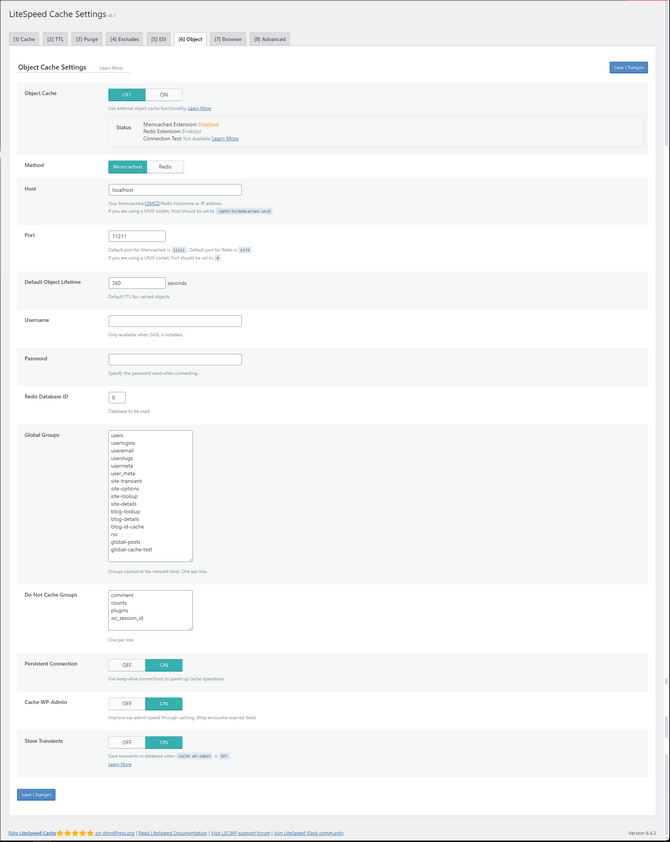
- Object Cache - Turn this ON to enable object caching for your website;
- Method - At FastComet, we primarily use Memcached, but if you have a VPS or DS with us, you can choose to install Memcached or Redis. They use the default ports (unless manually changed), while FastCloud Extra uses custom ports, and you have to contact our Technical Support team for one to be assigned to your account;
- Host - Leave it as localhost if your website is on the same server where LiteSpeed is running. Otherwise, input the IP where Redis or Memcached are running;
- Port - As mentioned above, contact our Technical Support team for your Memcached port if you are using our FastCloud Extra plan. For our private servers, Redis and Memcached use the default ports unless you have manually changed them;
- Default Object Lifetime - As the name suggests, the default TTL for cached objects. The default is fine;
- Username and Password - These are only necessary if SASL is installed. Otherwise, leave blank;
- Redis Database - Only used if you use a single host account to install Redis on multiple websites. Each website will have a database assigned to it, so input its ID here;
- Global Groups - These groups will be cached on a network level. Defaults are fine;
- Do Not Cache Groups - Input any groups you don’t want to be cached here. Default ones are enough;
- Persistent Connection - Turn this ON to allow the caching connection to remain alive, thus speeding up the process;
- Cache WP-Admin - This should be set to ON to speed up the admin page;
- Store Transients - Typically, keep this OFF if the above option is enabled. If this is enabled and Cache WP-Admin is not active, you will see server status notifications, but they are unnecessary.
We strongly recommend that you utilize our object caching services. They will speed up your website immensely and improve its performance scores noticeably.
Browser Cache
Finally, the Browser Cache tab will allow you to enable browser caching. It is another way of caching your website’s data; however, do not worry. These three methods will not conflict with each other and will instead work in tandem to boost your site’s speed. This tab has only two options, so let’s review them quickly.
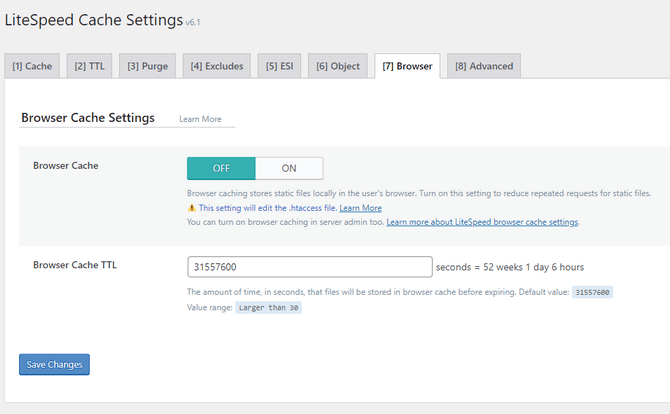
- Browser Cache - This will allow the user’s browser to store cache data locally. It isn’t enabled by default, and we have no idea why. Turn it ON;
- Browser Cache TTL - The default value of 31557600 is fine. It equals one year and is recommended by Google for an efficient cache policy for serving static files. If you have a very dynamic website, like one running WooCommerce, we recommend changing this to 43800, which equates to one month of TTL.
These are the most essential parts of the Cache page in your LiteSpeed Cache plugin. As you have noticed, there are several more tabs, so let’s look at them too!
TTL
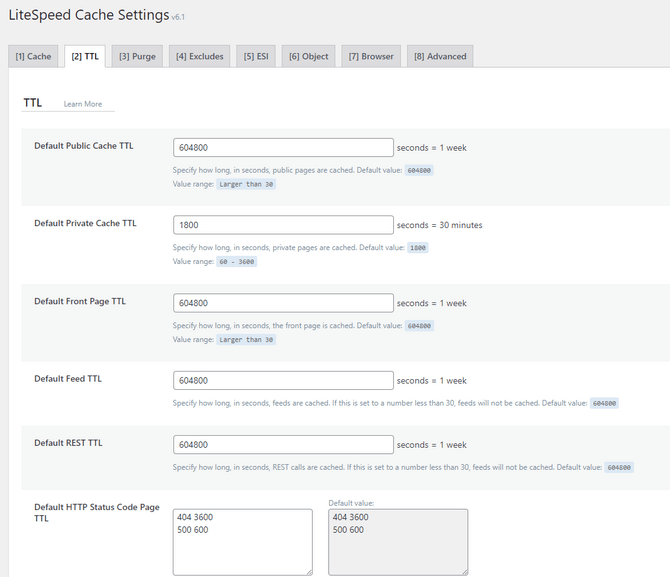
The next tab, TTL, contains the Time to Live for various types of cache in seconds. Typically, we recommend leaving the default settings as they are. That should be sufficient for your website. If you update your website more often, a shorter TTL might be better, but it will consume more resources. A longer TTL will consume much fewer resources, but the cache won’t be refreshed as frequently, which might impact what visitors see. Feel free to tailor this page to your website’s particular needs.
Purge
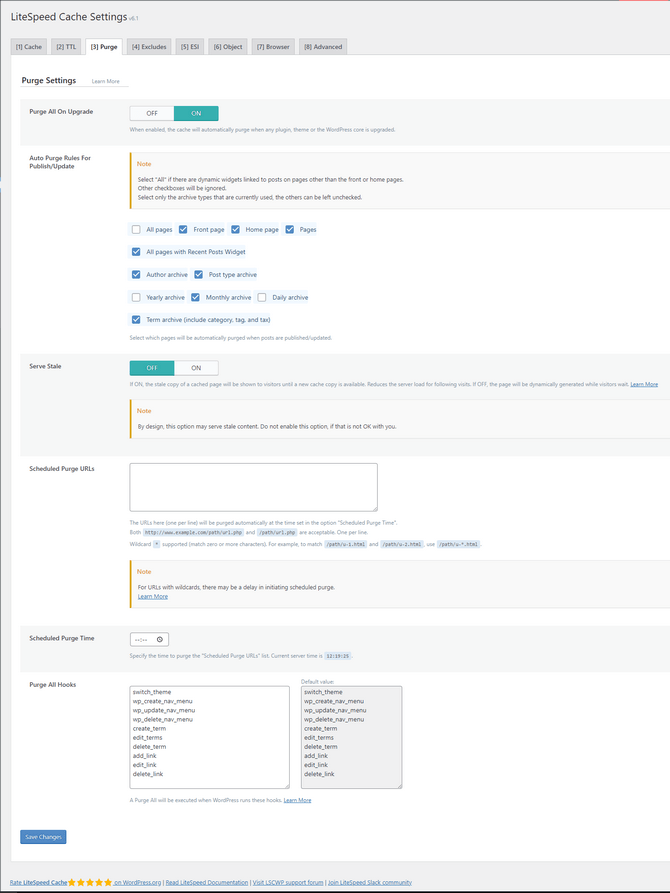
The Purge tab contains options to control when a cache is purged so a new one can be generated. That is a great way to specify particular website behaviors when generating its cache anew to avoid serving old content. The options are a few and straightforward to understand.
- Purge All on Upgrade - We strongly recommend turning this ON. As the name suggests, the cache will be purged each time any plugin, theme, or WordPress itself is updated. That way, it can be replaced with a new cache, including the updates;
- Auto Purge Rules For Publish/Update - You can pick and choose what publishing or updating (when it comes to posts) will trigger the automatic purge. Default settings are fine, but feel free to fine-tune them as per your website’s needs;
- Serve Stale - We recommend keeping this option OFF. There is no real benefit to serving visitors stale cache (cache that has yet to be generated anew), and only uses up resources;
- Scheduled Purge URLs and Scheduled Purge Time - Using these two options, you can specify when the cache for given URLs will be purged so it can be regenerated. It is useful if you have very dynamic pages that have a period when traffic is low for instance;
- Purge All Hooks - When any of the hooks in the fields are run, the plugin will purge all hooks instead. Default settings are fine.
Purging your cache is helpful, especially if you update your website often, so being able to automate it to a degree is a welcome convenience.
Excludes
The Excludes tab allows for more granular control over what is excluded from caching. This tab is self-explanatory, so if you specify any URIs, Query Strings, Cache Categories, Tags, etc., that you don’t want cached, this is where you input them. There is nothing to do here by default, so unless you have something particular in mind that you wish not to be cached, you needn’t change anything here.
ESI
Next up is the ESI tab. ESI stands for Edge Side Includes, and we recommend keeping the setting OFF.
Briefly put, ESI allows you to specify elements within your pages that can be served from either public or private cache, depending on the user accessing them. While it allows for even more control over what content is served to whom from which cache, it also complicates things immensely. If you genuinely want to have this much granularity about what cache is served, you should check out LiteSpeed’s blog post on the topic.
Advanced
Finally, the Advanced tab. As the name suggests, only change this if you know what you are doing. Since we do, we can offer a few recommendations.
- Login Cookie and Vary Cookie - Only use these fields if you are running more than one WordPress installs (not multisite) and need the cache to distinguish who is logged into which WordPress site;
- Improve HTTP/HTTPS Compatibility - Leave this OFF. Enable it if your website uses HTTP and HTTPS and notice caching is not working quite right. We recommend you always use HTTPS with all the resources within your website. You can also try forcing SSL before turning this on, as it will use up server resources;
- Instant Click - This is a fantastic option we recommend you turn ON. What it does is when a user hovers over a link, the page will be loaded in the background, so by the time they click on the link itself, the page will be served more quickly. It can consume server resources, but it is worth it for the speed boost.
Those are all the tabs in the Cache page of the LiteSpeed Cache plugin for WordPress. As you might have expected, the bulk of the options are contained here, and we hope this part of our tutorial has cleared them up.

WordPress Hosting
- Free WordPress Installation
- 24/7 WordPress Support
- Free Domain Transfer
- Hack-free Protection
- Fast SSD Storage
- Free WordPress Transfer
- Free CloudFlare CDN
- Immediate Activation