How to Configure Staging in WordPress
Updated on Dec 6, 2022
Warning
Due to the SitePush plugin not being updated for more than five years, we strongly advise you to use WP Toolkit for your WordPress staging. You can find our tutorials on WP Toolkit here.
We will review the setup of SitePush for the purpose of pushing content/code changes from one WordPress website to another. This is usually used as staging, as it will allow you to have a live and development WordPress copies and push changes that you make on one of the websites to the other.
In this tutorial, we assume that you have one WordPress installation, which is your main production website. We will install a second WordPress instance, configure SitePush on both websites and then push all of the content and code from your live website to the second copy.
The SitePush Staging configuration in WordPress includes:
Install Second WordPress Instance and add SitePush
The first thing to do would be to install a second WordPress instance. This can be achieved two ways, using the Softaculous auto-installer, or a manual WordPress installation.
Next, download the official SitePush plugin on your local computer. Once that's finished that, do the following for both of your WordPress installations – the live version and the new instance you have installed in the previous step.
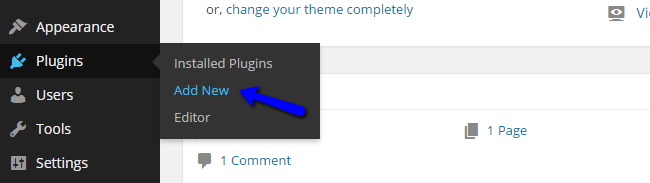
Log into the administrative area of your website. Click on the Plugins tab from the left-side menu and then Add New.
Click on the Upload Plugin button at the top of the page.

Select the plugin archive from your local computer and then click on Install Now button.
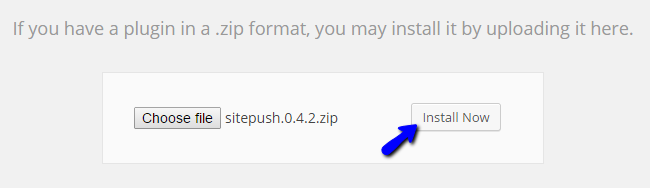
The system will install the module for you and then update you with a successful message, if everything went through without any issues. Click on the Activate Plugin button to finalize the process.

Configure SitePush Staging
The next step is the configuration of SitePush and the definitions for each of your websites that you wish to push changes to. This is the tricky part, but we will review the entire process so you can get a better understanding of how it works.
As you will be using different URLs for your WordPress installations, it is important to define the WordPress address and the Blog address. You can read more on that in the official WordPress Codex.
This step important so any changes that you push from one website to another are converted properly with the new URL. The definition is easily set within the wp-config.php file and you will have to perform this step for each WordPress instance you are setting up with the SitePush staging plugin.
You will have to add the following two lines of code:
define( 'WP_SITEURL', 'http://example.com/wordpress' );
define( 'WP_HOME', 'http://example.com/wordpress' );
Make sure that you change example.com/wordpress with the actual domain name set on your website. When you are ready, save the file to complete the changes.
Edit Files
There are two ways of editing files on the server - using an FTP client, following our FTP tutorial, or editing directly through your cPanel account > File Manager, following our >title="cPanel Tutorial" rel="noopener">cPanel tutorial.
The next step is the most important one. You will have to create two files that will keep the data for each WordPress installation that you configure with the SitePush staging. Let us review both files for better understanding of it’s options.
Staging Configuration File
The configuration file holds important information about each of the WordPress installations that you set up with the SitePush staging. The file includes the domain of each website, the path for it on the server and other information, which is important for the normal operation of the plugin. Let us review a sample staging configuration file for better understanding:
; <?php die('Forbidden'); ?> -*- conf -*-

[live]
label = Live Website
domain = example.com
web_path = /home/user/live-website
db = live
live = yes

[dev]
label = Development Website
domain = staging.example.com
web_path = /home/user/staging-website
db = dev
live = no
You need to edit each of the available options in order to reflect your requirements:
- [sitename]: Enter a unique name for your websites. In our example, we are using [live] and [dev] for our main and development websites. This is used internaly only and if no label option is set.
- label: This field is optional, but it is recommended. Setting a unique label for each of your websites will make it easier for management.
- domain: Enter the domain name set on your website.
- web_path: Enter the server-side path to your website.
- db: The SitePush label for the database your website is using. This option must be the same as the db option in your staging database file below.
- live: Set this option to yes or no for each WordPress instance you configure. Yes means that this is your main website and No means that this is a staging copy.
Once you configure your Staging Configuration file, you can choose a name of your choice for it. The important thing here is to make sure that it ends with the ".php" extension and it is uploaded outside of the public_html/ directory of your account. In this case, the path to the file would be:
/home/cPanelUsername/my-conf-file.php
Staging Database File
The second file that you need to create is the Staging Database file. It holds the data for the databases set on each of the WordPress websites that you configure with SitePush staging. Let us review a sample of such a file:
; <?php die('Forbidden'); ?> -*- conf -*-
; Do not remove the above line, it is all that prevents this file from being downloaded.

[all]
prefix = wp_
host = localhost

[live]
name = user_live
user = user_admin
pw = "mydbpassword"

[dev]
name = user_dev
user = user_admin
pw = "mydbpassword"
The options that you have for editing are:
- [dblabel]: Enter a unique label for this database. The label should be the same value, as the one for the db variable in the Staging Configuration file. The [all] value applies for all websites.
- prefix: Enter the prefix for all databases using SitePush. NOTE: All databases must use the same prefix.
- host: Enter "localhost" without the quotes if all WordPress instances are hosted on the same server.
- name: Enter the name of your database. This is the DB_NAME value in the wp-config.php file of your website.
- user: Enter the name of your database user. This is the DB_USER value in the wp-config.php file of your website.
- pw: Enter the database password. This is the DB_PASSWORD value in the wp-confir.php file of your website.
Once you configure your database file, you can save it with a name of your choice. Make sure that it ends with the ".php" extension and the file is placed outside of the public_html/ directory of your account. In this case, the path to it would be:
/home/cPanelUsername/my-db-file.php
Enable SitePush
This is the last step of the process and you simply need to configure the SitePush. The following steps should be completed for each website that you configure with the SitePush staging.
WordPress Backup
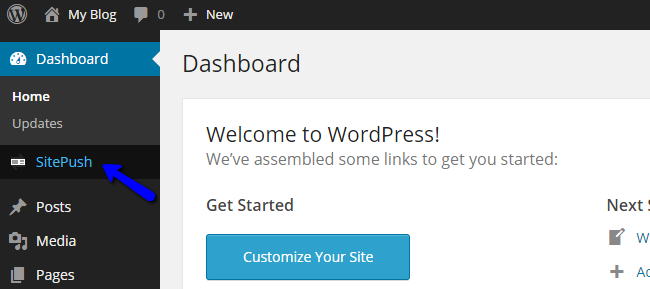
It is important to generate a full WordPress backup for your main website, before making any changes on it. After that, log into the administrative dashboard of your website again. Click on the SitePush option from the left-side menu.
Enable the following two options:
- I have read the instructions, backed up my site and accept the risks.
- Conver the URLs to link to current site.
Also, you will have to enter the path to the Staging Configuration and Database files. For more details on how to locate that information, please review the previous two sections.
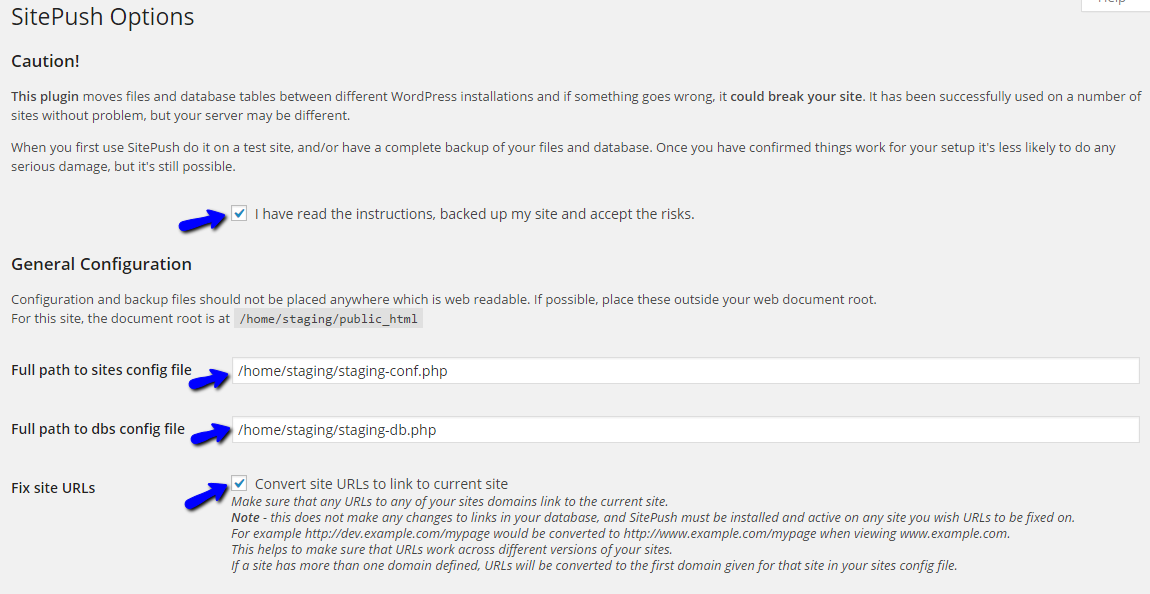
Once you complete that, simply scroll down to the bottom of the page and click on Save Changes. The system will configure your SitePush staging and display a successful message. This indicates that there are no issues with the use of the plugin on your websites. Still, if you notice any error messages, we offer full and free integration of SitePush with each of our WordPress Hosting plans. You can always count on us for your project!

WordPress Hosting
- Free WordPress Installation
- 24/7 WordPress Support
- Free Domain Transfer
- Hack-free Protection
- Fast SSD Storage
- Free WordPress Transfer
- Free CloudFlare CDN
- Immediate Activation