Presets and General
Updated on Mar 7, 2024
It is time to start configuring the LiteSpeed Cache plugin for WordPress. It can be a daunting task, especially if you are new to the plugin, but don't worry! Not only are there several presets you can choose from, that will handle the configuration for you, but we will also explain each individual option this plugin offers. But first, let's have a look at the presets, and then we will move to the General section.
You Will Read About:
Presets
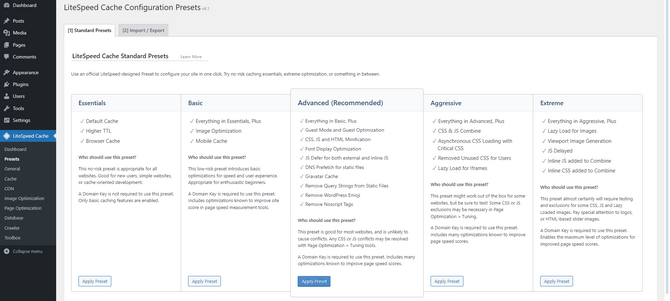
If you are new to the plugin or want a quick and easy way to set it up instead of manually adjusting each option, the Presets are a great solution. As you can see from the screenshot itself, each preset shows precisely what it adjusts and changes. There are also little blurbs, but let us summarize them for your convenience. A domain key is mandatory for each of the presets to function, and we will touch upon what that is later on in this tutorial.
- Essentials - This is the best preset for beginners, as it activates only, well, the essential options. Almost all websites will benefit from this without any conflicts or issues. All it utilizes is the basic cache settings and bumps the TTL (Time to Live) up a bit;
- Basic - Includes everything from Essentials and enables image optimization and mobile cache. This preset should also work on almost all websites without breaking them, as the image optimization and mobile cache aren’t known to cause many conflicts;
- Advanced - This is the default preset for the plugin. This should work on most websites, and if it causes any conflicts they are likely from the CSS and JS optimizations. It comes with everything prior, plus a slew of additional optimizations and features;
- Guest Mode and Guest Optimization
- CSS, JS, and HTML Minification, Plus JS Defer for External and Inline JS
- Font Display Optimization
- Gravatar Cache
- Remove Query Strings from Static Files, WordPress Emoji, and Noscript Tags
- DNS Prefetch for Static Files
- Aggressive - This preset should be applied with care, as it is not guaranteed to work on every website. Once more, the CSS and JS functions might cause conflicts. It has everything from the Advanced preset plus some more CSS and JS optimizations;
- CSS & JS Combine;
- Asynchronous CSS Loading, Plus Critical CSS;
- Removing Unused CSS for Users;
- Lazy Load for Iframes;
- Extreme - Only use this preset if you know what you are doing. You must tweak and test it to ensure your website works correctly. On top of what the Aggressive preset brings, this one also enables:
- Lazy Load For Images;
- Viewport Image Generation;
- JS Delay;
- Inline JS and CSS Added to Combine.
As you can see, there is a preset for any level of user, and we strongly recommend you experiment with each to find out which one best suits your website. Before you do that, though, you can check out the rest of our tutorial and learn what each option does. First, let’s get the basic configuration out of the way.
General
You have installed the plugin and have chosen to forego a preset. That is perfectly fine. Let’s do a quick, basic configuration in the General page to set up the plugin completely.
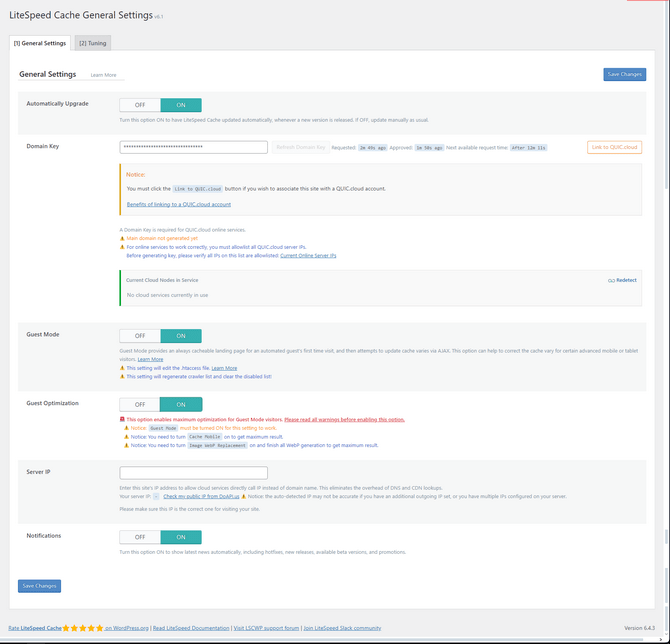
We recommend turning everything on here. Additionally, request a domain key and input the IP of your website’s hosting server. With that said, let’s break down what each option does exactly.
- Automatically Upgrade - As the name suggests, turning this option ON will automatically install any new versions of the plugin when they come out;
- Domain Key - While not immediately necessary, adding it to your plugin is good. The key is already set up if you ever decide to use QUIC.cloud’s services. There is no downside to requesting it;
- Guest Mode and Guest Optimization - We recommend turning these ON, as they can significantly improve the load time of first-time visitors. That will increase resource consumption by a tiny amount. It is worth it if you want to improve PageSpeed scores or if you want those first-time visitors to experience fast loading times. Guest Optimization should be enabled only if Guest Mode is as well. Our FastCloud Extra hosting plan will have no problems accommodating these two options. If you want to read more about them, you can do so here;
- Server IP - Paste your hosting server’s IP address here;
- Notifications - Enable this option to receive notifications about LiteSpeed Cache’s newest releases, updates, promotions, etc.
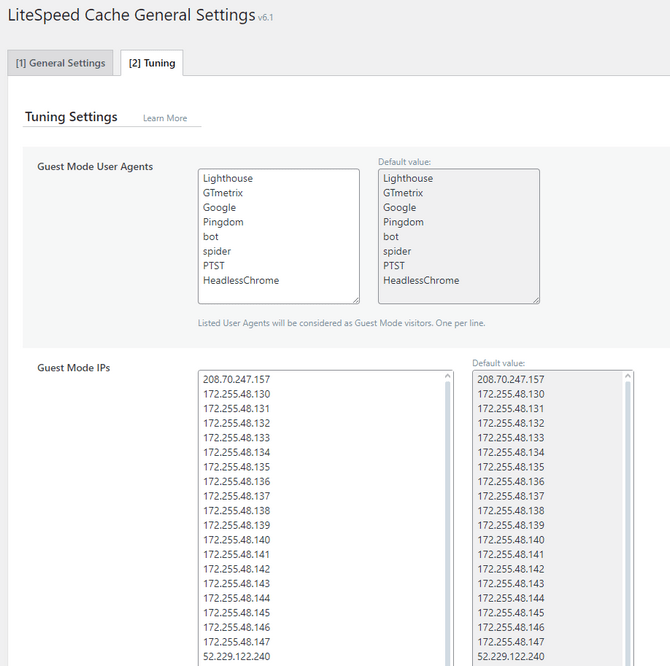
Additionally, the General page has a Tuning tab. You can specify which agents and IPs will always be served on a cached Guest Mode page (as long as it is enabled). It is already populated with several of the most popular testing engines and their IP addresses, but you can add other agents that do not require personalized content.
That is the basic configuration done! From this point forward, you can either still use a preset or tweak your plugin’s settings one by one to see which ones best suit your website. To make it easier for you, the next part of this tutorial will explain what each option does. We will also suggest the most optimal way to set up the plugin, which should work for most websites. We say “some websites” because we cannot guarantee this plugin will always work with all websites without any issues. Test each setting on a staging environment before you enable it on your live website.

WordPress Hosting
- Free WordPress Installation
- 24/7 WordPress Support
- Free Domain Transfer
- Hack-free Protection
- Fast SSD Storage
- Free WordPress Transfer
- Free CloudFlare CDN
- Immediate Activation