How to Manage Comments in WordPress
Updated on Dec 6, 2022
WordPress offers a commenting system that you may use for all of your pages or posts, which is one of its best features. It gives your website's visitors a chance to engage in conversation. They can talk about the subject with you or amongst themselves. This free input is essential for improving your website's functionality and user experience.
This tutorial will show you how to edit, delete, and approve pre-existing discussion parts and submit a remark to a post.
You must learn the following in order to properly manage comments in WordPress:
Why Are Comments Crucial?
To build communication with your visitors, comments are a crucial component. The comment systems are also one of the last remaining channels over which you can still have complete control as an admin, as forums are becoming less common as social media replaces their functions. For instance, even though Reddit's terms of service are moderator-friendly, you are still required to adhere to them. However, you have complete control over everything on your website, including the ability to delete comments from the database immediately.
On brand-new WordPress installations, comments are allowed by default, and you may choose exactly what appears on your page.
Why You Need to Manage Comments
Managing comments, especially if you receive many of them could be tiresome. However, it might not be as advantageous as you believe to disable the conversation choices on your website.
Even if you don't directly respond to your customers' remarks, managing your comments demonstrates that you care about your audience. Additionally, it implies that you frequently review and update the information on your website, which is advantageous from an SEO standpoint. It will be a good sign if his input is accepted and does not spend days in the moderation queue if a visitor finds something intriguing on your website and requests more information about it via a comment.
On the other hand, regular contributors will enhance your postings by assisting visitors to your website, which is wonderful for the community you are creating and the popularity of your website. Excellent comments can last for years and add new perspectives on significant and pertinent issues. Users that disagree with the information presented on a website frequently come to an understanding among themselves in the comments.
Auto-approving everything is not a great idea because it will soon draw spammers to your website and make the comments section appear more like a battleground than a forum for discussion. WordPress has a number of excellent filtering tools, which we will discuss in more detail later in this article. You can automate the moderation process as much as you can using those, which will help you save a ton of time.
The WordPress Comments Dashboard Interface
The notes that you will receive as part of the native commenting platform for WordPress can be viewed in your Dashboard → Comments section. In this interface, you can switch between different views - All, Pending, Approved, Spam, and Trash.
You can move items between the different categories. Please note that the spam view will also display comments that have been marked as spam by Akismet or other plugins.
Additionally, the WordPress filter may flag and transfer comments to this category based on your discussion settings.
Another thing to keep in mind is that mentions that have been deleted cannot be transferred or recovered after 30 days. They will be lost forever after that.
What is Discussion or Comments Settings Page
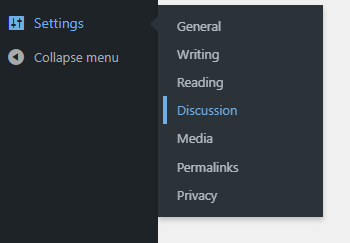
You may control how comments function on your website by using the options available on the Discussion settings page. Go to Settings → Discussion to access this section.
There are many settings you can change on this page, so we've compiled a list of the most popular ones:
- Comment author must fill out name and email - Great security setting, as it will help you in keeping track of the comment authors.
- Users must be registered and logged in to comment - Spam typically comes from anonymous individuals, therefore, removing any possibility of bots by including a login form will help.
Additional filter choices that will assist you in regulating the discussions on your website include ones that are enabled by default:
- Comment must be manually approved - Enable this to prevent comments from appearing on your website right away. They won't be shown until you or another admin approves them.
- Comment author must have a previously approved comment - If a visitor uses the same email address as their previously approved comment, their subsequent comments won't be kept for moderation.
- Comment Moderation and Disallowed Comment Keys - These two environments work quite well together. Only certain terms, links, emails, and IP addresses will be blocked by the comment moderation option from being published before you approve it. However, using the comment blacklist option will immediately put any matched notes in the trash.
You will also find the user Avatar options in these settings. Although you can configure the simplest settings right here, read our optimization advice later in the course. Some of them deal with optimizing avatar requests and third-party conversation systems, which will greatly speed up discussion-heavy websites.
Don't forget to click the Save Changes button at the bottom of the page once you've finished configuring your website.
What is Comment Moderation
Changing a comment's settings to keep the conversation on the topic or to get rid of spam or offensive language from your website is known as comment moderation. Content writers need to devote less and less time to comment moderation as a result of improvements to the WordPress platform.
Today, as we've already demonstrated in the previous section, you may specify a standard to which you'd like comments to adhere. WordPress will flag a comment for human approval or removal if it doesn't meet your pre-set criteria.
How to Add Comments to an Existing Post
We'll start out by adding a comment to an already-published post. By clicking the link for existing comments, you will be sent to the post page where you will see every remark that has already been made. There is a Leave a reply button there where you can provide feedback for that specific post.
Please utilize the POST COMMENT button at the bottom of the interface when you have finished typing the text in order for your viewpoint to be posted.
How to Edit, Delete and Approve Comments
You must select the comments component from the left vertical admin menu once you have logged in to the WordPress admin area.
Then you'll be taken to a page with a table view of all the comments that are currently posted on your website. You must hover over a specific remark and click the Trash option to remove it from these. The comment will be placed in the Trash as a result.
If you go to the Trash area, click the Delete Permanently button next to the comment you want to permanently delete, then the comment will be transferred to the Trash section.
You must browse the Comments page once more, where all of the comments are listed for a comment to be approved (provided you have enabled the comment approval option). There are some Pending comments that you need to approve. You can locate them there.
The comment's status will change to "Approved" after you click the Approve link next to the one you want to approve. At the top of the same page, WordPress also provides simple links for moving through the variously categorized comments.
You must first go to the Comments page, where all of the comments are listed, in order to modify a comment. They are situated in the table view that you can see in the page's middle. Once you have located the comment you wish to modify, please hover your cursor over it to see any further links, then click the Edit link to access the editing interface.
The editing interface is rather straightforward. When you use that interface, you will see three blocks for comment editing. The information about the creator of the composition is included in the first block. Name, Email, and URL are the editable fields available.
The second block has anything to do with the comment's subject matter. With the editing tools WordPress offers, you ought to be able to modify it quickly. After you've finished modifying the comment, focus on the third block, which is on the right side of the screen. The options to View Comment, Set Status based on how you categorize the Comment and Update the Same with the Changes You Have Made are all located in this area.
How to Delete Comments Using phpMyAdmin
By using phpMyAdmin, you can manage comments in another manner. One by one or in bulk using SQL queries, the administration tool can be used to remove comments from the database directly.
Warning:
Before making changes with phpMyAdmin, make sure you have a backup of your database. Visit our tutorial on "How to Backup your WordPress Database" for more details.
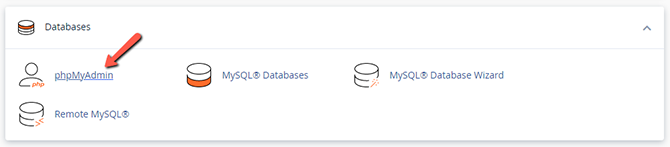
You will first need to log into phpMyAdmin in cPanel to delete only particular comments. To do that, log into cPanel and click on the phpMyAdmin link inside the Databases section.
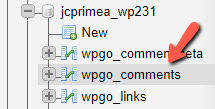
You can see a list of all the databases in your hosting account on the left side of the screen. When you click the database, your cPanel username and the WordPress database suffix _wpXXX will appear. choose the wp_comments table next.
Please be aware that wp_comments likely has two more characters following wp, for example, wpgo_comments.
Note:
The two additional characters depend on the database’s prefix. It can be checked in your wp-config.php, which you should take a look at by using the cPanel File Manager or an FTP client such as FileZilla.
If you wish to delete entire conversations more quickly, comments can be grouped by parent and its replies via the comment post ID field. Click the Delete button to delete a remark. Use the checkboxes next to each element to select which ones you want to delete in bulk, and then click Delete in the "With selected" section.
The maximum number of comments you can delete per page using the aforementioned technique is 20. (can be further increased to 500 via the row number option). There is another approach that overcomes these restrictions so that you can delete thousands of comments. You have the option to run queries straight from the SQL tab for each database in the phpMyAdmin interface.
You get a list of all unapproved comments, input the following query:
SELECT * from wp_comments WHERE comment_approved='0';
If you have received a lot of spam which was not filtered correctly and you want to remove all unapproved comments use:
DELETE from wp_comments WHERE comment_approved='0';
Alternatively, if you had auto approving on, you can also remove all approved comments by changing the "0" to "1".
For removing already categorized spam, execute:
DELETE from wp_comments WHERE comment_approved='spam';
To clean the trash category, you can use:
DELETE from wp_comments WHERE comment_approved='trash';
Note:
It’s best that you avoid the method above. The safest method is to delete comments directly from your WordPress Dashboard.
How to Disable Comments on Specific Pages or Posts
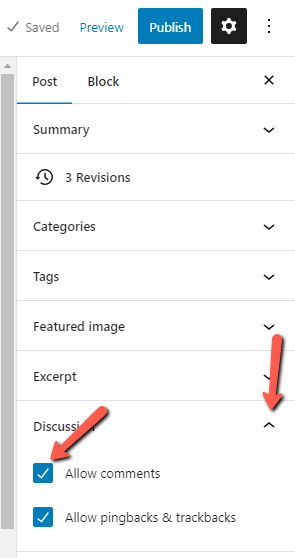
It is possible to disable comments on specific articles and pages thanks to WordPress's individual alteration of this property feature. Make Discussions viewable from the Screen Options by navigating to the edit post menu. Once the Discussion section of the post you wish to change is visible, click the box next to Allow comments to prevent further comments on this post.
Make sure you update the post before leaving to keep this setting. For more options on how to disable comments via the discussion section check our tutorials on the matter.
How to Optimize WordPress Comments
You might be surprised to learn how much faster your website will load overall if you optimize the comments section. Due to the additional HTTP requests from Gravatar, the simultaneous loading of all comments, and the lack of lazy loading, comment-rich websites incur a 300ms+ increase in load times on posts and pages. We'll give you some pointers and well-liked optimizing methods in the parts that follow to help your website take off.
Limit the Number of Displayed Comments
You have the choice to restrict the number of displayed comments per page under the Discussion settings. This is a great tool for speeding up the loading of your articles and pages, especially if your website generates many comments. Reconfiguring this is advised because, by default, this option is not enabled, and all comments will load with the page.
To lower the number of loaded comments "per page," visit the Settings → Discussion interface.
In the Others comment settings section, enable the Break comments into pages with option and add your preferred value for how many posts you would like to load.
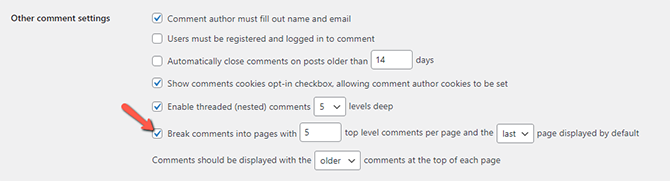
Don't forget to save your settings before you exit the menu.
Load Gravatars Locally
It won't matter how few comments are currently loaded—you still need to load each Avatar individually. And even though empty avatars are typically quite small (1.7KB on average), the problem here is the extra HTTP queries to Gravatar. Requests must be made to Gravatar's server because the native WordPress comment system requires it to obtain the users' avatars naturally unless you manage to get Gravatars to load locally or through a CDN.
There is an excellent plugin for using Gravatars locally called WP User Avatar. It is easy to configure plugin that will make your life a lot easier.
Alternatively, you can use - Harrys Gravatar Cache. This plugin is updated regularly, and new features are being added.
Use a Third-Party Commenting System
The native comment system is not popular with everyone, which is very understandable. The neighborhood, however, is unable to agree on a specific third-party replacement option. Most plugins that are consistently supported have advantages and disadvantages, and as a result, user opinions are mixed.
Disqus, for instance, provides useful features like Subscribe to Thread, Featured Comment, Premoderating, Guest Moderator, and Timeouts that are not available in the original commenting system. However, it can sometimes cause a full page to load much more slowly, and the effect of data collection on privacy is still a topic of discussion.
There isn't only one guide on How to integrate Disqus with WordPress; we already have one. Numerous variations offer a comparable or expanded set of capabilities, such as Jetpack, wpDiscuz, and GraphComments.
Lazy Load Comments
On-demand loading, often known as lazy loading, is an optimization technique that only serves users the information they require from a page. In our instance, the comments are situated after most of the content, as all consumers would anticipate and logic suggests. This implies that comments do not necessarily need to load once a page has been browsed. Instead, they can be accessed through a hidden comment section or when a particular percentage of the page has been scrolled.
There may be problems with web crawlers harvesting your comments, which would negate the effect of the comments increasing your SEO, depending on how Lazy Load is implemented.
Lazy Load Native Comments
Despite the fact that WordPress is unable to add lazy loading to comments, there are a few excellent plugins that make using this method simple enough for even beginners. Although there are plugins that can assist you in lazily loading your HD images and videos, we will only cover comment-related lazy loading in this guide. The strange thing about these plugins is that the same developer created all three of the most popular ones.
Lazy Load for Comments can lazy load your comment section and the Gravatars, thus reducing the number of HTTP requests. You will have a new option in your Discussion settings after installing the plugin. You can choose whether you want your comments to lazy load "On Scroll" or "On Click" using the drop-down option. The latter will produce a button that site visitors can click to access the comment area.
As an alternative to this plugin, you can use the default wpDiscuz plugin.
Lazy Load Disqus Comments
With the aid of the Disqus Conditional Load, those of you who have chosen to use Disqus can slow load your comments. The DCL's activation is not unusual if Disqus itself has already been installed on your computer. If not, you will be requested to first sign up for a Disqus account and finish installing the base plugin. The alternatives offered by DCL will continue to be grayed out and unavailable to you up to that point.
Once ready, access the Disqus Conditional Load plugin via Disqus → DCL Settings.
If you have the pro version, you can choose whether you want the load to occur on click, scroll, or on scroll start (this means the comments will not load until the user shows some scroll activity on the page). Additionally, you can choose whether or not to use counter.js and the width of the comments. It's important to remember that this particular counter.js can delay page loading by several thousand milliseconds.
If you select that option from the drop-down menu above, you will also find two cache-related options and customizable messages for the On Click button label and loading text if you scroll down the options.
Lazy Load Social Comments
With the free Lazy Social Comments plugin (formerly known as Lazy Facebook Comments), your users can easily add Facebook comments to your website just by using their social login, which you can then lazyload. The practice of such one-click entries became widely used by giveaway apps like Gleam.io to log users and verify objective progression.
When you install and activate the Lazy Social Comments plugin, navigate to Settings → Lazy FB Comments.
Here you will see all of the plugin-related options starting with the Facebook App ID. This ID will be the thing that connects your website to Facebook. Log into your Facebook account and then access the Developers area. Then click on the My Apps menu → Add New App. Add a name to help you remember what the app is for, and click the Create App ID button.
Your application will be in In Development status once you build it until you give a link to your privacy statement and then click the OFF slider to change the status of the app to Live.
You must now copy the App ID from the page's top and paste it into the corresponding area in the plugin.
Now adjust the remaining settings as desired. That includes how many comments are originally displayed and how they are arranged. The default sorting algorithm is social or relevant, as most of us are used to seeing it on Facebook. Another option is to order by newest or oldest.
The second half of the options include the way the lazy comments load (On Click or On Scroll) and the appropriate text if you choose the former.
Use Along With Other FB Plugins is the name of the final selection. If another plugin that interacts with social media has already loaded the Facebook SDK, you can choose not to load it. To the already vast collection of properties, you may modify with this plugin; this is a wonderful little addition.
This tutorial will come to a close at the conclusion of the section on comment optimization. Although we remain committed to updating this list with new information or substituting plugins in the event that the ones on it are no longer maintained in the future.

WordPress Hosting
- Free WordPress Installation
- 24/7 WordPress Support
- Free Domain Transfer
- Hack-free Protection
- Fast SSD Storage
- Free WordPress Transfer
- Free CloudFlare CDN
- Immediate Activation