How to Install and Configure Yoast SEO
Updated on Dec 6, 2022
In this tutorial we will show you how to add the YoastSEO plugin to your WordPress website. This plugin will assist you in understanding the main SEO rules and requirements for you website, and it will help you improve your overall Search Engine Rank. This plugin is written from the ground up by Joost de Valk and his team at Yoast to improve your site's SEO in all aspects. The WordPress Yoast SEO plugin even goes the extra mileby taking care of all the technical optimizations needed for your website to rank higher.
To be able to use Yoast SEO for your WordPress website, you need to:
Install and Activate Yoast
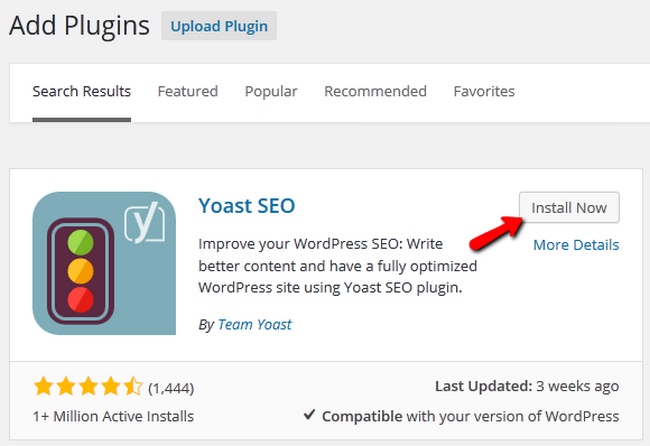
First we will begin with the installation of the plugin. The process can be easily managed via your WordPress admin area by navigating to Plugins → Add new.

Type Yoast SEO in the plug-in search bar and click the Install Now button.
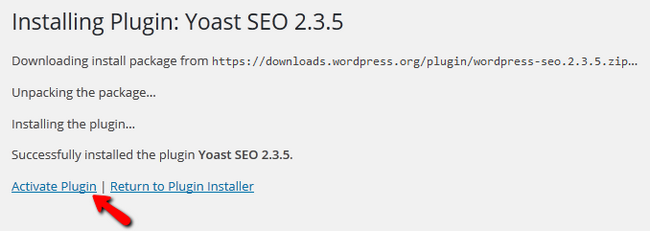
After the installation process has been completed, select the Activate Plugin option located below the installation log.
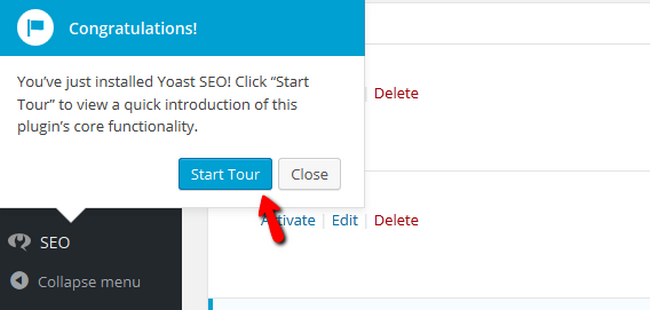
You will be prompted with a “Congratulations!” message. To get a quick introduction of the plugin features click the Start Tour button.
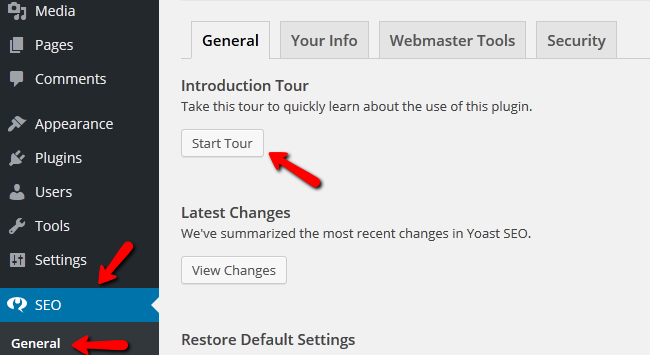
If you have missed the message you can always get a Tour by navigating to SEO→General.
What actually this plugin does once you activate it, is that it first and foremost helps you write better content. Yoast SEO forces you to choose a focus keyword when you're writing your articles and then makes sure you use that focus keyword everywhere to increase their effectiveness.
Configure Titles and Metas Settings
In this and next few steps, we will explain the most important features of Yoast SEO and how to configure their settings once you have installed the plugin. Yoast SEO will have some of them pre-defined but depending on your website’s content, you might be able to tweak them even more.
After you have filled your details in the General section, access the Titles and Metas section.
In the General tab, focus your attention on the Force Rewrite option. Usually you won’t need to check mark this box as the plugin uses the wp_title tag when displaying SEO titles for posts and pages. However, some themes use a different code to display these elements and in those situations you will need to enable the Force Rewrite.
The Title Separator setting is totally depending on your taste as it does not affect the search results, but using dashes seems to be one of the cleanest options out of the bunch.
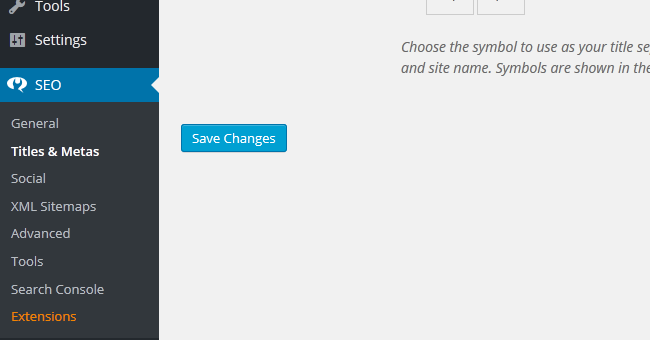
Next on the list is the Homepage tab. The most optimized structure for a Title Template is:
%%sitename%% %%page%% %%sep%% %%sitedesc%%
These variables will be replaced by the specific values from the page when the page is displayed.
Meta Description Template – This is the text that will appear under the site link in the search result. If you have the same content structure for every post you can use this template. If not, you will need to configure each post’s Meta Description when publishing it.
Post Types:
- noindex, follow – By enabling this option, you are specifically notifying search engines to only follow the links but not add them to the search results. You can use this to avoid showing duplicate content by keeping the content out of the search engine result page (SERP).
Archives:
- Author Archive – If you are the only content publisher in your blog, you will have to set this to noindex to prevent duplicate content.
- Date Archive – This option does not provide important information to the search engines so leaving it as noindex is fine.
Configure Social Settings
As social media is being more integrated into our daily lives than ever, adding your social media accounts here is a good idea. This will connect them to your website and they might show up on the side of the SERP when someone is searching for your content.
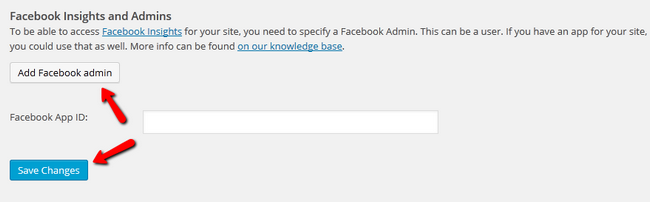
- Facebook – Check Add Open Graph meta data as this will allow you to define your own title, meta description and image for Facebook in the WordPress editor. You can also upload an image that will be used in the cases when your post does not contain one. If you have a Facebook page you can also add your admin here. This will provide you with information regarding the traffic of your Facebook Page is generating towards your website. Don’t forget to hit the Save Changes button when you are done.
- Twitter – In this section, you will be able to enable a Twitter card and choose between Summary and Summary with large image. The second choice seems to work better as it is more visible.
Configure XML Sitemap and Advanced Settings
Sitemaps are essential for WordPress SEO. They provide a roadmap for search engines to crawl your site and are the easiest way to notify them about changes to your content. However, having more than one plugin creating sitemaps will hurt your SEO as the search engines will try to crawl both of the sitemaps at the same time and will most likely miss part of the content while crawling.
- Post Types – This option will allow you to exclude post types that you don’t want in your sitemaps. Usually media pages will not contribute to the SEO so they can be excluded. It is also a good practice to create custom exclusions for any post which you have set to noindex previously. This can be done via the Exclude Posts tab by entering the ID of the post.
Enabling Breadcrumbs will display the path the user has taken to get to the page they are currently viewing. This is very user friendly and also helps the search engines in orienting in the structure of your website. Yoast’s team recommends, that you enable this feature and you can implement it by adding this code snippet into your theme’s header.php or above the page title in the:page.php
<?php if ( function_exists('yoast_breadcrumb') )
{yoast_breadcrumb('<p id="breadcrumbs">','</p>');} ?>
Permalinks:
- Redirect Attachments – This is especially good when your website features a lot of images. If enabled this will redirect users who find the image via Google to the post on your website instead of the attachment page of the image.
- Remove Stop Words from Slugs – This option is very important as enabling it will remove all of the words which are ignored by search engines such as (and, at, to, it etc) from the URL of your posts. This may make some post URLs harder to read but will generally improve the SEO.
- Replytocom Variable – Checking this will increase the crawl efficiency if your website has a lot of comments as it removes the ?replytocom variable from comment reply links.
- Clean up <head> – You can check all of the boxes here except the RSS links if your website uses RSS
RSS:
This feature is used to automatically add links back to your blog and your blog posts in the RSS, helping search engines identify you as the original source of the content. The pre-configured settings are well thought out and you might not change them.
Page Analysis:
Now let us move from the admin dashboard to the front-end of your website. Yoast SEO has added a few important features which you can use to analyze the page you are currently on. You can check your page for all of the important SEO markers by hovering over SEO in the admin bar and then clicking on the Analyze this page option.
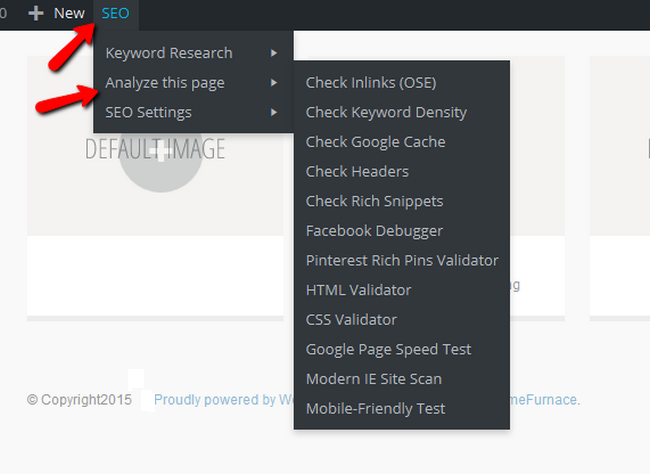
Now you will be able to check:
- Keyword density
- Google Cache
- Headers
- Rich Snippets
- Facebook Debugger
- Pinterest Validator
- HTML Validator
- CSS Validator
- Google Page Speed
- Modern IE Site Scan (for Internet Explorer)
Note that the plugin won’t test your page but instead direct you to different tools available online that will do that for you. With this, we will conclude our tutorial on Yoast SEO. We hope that you will use what you have learned from it and unlock the full potential of your website by optimizing the search results for it.

WordPress Hosting
- Free WordPress Installation
- 24/7 WordPress Support
- Free Domain Transfer
- Hack-free Protection
- Fast SSD Storage
- Free WordPress Transfer
- Free CloudFlare CDN
- Immediate Activation