How to get Google Verified Authorship
Updated on Dec 6, 2022
Recently the amount of pictures coming in front of popular search results in Google related to blog posts is dramatically increasing. The service is called Google Verified Authorship and it is related to a profile configuration in the Google+ Social network.

In this tutorial we will discuss how you can enable your Google+ avatar to be displayed as author of certain post in the search results provided by Google.
To enable the verified authorship, you need to complete these steps:
Configure your Google profile
So basically what you need to have as mandatory for activating such feature is a Google+ account and of course your WordPress blog.
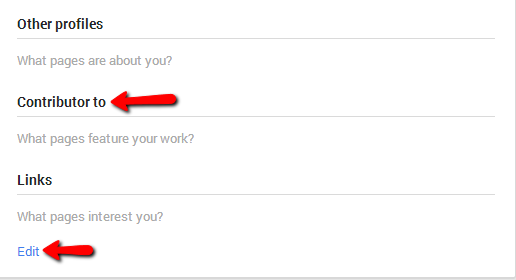
First we will begin with explaining how the feature should be enabled via your Google+ account. Once you login into your account you will need to navigate About → Links interface → Edit so you can add an entry to the Contributor to field.
Once you press the edit button you will be presented with an interface where under the Contributor to section you should press the Add custom link link and then fill the Label and the URL for your website.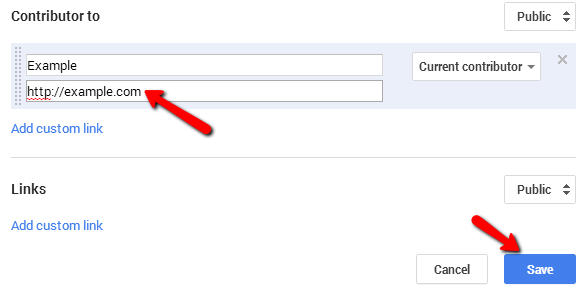
The last configuration you will need to handle is to allow your +1’s to be publically visible. This can be easily performed if you navigate to the Settings page of your Google+ profile and search for “+1”. The result you will find should be single and it will be under the Profile settings list.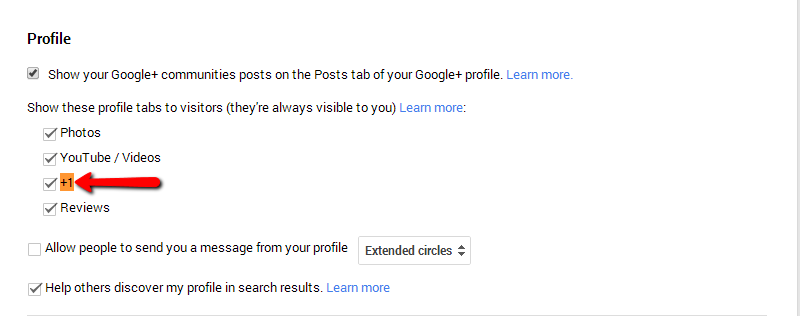
Once you make sure that this option is checked the configuration on your Google+ profile are finished and you will need to perform the final configuration this time however on your website.
In order for the feature to be available for your website you will need to add a line of code to the header.php file of the template your WordPress website is currently using. Before adding the code however you will need to first build it.
The code looks like:
<link rel="author" href="https://plus.google.com/54784746532/posts" />
Once you are located on the home page for your profile you will need to simply copy the URL from your browser and paste it as value of the href attribute of the abouve provided piece of code. So for example if the URL to your Google+ profile is:
https://plus.google.com/u/0/1247587458/posts
The code you will need to place in your website’s template file called header.php looks like the following:<link rel="author" href="https://plus.google.com/u/0/1247587458/posts" />
Add a Code Snippet to WordPress
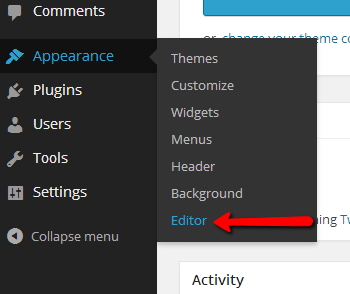
So once you have built that piece of code it is time to add it to your header.php template file. From your admin dashboard, navigate to Appearance→Editor.
And then you will need to find the header.php file from the right horizontal templates list available for editing. Once you open the header.php file for editing, find the closing head tag (</head>) and simply add the built code previously there.
	<![endif]-→
	<?php wp_head(); ?>

<link rel="author"
href="https://plus.google.com/u/0/1247587458/posts" />
</head>

<body <?php body_class(); ?>>
<div id="page" class="hfeed site">
	<?php if ( get_header_image() ) : ?>
Click the Update File button then so that file can be properly updated with the new code so the changes you have just performed can be saved. The actual picture in any search results in Google from your website will require some time to be displayed as Google will need to reindex your entire website.
Congratulations! You now know how to get Google Verified Authorship for your Blog!

WordPress Hosting
- Free WordPress Installation
- 24/7 WordPress Support
- Free Domain Transfer
- Hack-free Protection
- Fast SSD Storage
- Free WordPress Transfer
- Free CloudFlare CDN
- Immediate Activation