Install and Manage Themes
Updated on Apr 27, 2023
The theme is one of the most fundamental parts of a WordPress website. It is the cornerstone for website personalization. The theme is the first step to making your website truly yours. It is the facade of a website: how it looks; how users interact with it. Fortunately, the WP Toolkit is here to simplify the installation process. It can't help you pick the perfect theme for your website, though: that choice is entirely up to you, as it should be. A website should be as unique as its creator. Once you have found the perfect theme, installing it via the WP Toolkit is as easy as searching for it and clicking Install. Not only that, but the Toolkit will also allow you to manage your themes without the need to log into your website's administrative dashboard. Let us show you!
This post includes:
Installing Themes
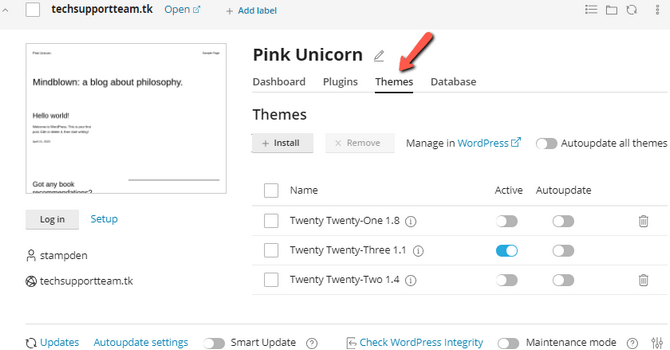
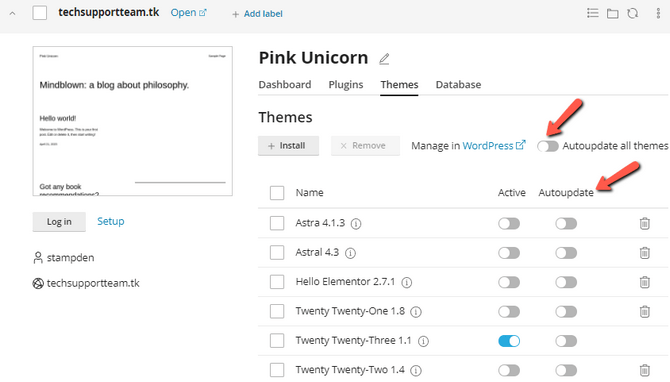
The WP Toolkit comes with a Themes tab specific to each website that will show you all the currently installed themes for a particular website.
That tab also has an Install button, where we begin the theme installation process. After clicking it, a page will open on the left side of the screen. On it, you will see a lot of themes to scroll through, so we recommend you either use the filters on the right to sort by popularity or the number of downloads, or both. You can also find a theme you like online and search for it here. There is also an Upload Theme button, which you can use to install a theme if you already have it as a .ZIP file. On this screen, you will also see the oldest WordPress version required for the theme. Once you have found a theme you like, all that is left is to click on Install next to it. The process will begin and can take a few moments, depending on how large the theme itself is.
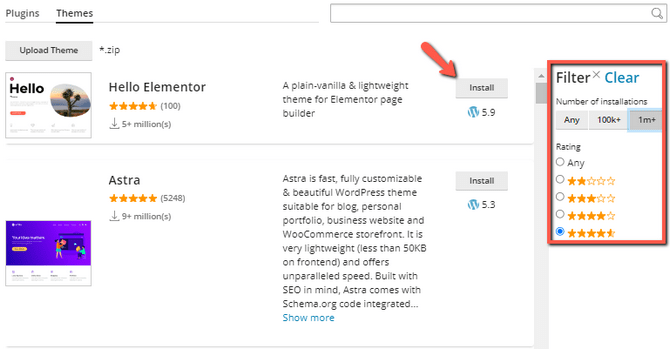
When it is done, the Install button will instead say Installed.
You can then close this page and return to the WP Toolkit's dashboard. You will find your new theme installed, but it will not be active. You can flick the Active switch to change that.
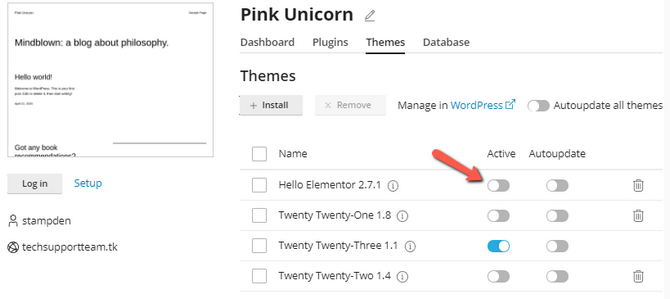
The Toolkit will deactivate your current theme and then activate the new one. Once the process is done, you will get a successful message on the top right, and the website preview will also change.
Warning
If a theme requires a specific plugin, for instance, to also be installed, you will have to install that plugin separately. The theme installer will not handle that for you, so please make sure you read the theme’s documentation to find out if it requires anything additional to be installed.
You can also bulk-install or upload themes to all of your websites. That can be done from the Themes tab of the WP Toolkit itself.
To bulk-install a theme – or multiple ones – you have to find it via the search bar and then select it. Then, click on Select Websites.

Afterward, select the websites where you want to install the theme(s) and hit Install. The process will begin, and a progress bar will appear in the bottom right. The themes will appear in the manager when it finishes.
The exact process can be performed by uploading themes for multiple websites as well. The Upload Themes button will take you to a page where you can upload the .ZIP file of your theme. There you can select the websites to upload the theme to. There is also an option to activate it after uploading.

In the next section, we will discuss the remaining two options from this page, so please continue.
Managing Themes
The WP Toolkit also comes with some fundamental management tools for your themes. You may have noticed them already in our previous screenshots, but we will go into more detail about them now.
A list of all currently installed themes can be found under the website's Themes tab. That tab also has several other functionalities: turning automatic updates on or off and deleting themes. There is also a switch to bulk-enable automatic updates.
Warning
It is important to note that, while convenient, automatic updates can also cause issues for a website. If you have altered any of the files that a theme update will affect, then those files might cease to function properly. That might even break the way a website operates or is presented to visitors.
You can also select multiple themes to apply an action to. You can use the ticks next to the themes. That won't work for activating multiple themes, though, because your WordPress website can have only one theme active at a given time.
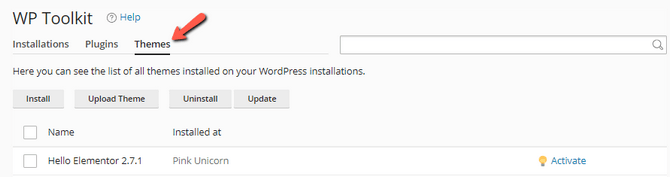
Finally, if you have more than one website, you can bulk-activate or deactivate themes via the Themes tab at the top of the dashboard. Instead of showing you the themes installed on a particular website, it shows you the themes installed on all the websites which are present in the WP Toolkit.
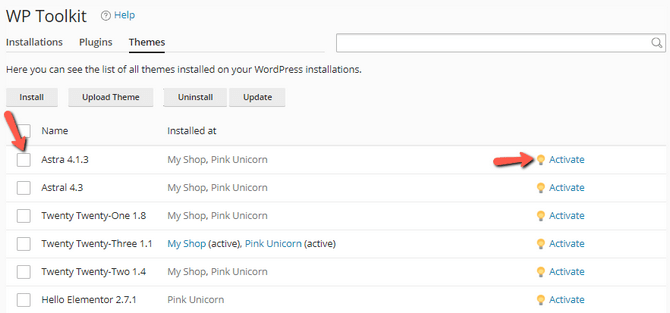
The interface shows you the currently installed themes and on which websites they are installed. Taking the screenshot above as an example, we can activate the Astra 4.1.3 theme on both websites. The Hello Elementor 2.7.1 theme can be activated only on a single site since it is installed on only one of them. That is handy when you have the same theme installed on multiple websites and wish to activate it all at once instead of doing it manually, one by one.
You can bulk uninstall or update themes from this interface as well. Select the themes you would like to uninstall or update, and then click the respective button. Once more, the process will begin, a progress bar will appear in the corner of your screen, and once it is done, the Toolkit will let you know.
That concludes our look into the theme-managing capabilities of the WP Toolkit. The tools it provides are not the most groundbreaking or revolutionary, but they are definitely robust and essential. They will save you a lot of time and effort. We hope you find them as useful as we do!

WordPress Hosting
- Free WordPress Installation
- 24/7 WordPress Support
- Free Domain Transfer
- Hack-free Protection
- Fast SSD Storage
- Free WordPress Transfer
- Free CloudFlare CDN
- Immediate Activation