How to Manage Pages in WordPress
Updated on Dec 6, 2022
You must understand how to manage the pages on your WordPress website if you want to give your users the option of browsing numerous pages on your website. You will receive comprehensive instructions on how to add, amend, or remove a page from your WordPress website in this article.
In order to learn how to manage your pages, you should learn:
How to Add a New Page
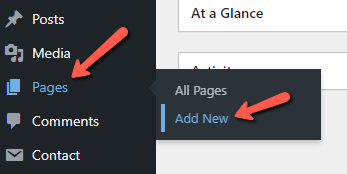
We'll start by providing examples of how a page should be made. You must go to Pages → Add New after logging into your WordPress admin area, assuming you haven't previously.
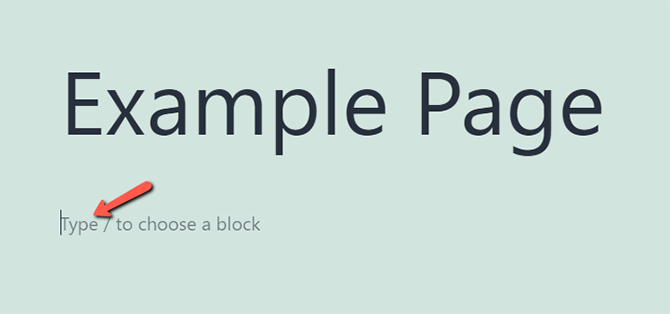
You will be given a few fields and options easily split on the following page, titled Add New Page. The title field, which is the first field on that page, needs to be filled up with the precise title of your page. Following the addition of the page's title, add the following content using the normal text box that appears below the title:
Additionally, you have the choice to add media to your page by clicking on the corresponding button above the input area for that item.
After adding all the necessary content to your page, you should edit the settings for your page that are displayed in the blocks on the right side of the screen.
The first section, under "Publish," contains your page's publication options. The Save Draft and Preview buttons are located at the top of the block. You can save the page you are currently adding as a draft, which prevents it from being seen, by clicking the Save Draft option:
- Status – How long the page will be kept for. Both Draft and Pending Review are options.
- Visibility – Your page's visibility after it has been saved. There are three options accessible here: Password Protected, Private, and Public. Select the one that best meets your needs.
- Publish – If you want to plan the publication of your page at a specific time, this option is quite helpful. You can choose the precise day and time that this page shall be published here.
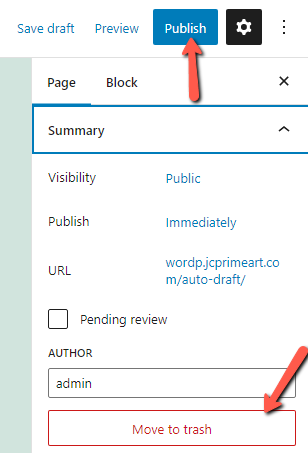
Use the Move to Trash link at the bottom of this block to destroy the page if you want to, or use the Publish button at top-right corner of the page to publish it.
How to Configure the New Page
You can select different attributes for this page in the following block, which is related to the Page Attributes.
There are 3 options under this block:
- Parent – This options allows you to choose the parent page of the current one if of course, you would like the current page you are adding to become a child page of the already existing parent page.
- Template – You can choose which default template this page can be using when it is displayed.
- Order – The order in how your new page will be displayed.
The Featured Image element, which is the last one on this interface, is used to typically add a featured image to your website. This image may be shown differently depending on the design you are using.
When you are finished setting up all these choices, simply click the Publish button in the upper right corner to make your page live.
How to Edit or Delete a Page
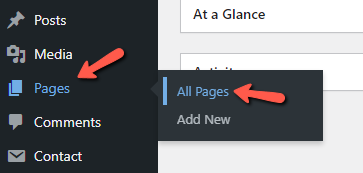
The second section of this course will cover how to update or delete a page. You must be logged in to your WordPress admin area and go to Pages → All Pages to access the list of pages so you can select which ones you want to change or remove.
The Pages page contains a table view holding all of your pages. It should be available right at the center of the page, and if you would like to edit a page, you should simply hover on the page you would like to edit and use the Edit link.

This link will essentially take you to a page with the same interface you would see when creating a page, except this time, it will be filled with data specific to the page you are changing. You should edit the data in accordance with your own requirements before pressing the Update button.
Last but not least, you must go back to the Pages page from your WordPress admin area's Pages → All Pages in order to delete a page. You will be able to see the Trash link, which is used to move the selected page into the Trash area, once you hover over the page from the pages listed in the table view at the center.
Of course, you can also utilize the drop-down list below (or above) the table view to quickly choose all of the pages you want to delete and move them to the Trash section. You can move all of the checked pages to the Trash by choosing the Move To Trash option and then pressing the Apply button.
You can permanently delete a page by accessing the Trash section located above the table view on the Pages page. After doing so, you will be taken back to the original page.
Once more, a table view will be displayed with all of the pages relocated to the Trash area. To Permanently Delete a page, hover over the Page you want to Delete and click the Permanently Delete link.

Naturally, suppose you want to delete numerous pages. In that case, you can tick the boxes next to each page name and then choose the option to delete the pages permanently from the dropdown list below (or above) the table containing all of the pages.
Congratulations, the pages on your website are now entirely under your control!

WordPress Hosting
- Free WordPress Installation
- 24/7 WordPress Support
- Free Domain Transfer
- Hack-free Protection
- Fast SSD Storage
- Free WordPress Transfer
- Free CloudFlare CDN
- Immediate Activation