Staging Automated Backups in WordPress
Updated on Dec 6, 2022
Whenever you are using any type of plugin that manipulates the actual content or coding on your WordPress installation, it is important to generate a backup of your website before that. This may save you hours and hours of work if something goes wrong with the process.
The SitePush staging feature for WordPress offers an easy way to ensure that your work is saved before you push changes between your websites. A backup of your destination website will be generated each time you attempt to push content/code to it. This is an excellent way to ensure that you have a working copy before the changes you attempt to perform.
The feature is disabled by default. To enable it, you need to:
Create a Staging Backup Directory
First, you will have to create the directory for the backups of your staging website. This is easy, connect to your account over FTP and create a new directory. The important thing to consider here would be to create the directory outside of the public_html/ folder of your account. This way, it will not be accessible at all and your backups will stay protected. For example, if you create a folder called “backup” outside of the public_html directory, the path to it would be:
/home/cPanelUsername/backup
Keep the path for your records, so you can configure it during the next step.
Configure the Staging Backups
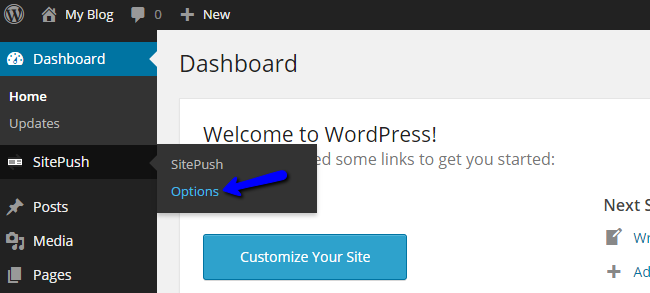
The second step is the actual staging backup configuration. You will have to log into the administrative dashboard of your website. Click on the SitePush option on the main menu and then Options.
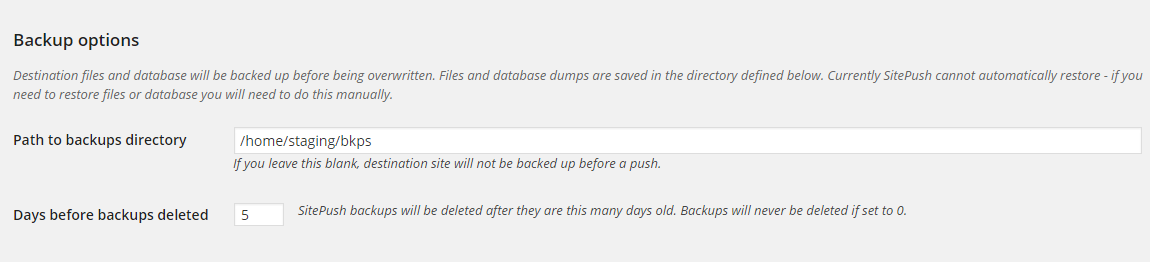
Scroll down to the Backup Options section and edit the following:
- Path To Backup Directory: Enter the path to the backup folder on your account. This is the folder you have created in the previous step.
- Days Before Backups Deleted: Enter how many days the backups should be kept in the folder before deletion. If you are limited on disk space, we suggest setting a lower number.
When you are ready, scroll down to the bottom of the page and click on Save. If you see a successful message, this will indicate that the change was accepted and your website is now backed up.

WordPress Hosting
- Free WordPress Installation
- 24/7 WordPress Support
- Free Domain Transfer
- Hack-free Protection
- Fast SSD Storage
- Free WordPress Transfer
- Free CloudFlare CDN
- Immediate Activation