How to Create a Contact Form in WordPress
Updated on Dec 6, 2022
Your customers will have a way to contact you if you enable a contact form and page on your website. That can provide you with a variety of advantages, from straightforward bug reporting to a very convenient way for your clients to contact you about a product you are promoting on your website.
Every website needs a contact form, so visitors can easily contact you about your products and services. By default, WordPress does not come with a built-in contact form, but there is an easy way to add contact forms to your site.
In this guide, we'll show you how to easily add a contact form to your website. After a few simple steps, you'll have a fully functional, spam-protected Contact page.
To create a contact page, you will need to learn the following:
Why You Need a WordPress Contact Form
Why do I need a contact form, you might be wondering. Why can't I simply include my email address on my website so that visitors can email me?
Beginners frequently ask that query because they are concerned that creating a contact form will require coding expertise.
Fortunately, you don't need any coding experience to add a contact form to your WordPress website using a plugin.
The top 3 benefits of using a contact form as opposed to putting your email address on a page are shown below:
- Spam Protection – Website scraping spam bots frequently look for the mailto: email address attribute. You will start to get a lot of spam emails once you submit your email address on the website. On the other hand, your contact form can thwart spam emails and prohibit spam from contact forms.
- Consistent Information – People don't always send you all the information you need when you email them. With a contact form, you may clearly state to the user what facts you need, such as their phone number, spending limit, project specifics, and more.
- Saves Time – There are numerous ways that contact forms can save you time. Along with providing consistent information, form confirmations can be used to direct users toward the appropriate next steps. They could ask you to watch a video or wait up to 24 hours for a reply, for example, to stop sending you additional questions.
With that said, let’s show you how to easily create a contact form in WordPress, step by step.
How to Choose and Install a Contact Form Plugin
Using a plugin is the simplest approach to put up a contact form. Numerous paid and free plugins are available that can do this. WPForms, Gravity Forms, Jetpack Forms, and Contact Form 7 are a few of the top ones. We decided to utilize Contact Form 7, which is the most popular and possibly the simplest to configure, to create this tutorial.
You can directly search for it in the WordPress plugin installation section found under WordPress Dashboard → Plugins → Add new:

You can check out one of our other WordPress series tutorials about management of your plugins if you're not sure how to install and activate a plugin.
A new admin menu option named Contact will be available once the plugin has been installed.
How to Create a Contact Form
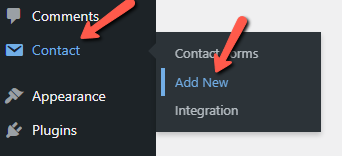
Now let's add a fresh form. Hovering your cursor over the new menu (Admin Dashboard → Contact) will reveal three additional submenu options, including Contact Forms, Add New, and Integration. Click the Add New button to add your own special Contact Form.
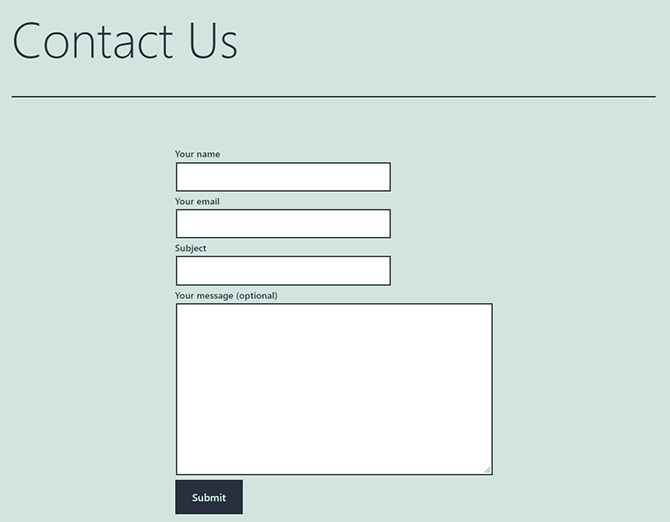
Which elements your contact form will feature on this page is up to you. There may be radio buttons or drop-down menus above the usual information. The typical form looks like this:
<label> Your name
    [text* your-name] </label>

<label> Your email
    [email* your-email] </label>

<label> Subject
    [text* your-subject] </label>

<label> Your message (optional)
    [textarea your-message] </label>

[submit "Submit"]
The Form tab of the plugin's Settings is where you'll find the previously specified code.
- Your Name - The name of the visitor trying to connect with you.
- Your Email - The email of the visitor sending you a message.
- Subject - The subject of the message.
- Your Message - The message a user who fills out a form on your website will send to you.
- Submit - The submit button for the contact form which sends the message to you.
How to Secure your Contact Form with reCAPTCHA
In the past, you needed to set up a separate CAPTCHA plugin and add an extra tag to the form's shortcode. Today, the integration process has been greatly enhanced with the release of reCAPTCHA v3.
How to Generate a reCAPTCHA Key Pair
You must create a Key pair for reCAPTCHA v3 before you can finish the integration. Keep in mind that v2 pairs won't integrate with v3. Open a new browser tab, go to the reCAPTCHA URL, and click the Admin Console icon.
To register a new site, click the plus sign (+) in the top right corner of the page. The following fields are available for you to fill up here:
- Label - The label inside the Admin Console interface will assist you in keeping track of your websites.
- reCAPTCHA Type - You can choose to utilize reCAPTCHA v2 or v3 here; the latter is what we advise.
- Domains - domain names connected to this registration. You will encounter an error if you merely register for example1.com and attempt to use your key pair on example2.com. Example1.com's subdomains will still be covered because they are a part of the DNS zone for that domain.
- Owners - You are automatically added as the domain's or project's sole owner. You can enter the emails of any other individuals who have owner or developer access to your project here. They will then have access to the settings and the project will be added to their Admin Consoles.
Click Accept to agree to the reCAPTCHA Terms of Service, then Submit to finish the registration.
After that, you'll have the site and the secret keys you need to finish integrating the WordPress plugin.
You can bookmark that page by using the Go to Analytics button. It will display information about reCAPTCHA, such as the proportion of low- and high-risk entries, the distribution of scores, the most suspicious activities, etc.
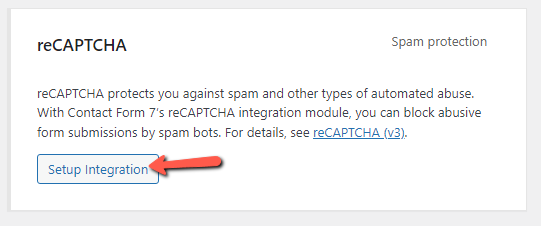
How to Integrate reCAPTCHA in Contact Form 7
To access the Integration with other services menu, go to Contact → Integration and click the Setup Integration option for reCAPTCHA.
To save changes, paste the keys from the Google Admin Console into the appropriate fields.
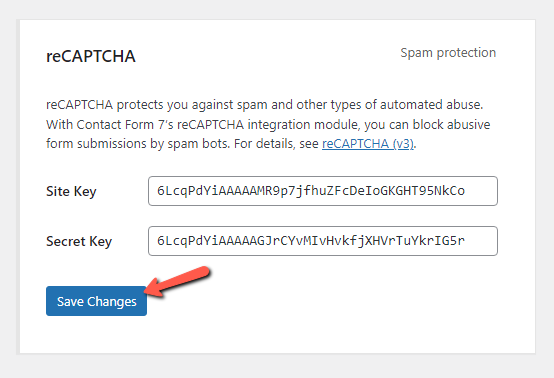
After the refresh, you will see the following message - "reCAPTCHA is active on this site."

With this, you have successfully secured the contact form for your website.
How to Add the Contact Form to your "Contact" Page
If you haven't created that page already, now it's time to do so via your admin dashboard by going into Pages → Add New:

If you are not quite sure how you should manage the pages on your website, you can check our How to Manage Pages in WordPress tutorial on the matter.
You must utilize the created shortcode provided by the plugin to show the contact form. If you didn't already copy the shortcode, go to Contact → Contact Forms to access the contact forms plugin's home page. The shortcode for the form you want to use is available there.

Copy that code and paste it into your Contact page's content field.
Once you publish your Contact Us page, you will be able to see the contact form when you access that page on your website.
How to Add WordPress Contact Form in the Sidebar
The opportunity to include a contact form on more than one page appeals to certain website owners. That is especially helpful for websites that provide articles because it encourages visitors to privately contact the company.
Contrary to WPForms, Contact Form 7 allows you to manually develop a widget for usage in certain situations, but the procedure is still very straightforward.
When you create a form, just as described in the second step of this tutorial, instead of leaving each field like this:
<label> Your Name (required)
	[text* your-name] </label>
You now need to add 25/ before the close bracket:
<label> Your Name (required)
	[text* your-name 25/] </label>
This action will make the text area of the fields smaller which will allow the form to display correctly in the sidebar.
Copy the shortcode of your contact form and navigate to the Appearance → Widgets from within your WordPress dashboard.
Drag a new Text widget to your Sidebar element and paste the shortcode of the contact form in it.
Click Save and Done to apply the change. You now have a fully working sidebar contact form.
Note:
Keep in mind that the Contact Form can be set to send autoresponder emails for everyone that inputs a request. For that, your domain emai records have to be set properly. If you need help with setting them, it’s best that you open a support ticket and rely on our technical support team to do everything as needed. Furthermore, you can use an SMTP plugin such as WP Mail. So, before contacting our technical support team, it would be even better if you get install and activate that plugin.
Congratulations, you can now create and secure a Contact Form for your "Contact" page for your website in WordPress!

WordPress Hosting
- Free WordPress Installation
- 24/7 WordPress Support
- Free Domain Transfer
- Hack-free Protection
- Fast SSD Storage
- Free WordPress Transfer
- Free CloudFlare CDN
- Immediate Activation