How to Create a Child Theme
Updated on Dec 6, 2022
In this section of our WordPress tutorial, we will talk about Child Themes, how to create one and what components are needed for the task.
To complete this tutorial, you will need to:
Why Use Child Themes
A WordPress theme that inherits the features, functionality, and aesthetic of another theme—the parent theme—is known as a child theme. The child theme can then be altered without affecting the parent theme.
Because they need less time and effort, child themes are the best approach to modify a WordPress theme. You don't need to write all of the formatting and functionality from scratch because the parent theme already has a ton of it.
They also make updating your WordPress themes secure. You won't lose any personalization when you update the parent theme because you changed the child theme and not the parent.
You can even utilize your child theme on another WordPress website after you're satisfied with it.
Before You Start Creating a Child Theme
You should be aware that you will be working with code when creating a child theme. To comprehend the adjustments you must make to the code to accomplish your objectives; you'll need a fundamental knowledge of HTML and CSS.
PHP knowledge is also advantageous. At the very least, you should be able to copy and paste code from other sources.
You should practice in your local development environment, as recommended. For testing purposes, you can transfer a live WordPress site to a local server or use fictitious data when creating a theme. You can also clone the site to a subdomain, which is less work but gives the same result.
Choosing a parent theme is the last step. You should pick a parent theme that resembles your ultimate objective in terms of style and features. The goal is to alter things as little as possible.
One of the default WordPress themes, Twenty Twenty-One, will be used in this article.
How to Create Your First Child Theme
By establishing the required folder and files, you can manually create a child theme. Alternatively, you can use a plugin to build a child theme.
The manual approach is beneficial since it will enable you to get acquainted with the files you will need during the session. If you have trouble producing those files, you can utilize the plugin technique.
How to Create a Child Theme Using Code
You must first create a new folder for your child theme in /wp-content/themes in your WordPress installation folder. This folder can have any name you choose. We're going to call it wpbdemo.
The first two files for your child theme must be created next. Open a text editor first, such as Notepad. Then, put the subsequent code into the blank document.
Theme Name:  Example Child Theme
Theme URI:   https://www.example.com/
Description: A Twenty Twenty-One child theme
Author:      YourNameHere
Author URI:  https://www.example.com
Template:    twentytwentyone
Version:     1.0.0
Text Domain: twentytwentyonechild
Feel free to modify this code to suit your needs since it contains information about the child theme. In the child theme folder, you just made, store this file as style.css. This is the primary stylesheet for your child theme.
The next step is to make a second file that will import, or enqueue, the parent theme's stylesheets. Create a new document in your text editor and paste the following code within it to accomplish this.
/* enqueue scripts and style from parent theme */

function twentytwentyone_styles() {
    wp_enqueue_style( 'child-style', get_stylesheet_uri(),
    array( 'twenty-twenty-one-style' ), wp_get_theme()->;get('Version') );
}
add_action( 'wp_enqueue_scripts', 'twentytwentyone_styles');
When Twenty Twenty-One is used as the parent theme, this code will operate as intended. The WordPress Theme Handbook explains how to utilize alternative code if you use a different parent theme.
Use the plugin technique instead if you find it difficult to change the code for a different parent theme.
Put this file in your child theme folder (wp-content/themes/wpbdemo) as functions.php now. In order to provide your child theme functionality, we'll return to this file later.
Note:
The @import command in style.css was formerly used to import the parent theme. This approach will prolong the time it takes for the style sheets to load, thus, we no longer advise using it, as website speeds/load time are also essential, after all.
Now that you've finished creating a child theme, you should notice the WPB Child Theme when you go to Appearance → Themes. To use the child theme on your website, you must click the Activate button.
Your site will use the features and aesthetic of its parent theme as you haven't made any changes to your child theme yet. Moving on to the next step, where you will configure the child theme, is now possible.
How to Create a Child Theme Using a Plugin
A simple-to-use WordPress plugin called Child Theme Configurator enables you to rapidly build and adjust child themes without writing any code.
The Child Theme Configurator plugin needs to be installed and turned on initially. See our step-by-step tutorial on installing a WordPress plugin for more information.
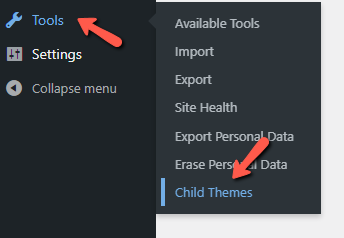
You must go to Tools → Child Themes in your WordPress dashboard after activation:
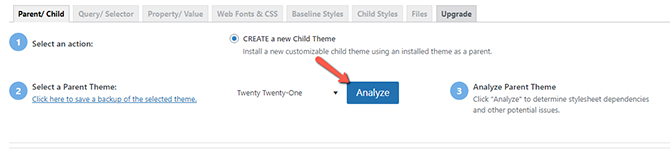
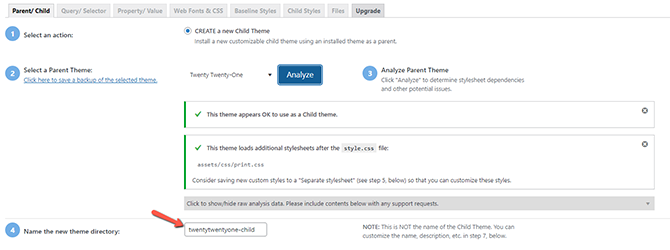
You will be prompted to choose a parent theme from a drop-down menu on the Parent/Child tab. The Twenty Twenty-One theme will be chosen. The plugin will determine whether the theme is appropriate for use as a parent theme when you click the Analyze button.
You will then be prompted to name the folder where the child theme will be saved and select a location for new styles. We'll keep everything set to default.
You'll be prompted to select the parent theme stylesheet access method in the section that follows. Once more, we'll use the default configuration.

You must select the "Click to Edit Child Theme Attributes" button when you reach Section 7. Then, you may add information to your child theme.
The menus and widgets from the parent theme are lost when you manually create a child theme. They can be copied from the parent theme to the child theme through Child Theme Configurator.

To create your own child theme, click the button Create New Child Theme. The style.css and functions.php files you'll need to subsequently alter the theme will be added to a folder the plugin will create for your child themes. Click the link towards the top of the screen to preview the theme before activating it to make sure it works properly and looks decent.

The child theme will now seem and function just like the parent theme at this point. We'll then start customizing it.
How to Customize Your Child Theme
We will now tweak the child theme to give it a somewhat distinct appearance from the parent theme. To accomplish this, we must add code to the style.css file, which calls for some CSS knowledge.
By copying and editing the parent theme's existing code, you can streamline the process. You may locate the code by using Chrome or Firefox Inspector, or you can copy it straight from the style.css file of the parent theme.
Copy Code from the Chrome or Firefox Inspector
Using the inspector tools that come with Google Chrome and Firefox is the simplest approach to finding the CSS code that needs to be changed. With the use of these tools, you may examine the HTML and CSS behind any web page element.
For instance, you may right-click on the post and choose Inspect to view the CSS that was used to create the post's body.
Your browser screen will divide into two sections as a result. You can see the page's HTML and CSS at the bottom of the screen. The HTML and CSS may alternatively show up on the right side of the screen, depending on the configurations of your browser.
The Chrome inspector will highlight various HTML lines in the top window as you move the mouse over them. Additionally, it will display the CSS rules that apply to the highlighted element.
You can experiment with modifying the CSS there to see how it might appear.
After saving your style.css file modifications, you should preview your website. Repeat the procedure for any further changes you want to make to the stylesheet for your theme. This page contains the whole stylesheet we developed for the child theme. You are welcome to experiment and change it.
Theme Name:   Example Child Theme
Theme URI:    https://www.example.com/
Description:  A Twenty Twenty-One child theme
Author:       YourNameHere
Author URI:   https://www.example.com
Template:     twentytwentyone
Version:      1.0.0
Text Domain:  twentytwentyonechild
 */

.site-title {
    color: #7d7b77;
}
.site-description {
    color: #aba8a2;
}
body {
     background-color: #fdf8ef;
     color: #7d7b77;
}
.entry-footer {
    color: #aba8a2;
}
.entry-title {
    color: #aba8a2;
    font-weight: bold;
}
.widget-area {
    color: #7d7b77;
Copy Code from the Parent Theme’s style.css File
You can also copy some code straight from the style.css file of the parent theme. After that, you can alter it by pasting it into the style.css file of the child theme.
Due to the wide usage of CSS variables in Twenty Twenty-One as a parent theme, that is very beneficial.
For instance, the first code read as follows when we changed the background color of the page above:
background-color: var(--global--color-background);
The variable "-global-color-background" is present here. Throughout the topic, the variable can be utilized in a variety of contexts. You only need to alter the variable's value to instantly change the color in each of those locations.
You must open the style.css file in your text editor after navigating to /wp-content/themes/twentytwentyone in your WordPress installation folder. The location of the definition of -global-color-background may then be found.
--global--color-background: var(--global--color-green);
Because of this, we find out that yet another completely different variable is trying to define our original one. In fact, a wide variety of color variables are declared in the:root section of the parent theme's style.css file. The Twenty Twenty-One theme employs this color scheme.
:root {
    --global--color-black: #000;
    --global--color-dark-gray: #28303d;
    --global--color-gray: #39414d;
    --global--color-light-gray: #f0f0f0;
    --global--color-green: #d1e4dd;
    --global--color-blue: #d1dfe4;
    --global--color-purple: #d1d1e4;
    --global--color-red: #e4d1d1;
    --global--color-orange: #e4dad1;
    --global--color-yellow: #eeeadd;
    --global--color-white: #fff;
These options will enable easy customization of your child theme once you've selected the ideal color scheme for your WordPress website.
You need only copy and paste that code into the style.css file of your child theme. Then, you must substitute the existing color codes with new ones that you selected for your personal color scheme.
The entire child theme for your website will then automatically incorporate those colors in various locations. In addition to being speedier, it will also ensure that your theme's colors are more uniform.
The green color variable doesn’t have to be green.
The same applies to other variables. Style of Twenty Twenty-One. CSS includes variables for headings, line spacing, font families, and more. Any of these can be incorporated into your new style. There is a css file in which to modify them.
How to Edit the Template Files
Different WordPress themes have various layouts. The Twenty Twenty-One theme, as an illustration, includes a header, content loop, footer widget section, and footer.
In the twentytwentyone folder, there is a different file for each segment. These are referred to as templates.
The area for which a template is utilized is typically the name of the template. For instance, the header and navigation portions are often handled by the header.php file, and the footer section is typically handled by the footer.php file.
Several files referred to as content templates may be used to manage some parts, such as the content area.
Finding the file in the parent theme folder and copying it to the child theme folder are the first steps in editing a template. You should then open the file in a text editor and make the necessary changes.
The footer.php file will be moved from the parent theme folder to the child theme folder in this tutorial. The next step is to open the file in a simple text editor, such as Notepad.
As an example, we’ll remove the ‘Proudly powered by WordPress’ link from the footer area and add a copyright notice there. To do that, you should delete everything between the <div class="powered-by"> tags.
<div class="powered-by">
    <?php
    printf(
        /* translators: %s: WordPress. */
        esc_html__( 'Proudly powered by %s.', 'twentytwentyone' ),
        '<a href="' . esc_url( __( 'https://wordpress.org/', 'twentytwentyone' ) ) . '">WordPress</a>'
    );
    ?>
    </div><!-- .powered-by -->
Then you need to paste in the code you find below those tags in the example below.
<div class="powered-by">
<p>© Copyright <?php echo date("Y"); ?>. All rights reserved.</p>
</div><!-- .powered-by -->
Once you save the file and visit your WordPress site, you should be able to see the new copyright notice.
How to Add New Functionality to Your Child Theme
A WordPress site's functions.php file employs PHP code to add features or alter the platform's basic functionalities. It performs the same function as a WordPress plugin that is instantly active when your site is using the selected theme.
You'll see instructions to copy and paste code snippets into functions.php in a lot of WordPress tutorials. However, if you include it in the parent theme, any further updates to the theme will overwrite it.
Therefore, when introducing customized code snippets, we advise using a child theme. We'll expand our theme's widget area in this tutorial.
This bit of code can be added to the functions.php file of our child theme to do that.
<?php
// Register Sidebars
function custom_sidebars() {

    $args = array(
        'id'        => 'custom_sidebar',
        'name'      => __( 'Custom Widget Area', 'text_domain' ),
        'description'   => __( 'A custom widget area', 'text_domain' ),
        'before_title'  => '<h3 class="widget-title">',
        'after_title'   => '</h3>',
        'before_widget' => '<aside id="%1$s" class="widget %2$s">',
        'after_widget'  => '</aside>',
    );
    register_sidebar( $args );

}
add_action( 'widgets_init', 'custom_sidebars' );
?>
When you save the file, your new custom widget area will be visible when you go to the Appearance → Widgets page of your WordPress dashboard.
You can learn more about adding widget areas in our guide on how to add dynamic widget-ready areas and sidebars in WordPress.
Troubleshooting
If you’ve never created a child theme before, then there’s a good chance you’ll make some mistakes. Just don’t give up too quickly.
The most typical problems you'll probably encounter are syntax mistakes brought on by omissions in the code. If anything goes wrong, you can always start over. For instance, you can easily erase the file from your child theme and start over if you unintentionally deleted anything that your parent theme needs.
We trust that you learned how to make a WordPress child theme from this tutorial. You might also want to review our list of essential plugins for your site's growth or discover how to pick the best website builder.

WordPress Hosting
- Free WordPress Installation
- 24/7 WordPress Support
- Free Domain Transfer
- Hack-free Protection
- Fast SSD Storage
- Free WordPress Transfer
- Free CloudFlare CDN
- Immediate Activation