How to use the Media Manager in Joomla
Updated on Mar 13, 2019
This tutorial provides an insight look at the Media Manager feature in Joomla and explains how to use it.
To be able to fully use Media in Joomla, you need to know how to:
Access the Media Manager
Log into your website as administrator and navigate to the Content tab and then Media Manager.

Create an Upload Folder
Once you access the Media Manager service on your website, you will see a Create New Folder button on the top of the screen. Clicking on it, you will be presented with a new empty box, where you can enter the name of the new folder, as per the following screenshot:

When you enter the name of your new folder, simply click on the Create Folder button and the system will complete the rest for you.
Upload Files
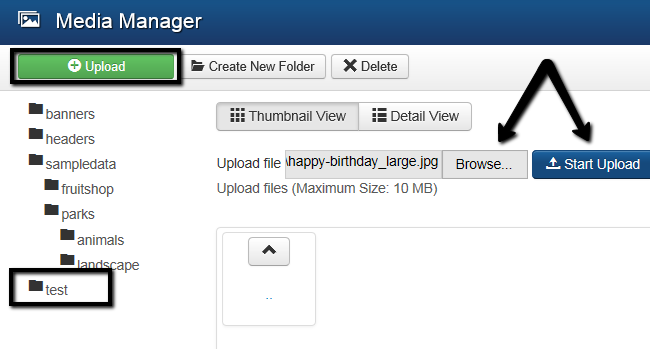
Select a folder, where you would like to upload the new file. In our example, we have selected the newly created folder "Test" in Step 2.
Click the Upload button at the top-left side of the screen. This will allow you to choose a file from your personal computer. When you select the file, simply click on the Start Upload button, which will initiate the process for you.

Remove Files
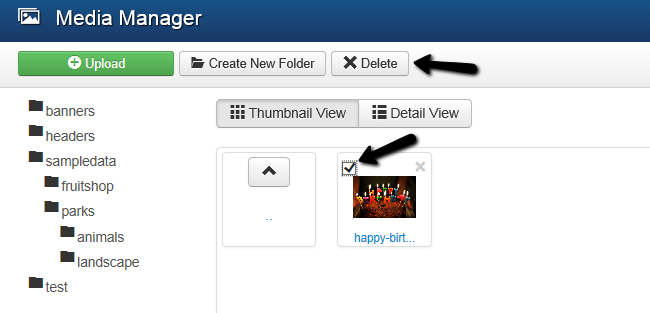
To remove a file via the Media Manager, you simply need to select it and then click the Delete button on top.

The same process can be used for multiple files as well. Simply select all files and click the Delete button on top.

Joomla Hosting
- Free Installation
- 24/7 Joomla Support
- Hack-free Protection
- Fast SSD Storage
- Free Domain Transfer
- Free Joomla Transfer
- Free Cloudflare CDN