How to rename the installation directory of Joomla via cPanel
Updated on Mar 13, 2019
This tutorial provides detailed information about changing the installation directory of your Joomla 3.x website using the File Manager service within your cPanel account. Joomla makes this process easy and it does not require specific configuration knowledge from you. However, there are certain steps that you need to complete fully in order to keep intact the full functionality of your website.
To change the directory of Joomla via cPanel, you need to:
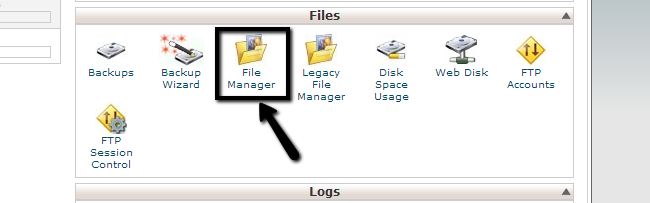
Access cPanel
The first step is to access your cPanel account on the server. Then you need to navigate to the Files tab and select the File Manager service.
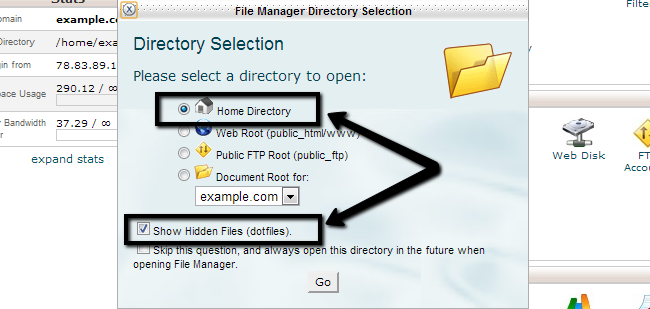
You will notice a pop-up window that will present a few options for you. Simply select the following two:
- Home Directory
- Show Hidden Files (dotfiles)
and then click on the GO button to proceed further.
Locate the Joomla Installation
The second step is to access the installation directory of your Joomla website. For example, if you access your website via the following link:
http://www.example.com/
where example.com is the actual domain that you are using on your website and it means that the Joomla installation is located directly within the public_html/ directory of your account. Or, if you access your website via the following link:
http://www.example.com/joomla30/
where example.com is your domain name and “joomla30” is a subfolder on your account, it means that the Joomla installation is located in a folder, called “joomla30” within the public_html/ directory of your account.
Rename the Joomla Directory
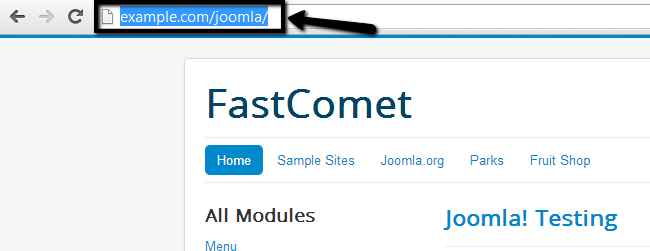
In our example, we have installed a Joomla website, using a subfolder called “joomla”, which means that it is accessible via the following link:
http://www.example.com/joomla/
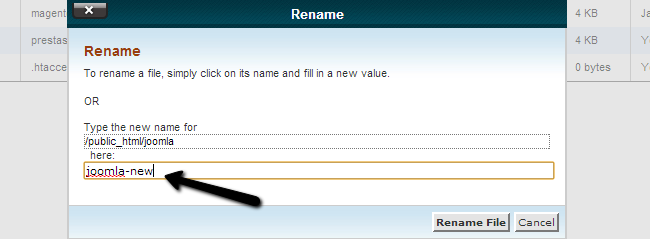
When you locate the folder on your Joomla installation, right-click on it and choose the Rename option.
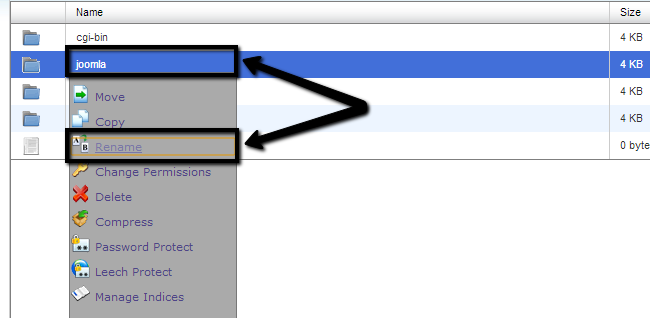
Enter the name of the new subfolder that you will be using for your Joomla installation and save it. In our example, we have renamed the folder from “joomla” to “joomla-new”. When you are ready, click on the Rename File button to keep the changes.
Edit the Configuration File
The last step of the process is to update the settings from within the main configuration file in your Joomla installation. This step is crutial because it ensures that all functionality on your website remains intact and unaffected by the change of the subfolder.
Configuration file
The main configuration file of Joomla is easy to find and it contains a large number of options that can assist you with the configuration of your website. We have an excellent tutorial on How to locate and edit the main configuration file in Joomla.
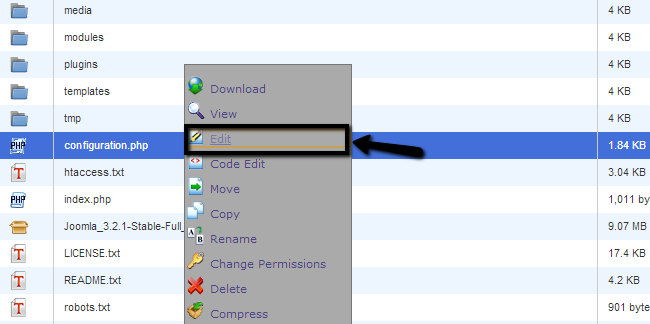
When you locate the configuration file, you have to right-click on it and choose the Edit button from the available list.
When you open the configuration file of your Joomla website for editing, the lines of code that you actually need to change are:
     public $log_path = ‘/home/example/public_html/joomla/logs’;
     public $tmp_path = ‘/home/example/public_html/joomla/tmp’;
where “example” is your cPanel username and “joomla” is the subfolder of your Joomla website. What you need to do is to change the “joomla” directory with the new name that you entered in Step 2 of this tutorial. In our example, we have renamed the directory to “joomla-new” so we have changed that accordingly.
Once you make the changes, simply click on the Save Changes button on the top-right corner of the screen. A pop-up message with a successful message will come up on the screen. After that, you can close the file as it already contains the changes.

Your website is now accessible via the new location. In our example, this is a subfolder called “joomla-new”.
Joomla Hosting
- Free Installation
- 24/7 Joomla Support
- Hack-free Protection
- Fast SSD Storage
- Free Domain Transfer
- Free Joomla Transfer
- Free Cloudflare CDN