How to change the favicon in Joomla
Updated on Mar 13, 2019
This tutorial reviews the process of changing the default Joomla favicon image on your website. A favicon, also known as tab icon, is the image file associated with the URL of your website in a browser's address bar. It is located right before your URL in the address bar and next to your site name in a user's bookmark list. Setting your custom favicon will make your website look more professional and help you gain visual recognition in the internet.
To change the favicon in Joomla, you need to complete the following steps:
Create a Favicon Image
The first step is to design the image for the new favicon on your website. You can do so using graphic software, such as PhotoShop, Windows Paint or any other program that is able to produce graphical images. The important thing to note here is that the new image should be with size of 16x16 pixels.
When you create your new image, you will have to convert it to .ico format so the system can accept your new favicon image.
There are multiple tools that you can use to achieve this:
Check the Template
To change the favicon image on your website, it is important to know the currently enabled template on the front-end of your website. This will specify the exact location where you need to upload the new favicon image.
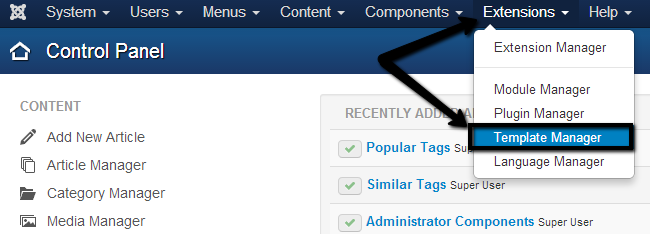
To check the template that is set as default on your website, you need to log into your website as administrator and click on the Extensions tab on the top-menu and then Template Manager.
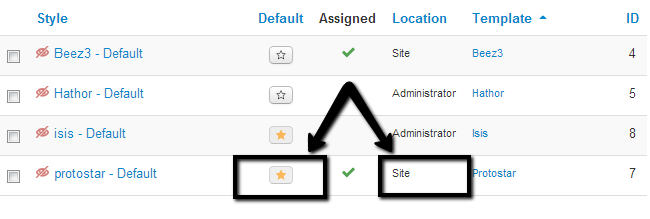
Review the available templates on your website. The one that is currently enabled has:
- Location - This field is set to Site
- Default - This field is enabled.
In our case, the template that is enabled on the front-end of our Joomla installation is called Protostar. Keep a note of the name for your front-end template as you will need it when uploading the favicon image to the server.
Locate the Joomla installation
Then you have to locate your website on the server. If you access your website via the following link:
http://www.example.com
where example.com is the actual domain that you are using on your website, it means that Joomla installation is located directly within the public_html directory of your account. Or, if you access your website via the following link:
http://www.example.com/joomla30/
where example.com is your domain name and “joomla30” is a subfolder on your account, it means that Joomla installation is located in a folder, called “joomla30” within the public_html directory of your account.
Upload the Favicon
The last step is to upload the favicon image to the correct location on the server. When you locate the Joomla installation on your account, simply access it via FTP or directly via the File Manager service within your cPanel account and enter the templates/ directory within your Joomla installation. It contains all templates that are available on your website.
In Step 2 you were able to see the template that is currently enabled on the front-end of your website. Enter the folder which matches the name of your template and simply upload the favicon.ico image to it. If there is already such favicon.ico image, you can rename it or remove it from the server.
Joomla Hosting
- Free Installation
- 24/7 Joomla Support
- Hack-free Protection
- Fast SSD Storage
- Free Domain Transfer
- Free Joomla Transfer
- Free Cloudflare CDN