Changing the Installation Folder of Dolphin
Updated on Dec 15, 2015
Probably one of the most common issues faced by the developers using the Boonex Dolphin for building beautiful Social Communities for their customers is the migration of the development version of the website to live environment by changing the folder where the platform will be running from.
Usually when you are migrating from a folder within the public_html folder (public_html/foldername) to the public_html folder directly, you will need to simply move the files and reconfigure your Boonex Dolphin platform so it can be using the new path.
To move your Dolphin Installation to another location you need to:
Step 1 Move the files to another folder
For the purpose of this tutorial we will consider that your platform will be installed in the public_html/community folder. In order to move the files of the platform directly inside the public_html folder you will need to use the Move feature available in the File Manager service of cPanel.
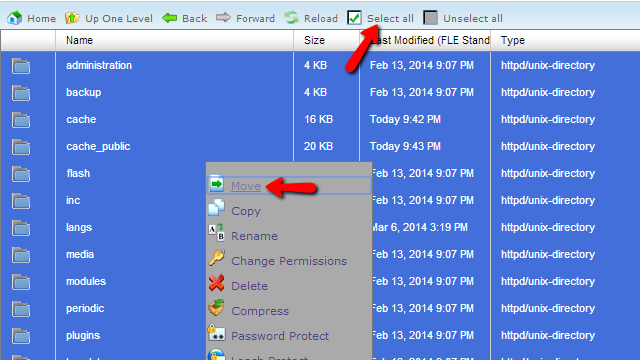
In order to select all of the files simply click on a single file and then use the Select all button of the File Manager service.
Once you have all of the files selected you will need to right click and use the Move feature which will bring an additional configuration interface for the actual move.
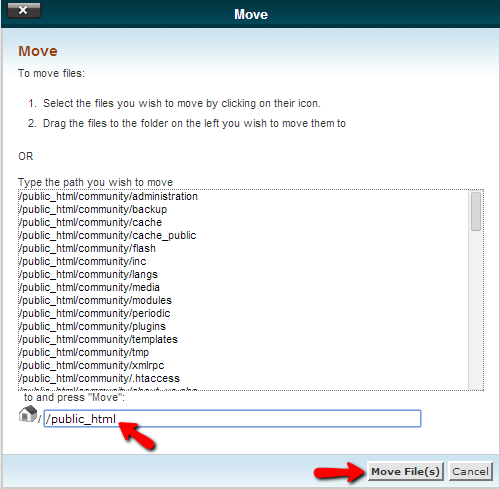
Here you will need to make sure that the public_html folder will be properly displayed as the new path for your files. Note that by default the value there will be public_html/community in this case since it is displaying the current folder you are located at.
Once you press the Move File(s) button all of the files will be moved.
Note
Please make sure that the content of your public_html folder is not related to another website already installed there as most probably this type of migration will cause your native website for the public_html folder to be no longer available and replaced with the files of your Social community.
The best case scenario here will be if your public_html folder contains only the directory you are moving your Social Community from.
Step 2 Reconfigure the application with new path
Now that you have the files moved you will need to reconfigure the path for you Social Community. This is quite an easy task and if you proceed reading our tutorial you will be able to handle the reconfiguration in no time.
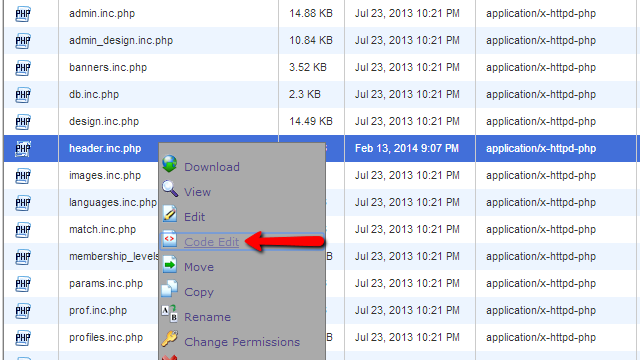
The configuration of your Boonex Dolphin platform installation is saved in the header.inc.php file which is located inside the inc/ folder of the installation. Now, since you have moved those files into the new folder (in our case the public_html folder) the path to the header.inc.php file will be:
/public_html/inc/header.inc.php
Open the file with your favorite code editor locally on your computer by downloading the file or directly use the Code Edit feature of the File Maneger service provided in your cPanel.
Once you have the code in the file in front of you, there are two lines that should be edited by simply removing the name of the subfolder you had the platform installed at:
$site['ver']               = '7.1'
$site['build']             = '4'
$site['url']               = "http://example.com/community/";
$admin_dir                 = "administration";
$iAdminPage				= 0;
$site['url_admin']         = "{$site['url']}$admin_dir/";

$site['mediaImages']       = "{$site['url']}media/images/";
$site['gallery']           = "{$site['url']}media/images/gallery/";
$site['flags']             = "{$site['url']}media/images/flags/";
$site['banners']           = "{$site['url']}media/images/banners/";
$site['tmp']               = "{$site['url']}tmp/";
$site['plugins']           = "{$site['url']}plugins/";
$site['base']              = "{$site['url']}templates/base/";

$site['bugReportMail']     = "[email protected]";

$dir['root']               = "/home/example/public_html/community/";
$dir['inc']                = "{$dir['root']}inc/";
$dir['profileImage']       = "{$dir['root']}media/images/profile/";
The first edit should be performed near the 5th line of the file or in the following line:
$site['url'] = "http://example.com/community/";
This should be changed to:
$site['url'] = "http://example.com/";
Note that the community part of the URL which is the actual name of the subfolder has been removed.
The second edit you should perform is near the 20th line of the file and it is the following piece of code:
$dir['root'] = "/home/example/public_html/community/";
This should be changed to:
$dir['root'] = "/home/example/public_html/";
As you can see again the community part of the path is removed as it is the name of the folder where your platform was installed.Please make sure that both of the paths end with a “/” as this is a mandatory and if you miss it your platform might be unable to load entirely.
Once you are done editing the file please save it and access your Social community on its new location.
Congratulations! You now know how to change the folder where your Social Community is installed and is running from!

Dolphin Hosting
- Free Dolphin Installation
- 24/7 Dolphin Support
- Hack-free Protection
- Fast SSD Storage
- Free Domain Transfer
- FFmpeg Support
- Free Cloudflare CDN