How to stage websites via Softaculous
Updated on Nov 27, 2024
The Softaculous Staging feature allows you to create a full copy of a live website. There, you can preview any changes or upgdates before you apply them top the live website. When you want to change or update your website, plugins or theme, it is highly recommended to do that in a staging environment at first to ensure everything works as intended. Otherwise, if an update or change is not entirely compatible with your live website's configuration, that may cause functionality or stability issues.
Softaculous Staging helps you to create, manage and push staging copies to a live environment with one click. It works for the most CMS systems, which are available in Softaculous. With all of that said, let us take a look at exactly how to use it. We will use WordPress as an example.
In This Tutorial:
Create a Staging Environment
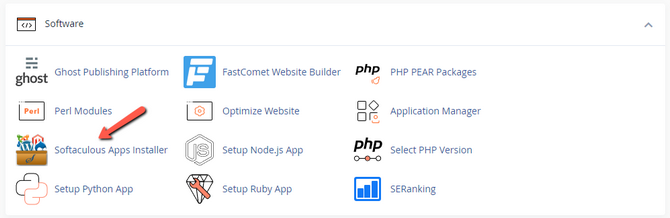
To begin, open your cPanel then go to the Softaculous App installer in the Software section.
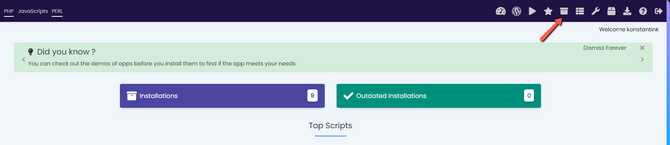
You will see the installer's homepage, showing you how many installations you have and some of the more popular applications you can install. However, what you are looking for is the All Installations button in the top menu. If you would like to learn what the rest of the buttons do, check out our Softaculous tutorial.
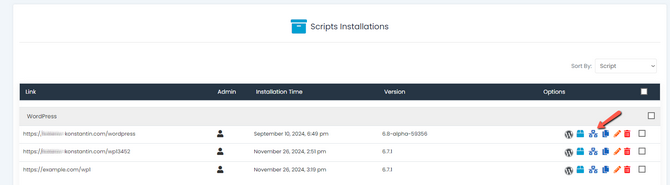
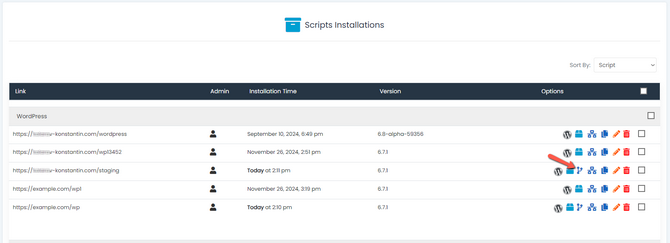
You will see a list of installations on the next page, separated by application. You can also manage them via the buttons to the right of each. For the purpose of this tutorial, look for the Create Staging one.
On the next page you will see a set of staging details that you must fill in. These will dicate where the staging website is created, as well as on which domain and what the database name will be.
- Choose Protocol - Pick between http or https. If your site has SSL, then choose https protocol;
- Choose Domain - The domain name on which you want to create the staging website;
- In Directory - Here, you need to choose the root directory of the staging website. Users typically use /staging;
- DataBase Name - You can change the Database name or leave it as it is. You must use a different database from the one your live website uses.
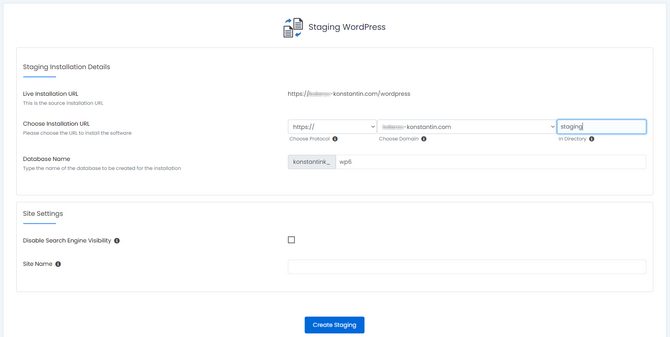
Once you fill in the details, click Create Staging at the bottom. The process will take a few moments after which you will see the "success" page. There, you can visit the staging website or head to the staging admin dashboard. Now, let us look at how to push changes to the live website.
Push changes to Live Environment
Once you are satisfied with the changes in the staging copy of your website, you can push them to your live website. To do that, go back to the All Installations screen in Softaculous. There, click on the Push To Live icon next to the corresponding staging installation you wish to push to the live environment.
Next, you will see two tabs: Default Options and Customize. Additionally, there is a button if you want to completely separate the staging version from the live. The Default tab is the quickest way to push changes to live. This is what it will do when you click Push to Live.
- Create a backup of your live website;
- Overwrite all the files in your live installation with the ones from your staging copy;
- Erase the database of your live installation and replace it with the one in your staging copy.
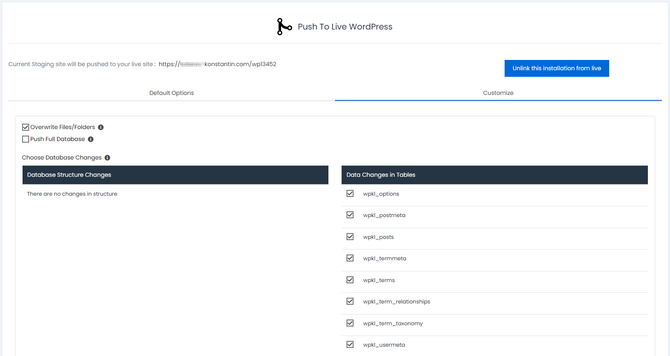
The Cuztomize tab, however, will give you a more granular control over what is pushed to the live website. Here are the available options.
- Push only the Files;
- Push Full Database (includes structure changes as well as the tables);
- Only Database structure;
- Only Data from the database tables.
When you are ready, click Push to Live at the bottom of the screen. Once again, the process will take a few moments and inform you if there are any errors along the way. If there are none, you will see the "success" page, where you can head directly to the website to preview the changes or log into the admin dashboard.
And there you have it! Pushing to live via Softaculous is as easy as that. The staging version of the website will remain in your hosting account so you can either continue to make changes on it, push to live or completely remove it by using the delete option in Softaculous.

cPanel Hosting
- Free Domain Transfer
- 24/7 Technical Support
- Fast SSD Storage
- Hack-free Protection
- Free Script Installation
- Free Website Transfer
- Free Cloudflare CDN
- Immediate Activation