Backup and Restore your Database
Updated on Sep 12, 2016
PrestaShop 1.6 is a php/MariaDB driven application which hardly relies on its database for storing different type of information across the large amount of database tables it has. From time to time you might want to back up or restore the database of your Store in case of some major issue with the same. Currently our PrestaShop Hosting package fully includes automatic backup for the files and folders of your account, however just to ensure that you will have a backup in a point of time when your Store is in good shape the next few lines of this tutorial will show you how to do it.
To complete this tutorial, you will need to:
Backup the Database
There are few ways to backup up the database used by your website. The best however we find the one provided by the authors of the PrestaShop 1.6 application. In order to use that backup method you should login into the Back office of your Store and then navigate to Advanced Parameters → DB Backup.
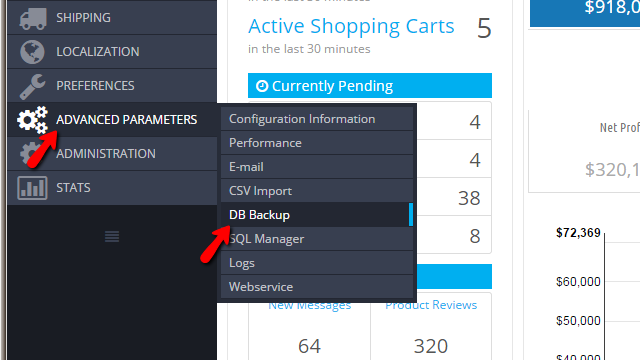
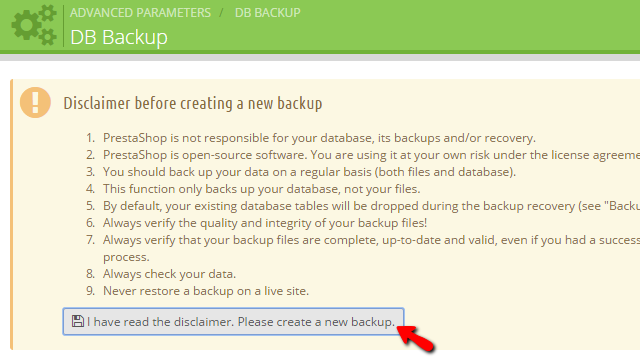
This is an actual dedicated page from the Back Office of the PrestaShop 1.6 application which will grant you the option to perform a full scale backup of your database. Let's proceed with the generation of the actual backup. On the next page you will be provided with detailed information on the backup process under the Disclaimer section and there you will also find the "I have read the disclaimer. Please create a new backup." button which you should use for the backup generation process to be started.
As soon as you click on that button the page will be reloaded and at the top of the same you will notice a message indicating the successful backup you have just performed and also a button labeled Download the backup which will allow you to actually download the backup.
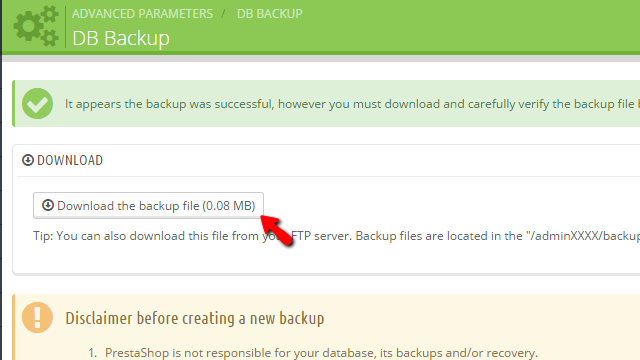
Once you click on that button your download will begin immediately so you can have a fresh backup of your database.
Restore the Database
In order to restore a backup you will need to first download the same or in case you have already downloaded it when the same was generated you can proceed with the restoration after the following explanation on how to obtain a backup copy of your database.
When a backup of the database is generated via the Back Office of your Store it will be stored in the admin folder and more precisely in the backups folder located inside the admin folder. In order to obtain a copy of the generated backup you have two choices:
-
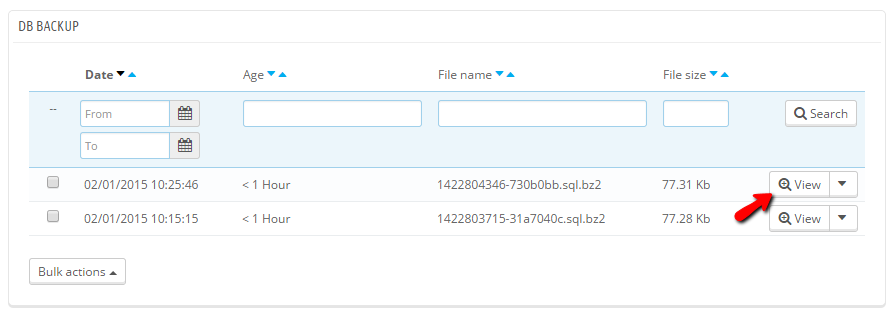
You can access the backup generation page and if you scroll down to the bottom of the page you will find the DB Backup table view which will actually show you the already generated backups for the database of your Store. If you click on the View button next to every backup your download process will begin and you will be able to obtain the copy.
-
The second option you have for obtaining a backup is to login into the FTP service for your account and to navigate to the mentioned backup folder (adminXXX/backups) where you will be able to find all those backups archived for easier download.
No matter which from the two options will be chosen you will always end up with a downloaded copy of your database.
Now that you have the backup it is time to restore the same. Unfortunately the authors of the PrestaShop 1.6 application did not included any restoration feature in the Back Office of the application and for this reason you will need to use the good old restoration method for any database.
The method is relatively simple as you will need to create a new database via your cPanel → Database Wizard and then to import the downloaded .sql file. Let's review that process in details.
First in order to create a new database using the Database Wizard feature you should follow our Create MariaDB Database and User via cPanel hosting tutorial. There you will find quite a detailed review of the process so you can end up with a database name, database username and of course a database password.
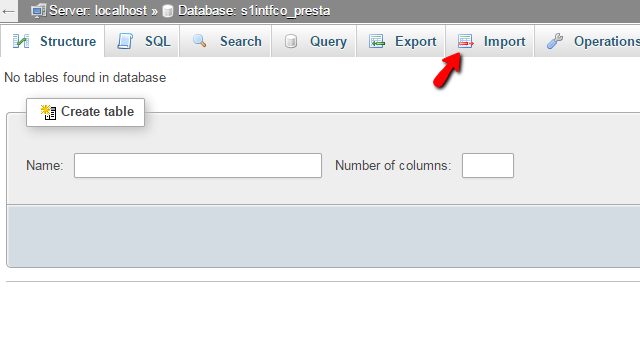
Secondly in order to import the downloaded .sql file you will need to use the phpMyAdmin feature provided in the cPanel service included in every PrestaShop Hosting package. You can find the feature in the Databases section.

Once you access the feature you will need to locate the database you have just created. Usually this database will be listed in the left vertical navigation panel along with all other databases for your account. As soon as you located the newly created database please click on the same so you can be presented with the table view for this database and then click on the Import button located at the top horizontal menu.
This will bring the importing interface where you will be able to Choose File in order to point the browser to the downloaded .sql file for your database. Next you will need to simply hit the Go button so the importing procedure can begin.
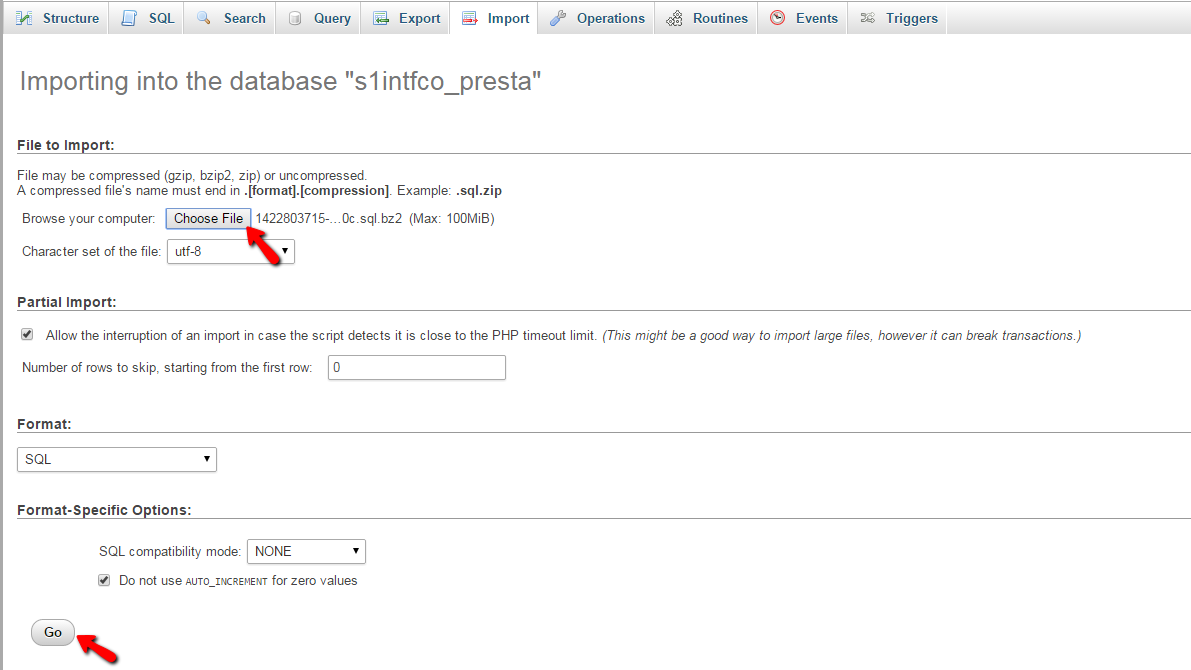
Once the importing is finished you will be provided with a message indicating the successful import and the amount of queries being executed against the newly created database.
The only thing left to do is to reconfigure your PrestaShop 1.6 based store with the database you have just created and which you have imported the backup into. For this purpose you will need to edit the main configuration file of the PrestaShop 1.6 application. This can be achieved quite easily via the cPanel → File manager feature.
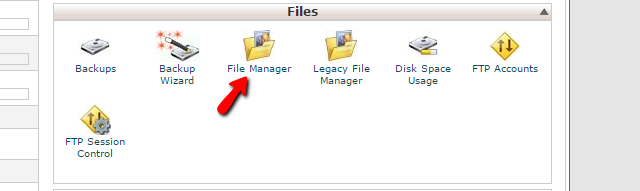
Once you access it you will need to navigate to the folder where your store is currently installed. Usually if your store is accessible directly on your primary domain your PrestaShop 1.6 should be installed into the public_html folder. Once you access the folder where the installation is performed you will need to locate the config folder where you will find the settings.inc.php file. The is the file you should be editing in order to configure your Store with the new database you have restored.

Please right-click on that file and choose the Code Edit option so you can be presented with the code editing tools of the File Manager service. Then on the top of the file you will be able to find the following lines:
define('_DB_NAME_', database_prest37');
define('_DB_USER_', 'database_prest37');
define('_DB_PASSWD_', 's0m3p@ssw0rd');
Here you will need to change the lines respectively with database name, database username and the database password used by your newly created database. Once you are ready with the edits please save the file by using the Save button located at the top right corner of the code editing tool and you are done.
Now please refresh your website and see the result of your hard work.
Congratulations! You now know how to fully backup and then restore the database of your PrestaShop 1.6 based Store!

PrestaShop 1.6 Hosting
- Free Installation
- 24/7 Tech Support
- Free Domain Transfer
- Hack-free Protection
- Fast SSD Storage
- Free Cloudflare CDN
- Free Website Transfer
- Immediate Activation