How to Enable Multi-Store in PrestaShop 1.6
Updated on Sep 12, 2016
Multi-Store Installations are very convenient for business owners that have more than one e-commerce venture and want to easily maintain their online presence. PrestaShop is one of the e-commerce applications which support this functionality. In this tutorial we will show you exactly how to setup a new shop via a Subdomain/Addon Domain and make it work in a multi-store configuration with your initial PrestaShop store.
To configure the multistore feature for your store you will have to:
Create a Subdomain
Multi-Stores are often configured as a subdomain to the original shop domain. If your setup is similar, you will first have to login to your cPanel account and navigate to the Domains → Subdomains feature. Alternatively you can use the search field to look for Subdomains.
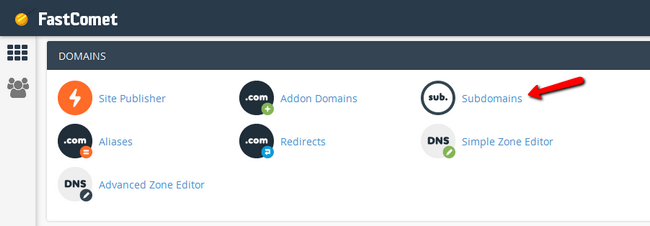
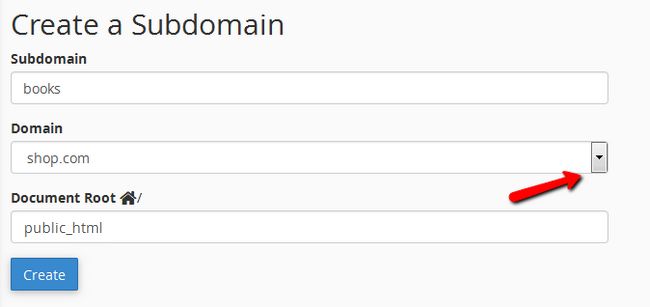
Here we will choose the domain for which we will create a subdomain and set the document root to public_html. Note that your store will not work properly if the subdomain is created outside of your public_html folder. Once created inside this directory the domain can be pointed to the installation of PrestaShop 1.6 via the back-office.
Note that you can easily make your Multi-Store under a completely new domain. You just need to repeat the above-mentioned process but instead of Subdomains, access the Addon Domains menu in cPanel. Again the document root must be public_html.
Configure PrestaShop's back-office
To configure the Multi-Store settings of your PrestaShop 1.6 installation, you will have to login to your admin area and navigate to Preferences → General.
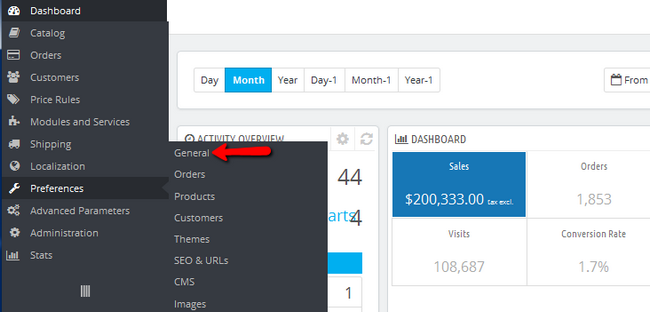
At the bottom of the page full of different settings you will see the Enable Mutistore option. Authorise it and save the change via the Save button located at the end of the page.

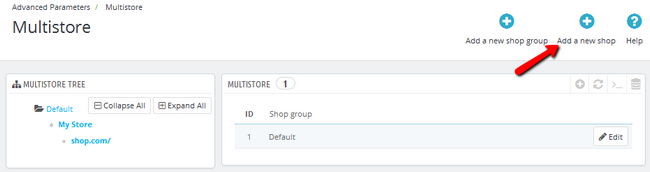
Now access the newly added option via the navigation menu Advanced Parameters→Multistore.
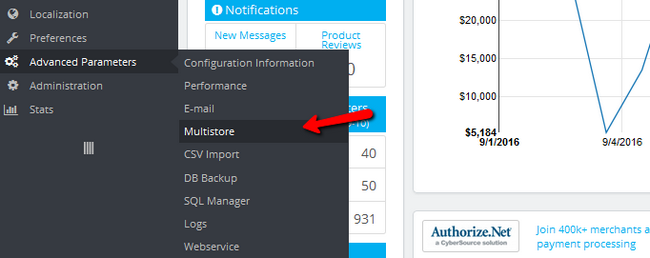
Here you will see that your multistore tree is currently populated with only one shop. To add a new one, click on the Add a new shop button. Note that you can also create a New shop group but by doing so you will not be able to share your initial store's customers, stock quantities and orders. New shop groups are useful when you have completely different categories of stores which you don't want to have intertwined. Like a clothing shops and building material shops.
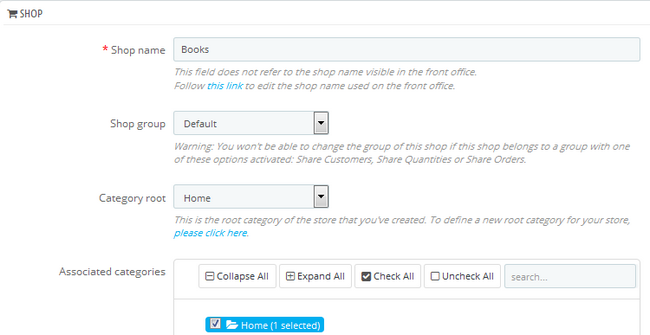
Now you can start configuring the new store:
- Shop name - The public name of your shop. This will be visible to everyone and be used as a website title
- Shop group - Shop groups are used to group the shops which you want to share customers, available quantities to sell and orders between themselves. Once, one of these options has been chosen, the shop will have to remain in this shop group and will not be movable
- Category root -Your main shop has the catalog root as its category root but any other shop you add can have any category as a category root
- Associated categories - Here you can choose which categories you want to be available in your new store
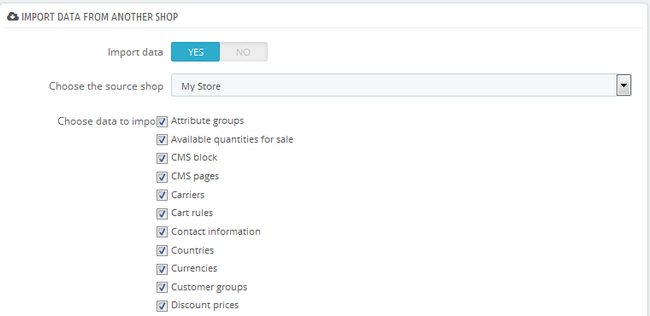
You can also choose to import data from another shop of yours.
Create a URL for the new shop
Click Save and you will be returned to the main Multistore window. Now you only have to add an URL via which your new store will be accessible.
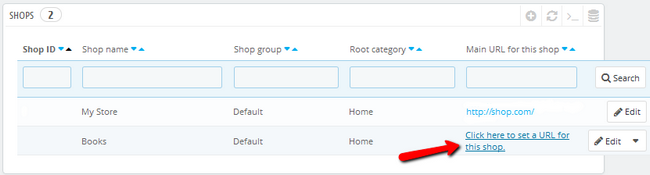
Shop - The shop for which you want to configure the URL
Is it the main URL for this shop? - The main URL of the shop is the one to which all other URLs will redirect
Status - Enable or Disable the URL at any given moment
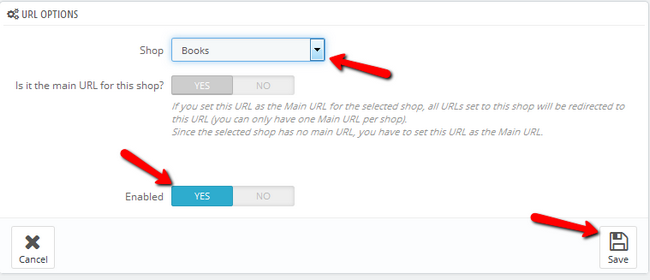
Click Save and continue to the next set of fields which in our case will be populated with the subdomain we created in Step 1:
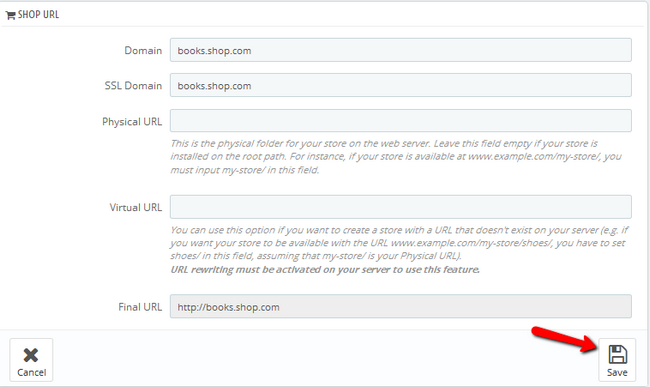
Domain - The shop's domain name. Make sure not to add http://, or any / and type just the domain itself
SSL - Here you will have the option to type a domain covered with SSL which you want to use for your secure connection
Physical URL - In this field you have to set the directory in which your installation on the server is situated. If it is located in the root of the domain or subdomain you will have to leave this field empty.
Virtual URL - As explained in the tooltip, this option will use URL rewriting to create a special URL for your shop even if there is no such sub folder in your hosting account. Note that this only works for subfolder shops, not subdomain shops.
Final URL - This field will show you the final version of your shop's URL by taking into consideration the previous options which you have configured.
Again make sure you Save the changes you make after you have finished configuring the Shop URL.
With this your work is done. Now you will be able to access your new Store via the Final URL you set up. You can create categories and products only visible to the customers of your new store. You can also change the modules and design layout to create a unique looking shop, but the multistore functionality will let you update all of your stores at the same time and use the same database.

PrestaShop 1.6 Hosting
- Free Installation
- 24/7 Tech Support
- Free Domain Transfer
- Hack-free Protection
- Fast SSD Storage
- Free Cloudflare CDN
- Free Website Transfer
- Immediate Activation