Adding New Products
Updated on Sep 12, 2016
Now that you have installed your application it is time to begin with the Products you would like to add for selling on your Online Store. If you have missed our installation tutorials you can find those in the PrestaShop Tutorials section under the Installation expanding menu.
Adding a new product is a piece of cake and you will be able to do so by simply following the next few steps we have prepared for you.
To provide new products via PrestaShop 1.6, you need to:
Add a New Product
In order to access the page where you will be able to configure a new product you will need to first login into your admin area and then from the Catalog drop-down menu to choose the Products link.
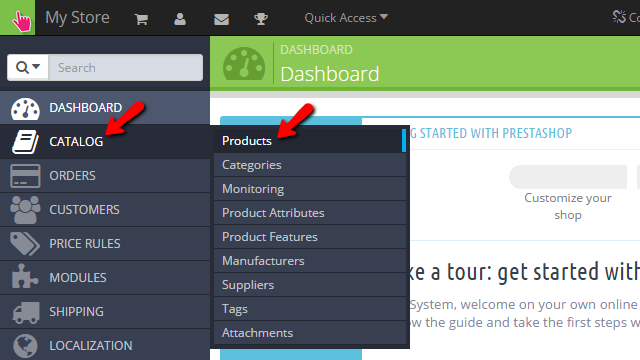
Then you will be presented with the page where you will be able to manage all of your products. However for the purpose of this tutorial we will focus only at adding a new product.
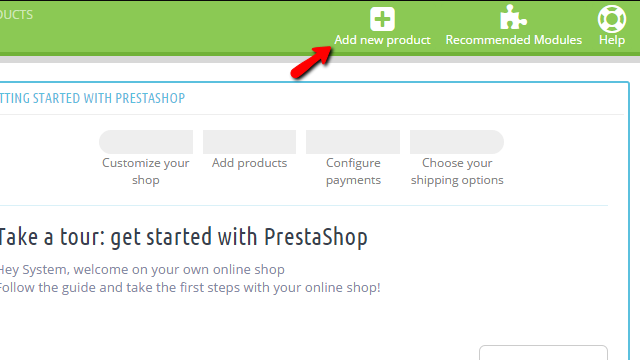
In order to add a new product from the page where you are currently located please simply click on the Add New Product button so you can be able to proceed further with the product configurations. We will provide detailed information on the default mandatory options you will need to consider when you are adding a product and the other will be reviewed in the next tutorials of this section.
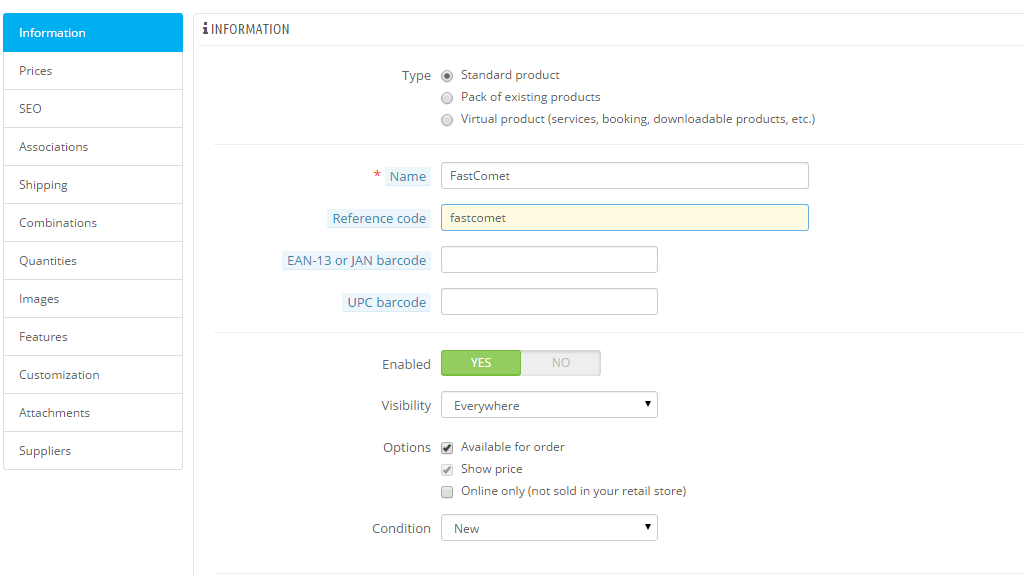
Once you access the Add new page for adding your product you will notice how the page is separated on two sections. The left one is an actual navigation menu for all the configurations you will need to perform related to your product. The automatically selected configuration will be the first one - Information.
Configure the Product
In this section you will find mostly basic information for your product. Let's begin.
- Type - The type of your product. Here you can choose if you would like to add a single standard product, a pack of existing product or a virtual (downloadable) product.
- Name - The actual name of your product
- Reference Code - Internal reference code
- EAN-13 or JAN barcode - If you have a specific barcode mostly used in Europe and japan
- UPC barcode - If you have a specific barcode mostly used in USA and Canada
- Enabled - If your product should be enabled by default or you would like to completely configure it first
- Visibility - Where the product should be visible on the different areas of your website
- Options - Few options you might consider useful at some point
- Condition - The actual condition of the product
- Short Description - Few words as a brief description for your product
- Description - Here you should type the whole description for the product
- Tags - Here you can add some tags related to your product
As soon as you are done editing the “Information” section you can proceed with the configuration of the other mandatory sections.
In the Prices section you will find information mostly related to the price of your product. The configurable options here are quite few and easy to configure. Here they are:
- Wholesale Price - this is the price you paid for the product
- Retail Price - the price you intend to sell the product to your customers
- Tax rule - the tax rule that should be applied to the price of the product upon purchase
- Unit Price - the price per single unit. Mostly used when you are selling a pack of products
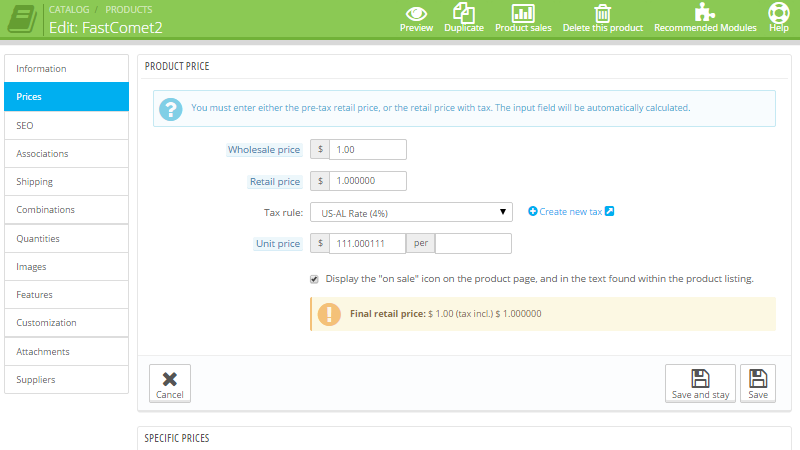
Once you are done with that configuration you should use the Save and Stay button so you can be landed on the same page when the product is saved.
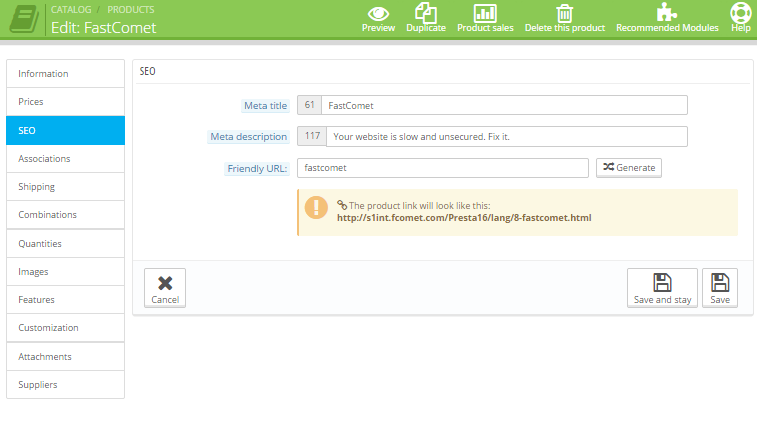
The next section we will discuss is the SEO section and there you should be able to configure the Meta attributes for your product. The available fields here are:
- Meta Tittle - The publically available title for your product's page
- Meta Description - The description of the product which will appear in the search engine results
- Friendly URL - The human readable slug of the URL leading to your product
These options are quite easy for configuring and you should be able to finalize the configuration in no time.
The next option is called Associations and you there you should be able to configure the categories where you product should be listed. If you expand the Home category you will be able to see all the categories currently configured on your store.
From there you can simply check the checkbox before the category you would like to have your product displayed in so the product can be added to that category. Note that you can select multiple categories by checking multiple checkboxes. This will allow to your product to be listed in every category.
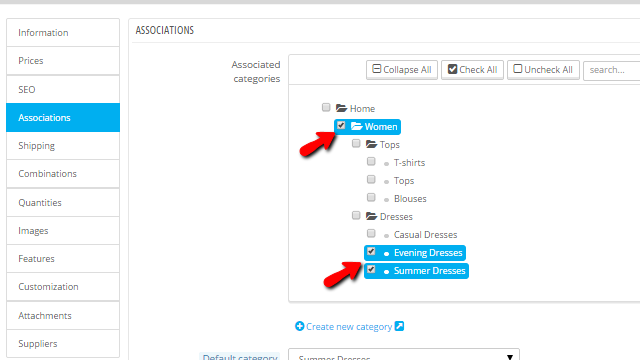
The other options on the same page are:
- Default category - There you will have the default category for your product listed once you select it from the category tree above
- Accessories - You can add existing products as accessories to the product you are currently adding
- Manufacturer - You can select a manufacturer of this product from those you have already added
Of course if you would like to add a new category or a new manufacturer you can do so with the two links provided for these purposes - Create New Category and Create New Manufacturer.
Next you will find the configuration for the shipping methods under the Shipping section. There you should define the parameters of the package for your product, apply some additional shipping fees and also select the carrier for this product in particular.
In order to add a carrier you should simply select the carrier from the list Available carriers and move it to the other list called Selected carriers so the carrier can be added for this product.
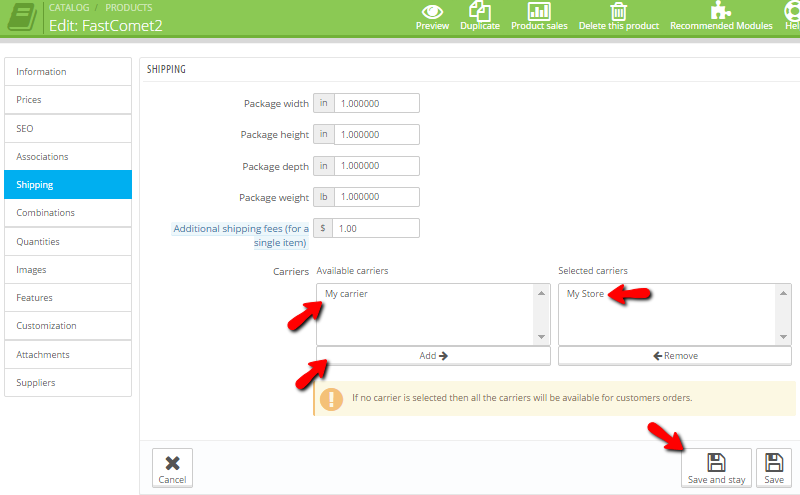
Finally you should use the Save and Stay or only the Save button so you can save the changes and respectively add the product to your website.
Once the product is saved you will be able to see a small Preview button appearing at the top horizontal action bar. By clicking on that button you will be able to preview how the product looks on your website.
Keep in mind that there will be no images since those can be added only after the product is saved and you will be able to do so via the Images section.
Congratulations! You can now add as many as products you would like to on your PrestaShop 1.6 website!

PrestaShop 1.6 Hosting
- Free Installation
- 24/7 Tech Support
- Free Domain Transfer
- Hack-free Protection
- Fast SSD Storage
- Free Cloudflare CDN
- Free Website Transfer
- Immediate Activation