How to Optimize PrestaShop with APC
Updated on Apr 9, 2019
Attention
APC cache has been depricated as of PHP version 5.5. As older PHP versions are no longer supported in the PHP selector in cPanel on all shared servers due to security reasons, this tutorial is obsolete for set users.
Normally APC was not available for the shared hosting based packages we and other hosting companies are offering to their customers, however with the recent improvements of our Shared Hosting environment we have made this feature available for all our shared hosting packages.
Start using the world's first PrestaShop 1.6 optimized environment and benefit all the goods we provide:
- APC Activation
- APC Optimization
- APC Integration
APC is opcode cache for PHP scripts and with the recent improvements of our Shared Hosting environment you will be able to take the full benefit of the opcode caching with just few clicks. The way how APC works is that it stores the compiled php files so they can be reused without the actual compilation process. This is dramatically increasing the response time of your website to client request if the same is using complex php file structure and require compilation of different codes constantly.
PrestaShop 1.6 fully integrates that caching technique and respectively the APC cache engine. The next lines of this tutorial will actually show you how to integrate PrestaShop 1.6 and APC opcode cache in just few clicks.
To setup the APC cache for your Store, you will need to:
Activate APC php module
Since APC is consuming resources when activated we have disabled the service by default. In order to get it up and running you will need to access your cPanel and to find the Select PHP version feature.

There you will see a version of the php service already activated for your account. Change that if you need to use different version of the service. Once you select the correct php version for your account you will be presented with a list of the currently supported php modules on our shared hosting environment.
Please tick the APC check box and then click on the Save button right below the list of available modules.
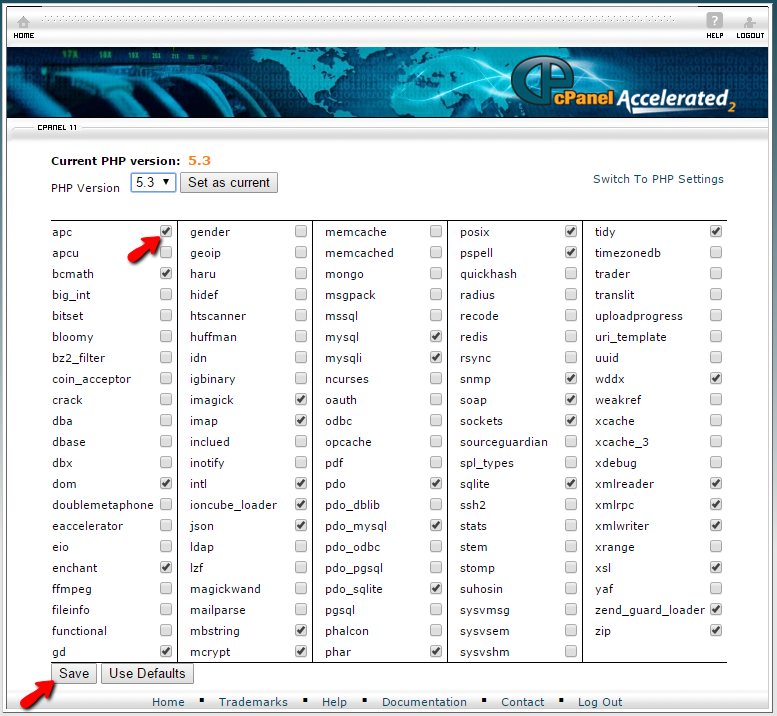
Once the modules are saved the APC service will be activated for your account and it is time to configure it with your PrestaShop instance.
Configure PrestaShop 1.6 with APC
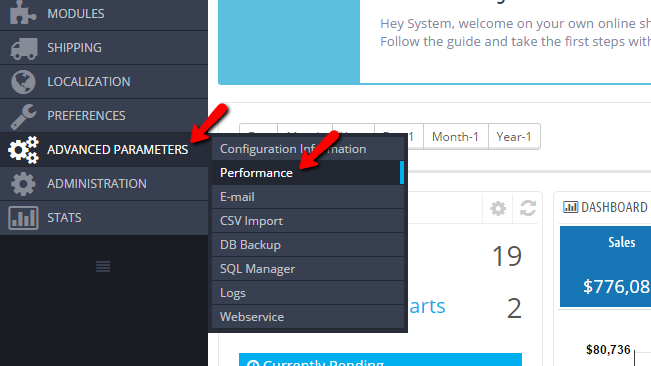
As we have mentioned the APC integration is already performed by the authors of PrestaShop 1.6 and you will need to simply activate it. In order to achieve that you will need to login into the Back Office of your Online Store and to access the Advanced Parameters → Performance section.
There you will see quite a lot of sections with different type of configurations, however the one you are looking for is the last one called Caching.
Please enable the caching by changing the option of the Use cache setting to Yes. Then you will be presented with the already integrated cache engines and from that list simply click on the APC radio button.
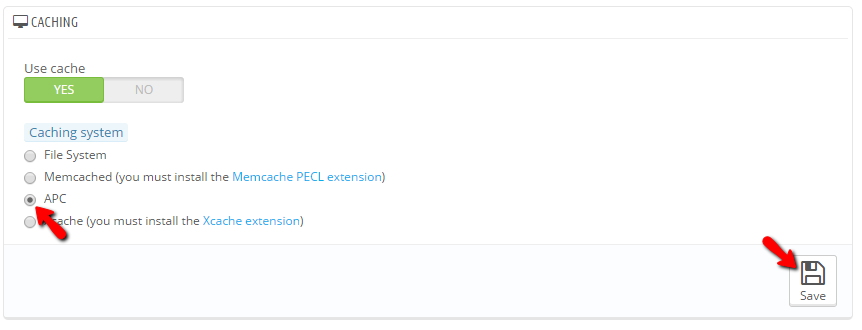
When you are ready simply click on the Save button and the cache will be activated for your Online Store.
Congratulations! You now know how to enable and configure the APC cache engine with your PrestaShop 1.6 based Online Store!

PrestaShop 1.6 Hosting
- Free Installation
- 24/7 Tech Support
- Free Domain Transfer
- Hack-free Protection
- Fast SSD Storage
- Free Cloudflare CDN
- Free Website Transfer
- Immediate Activation