How to optimize PrestaShop with Memcached
Updated on Jan 6, 2017
With the recent improvements of our Shared Hosting environment, we have made this feature available for all our shared hosting packages.
Start using the world's first PrestaShop 1.6 optimized environment and benefit all the goods we provide:
- Memcached Activation
- Memcached Optimization
- Memcached Integration
Memcached is Opensource, memory object caching system which is used to reduce the database load on dynamic websites such as the most Opensource applications used these days. In simple words, the cache engine will allow for certain database queries or database objects to be cached in the memory of the server so they can be reused whenever needed.
With the recent improvements of our Shared Hosting environment we have enabled this cache engine as an option to consider for our customers and in this tutorial, we will show you how to integrate Memcached on PrestaShop 1.6.
To optimize your PrestaShop 1.6 with Memcached, you will need to:
Activate Memcached php module
Since Memcached is a daemon running on the server for your user exclusively you will need to start it. However, at this point, this can be achieved only by contacting our support team. Once you do so they will provide you with the hostname and the port you need to use for that service. For example, you will receive similar information:
Hostname: 127.0.0.1 Port: 11211
Note that these are example values and using them will not get the service working.
Great! Now that you have this critical piece of information it is time to activate the PHP extension for the Memcached service. If you are wondering why is that so, well PHP cannot directly communicate with the Memcached daemon so it needs an extension. In this case, the extension can be activated in your cPanel service. Once you login you will need to navigate to Select PHP version.

There you will need to choose the version of the PHP service you would like to use from the top drop-down and then you will need to click on the Memcache module as it needs to be enabled.
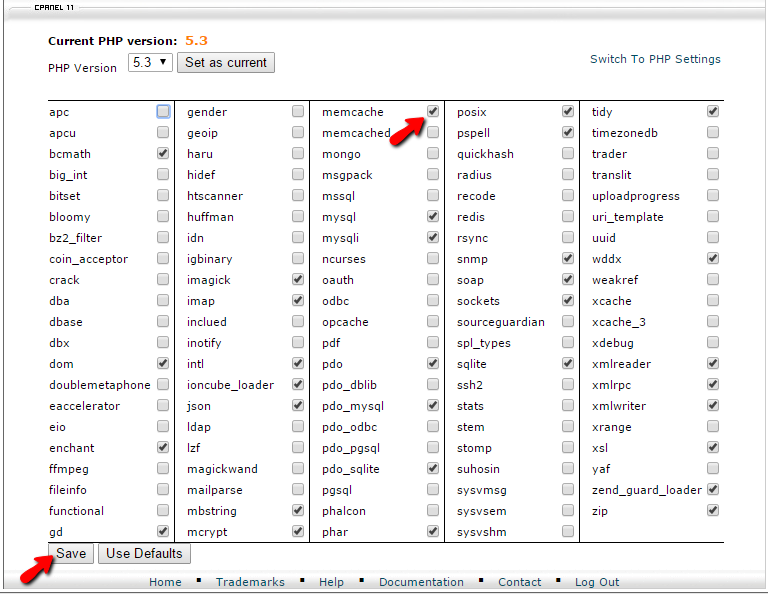
Now that you have the module enabled please use the Save button at the bottom of the modules list so the changes can be saved and Memcache activated.
Configure your PrestaShop 1.6 with Memcached
In this step, we will show you how to perform the actual configuration. Now, since PrestaShop 1.6 fully includes the code required for this cache engine to be used, you will need to only activate and configure it.
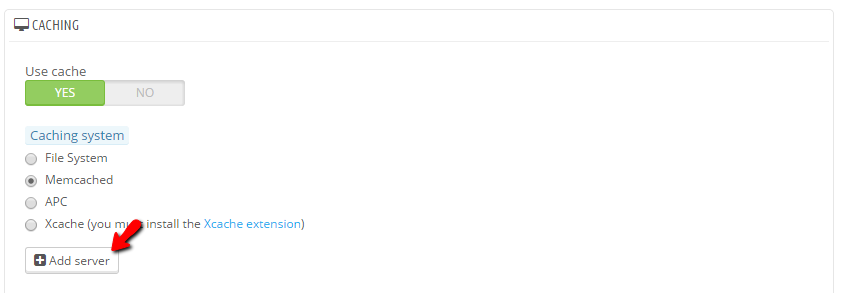
First, you will need to access the Back Office of your online Store. There under the Advanced Parameters → Performance section you will find all the settings for optimizing the performance of your Online Store.

Please scroll down to the bottom where you will find the Cache section. And from there enable the cache of your Store by clicking on the Yes button.

Next you will see a list of the supported cache engines appearing right below the activation button. Please click on Memcached and proceed by clicking on the Add Server button.
Next, you will see that few text fields will appear. Those are used for the configuration of the Memcached cache engine and you will need to fill them with the details you have received in Step 1 of this tutorial from our Technical Support Team.
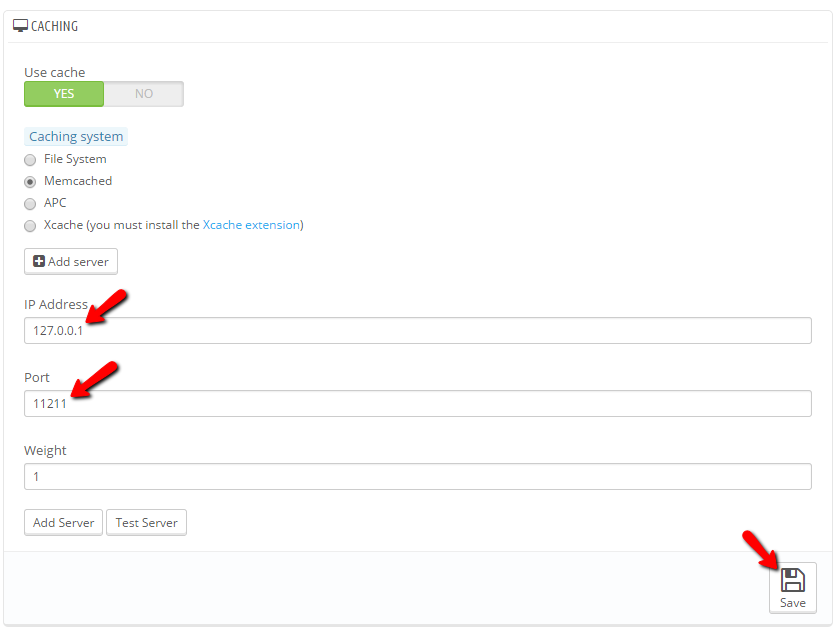
The settings you will need to configure are:
- IP Address - The IP address where the service will be available at. This usually is 127.0.0.1
- Port -The actual port where Memcached is running
- Weight - Leave this option to 1 if you are using a single Memcached instance
Once these are configured please click on the Save button at the bottom of the page so you can save all that configuration.
Congratulations! You have successfully activated the Memcached cache engine on your PrestaShop 1.6 based Online Store!

PrestaShop 1.6 Hosting
- Free Installation
- 24/7 Tech Support
- Free Domain Transfer
- Hack-free Protection
- Fast SSD Storage
- Free Cloudflare CDN
- Free Website Transfer
- Immediate Activation