Set up an IMAP email account in Thunderbird
Updated on Jun 24, 2025
In this tutorial we are going to show you how to configure your email account in Mozilla Thunderbird using the IMAP protocol for incoming emails. If you want your emails to be accessible through multiple devices, then the IMAP protocol is the one you should be using. To learn more about IMAP, head to our article about it.
In this tutorial we will be using the latest version of Thunderbird, so go ahead and download it if you have not already.
To configure IMAP and SMTP in Thunderbird, you need to:
Access the Mail Account Setup Window
When you open Thunderbird for the first time you will be prompted to add an account immediately. However, we skip that opportunity for just a moment and show you how to do it from the default interface instead. Both methods lead to the same place, so you will not be missing anything.
To begin, click on the horizontal lines in the top right. Then, select New Account > Email.
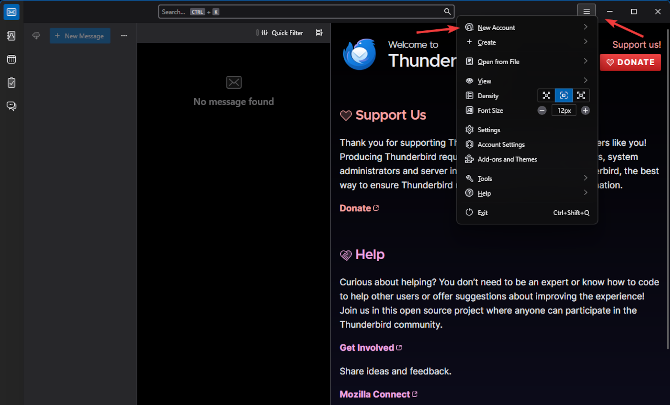
That will take you to the exact same screen you saw earlier. Here you can begin the initial setup of the email account.
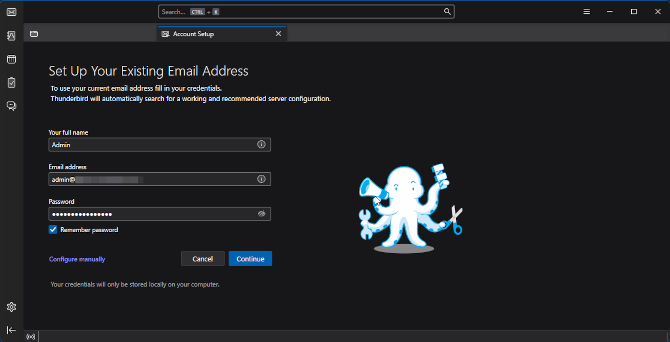
The three fields you need to fill are:
- Your full name - This dictates what recipients will see in the From field, alongside your email;
- Email address - Type in the email account you want to add;
- Password - The account's password.
With this, the initial setup is done and you can move on to configuring the incoming and outgoing mail servers. If you are using an email account from a dedicated mail provider (Gmail, Outlook, Yahoo, etc.) you can click on Continue. Thunderbird will automatically detect their settings and connect your account. However, for our purposes we will continue manually.
Configure the IMAP Protocol
To proceed, click on Configure Manually beneath the password field. That will expand the page with fields for the incoming and outgoing email server settings.
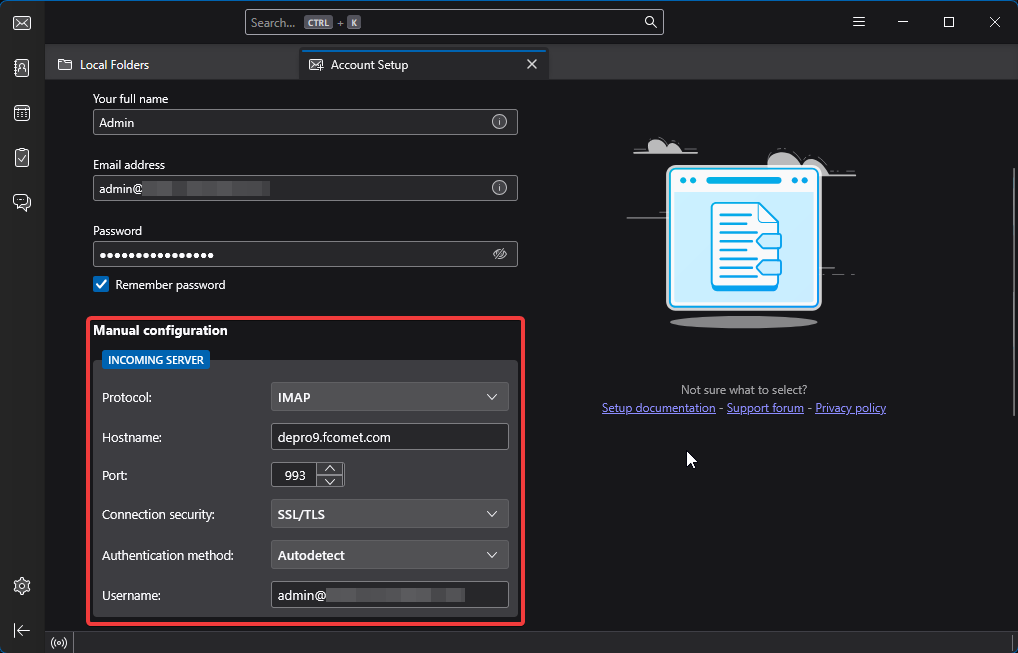
Here is what each field means and what information you will need:
- Protocol - You can choose between POP3 and IMAP. Select IMAP here;
- Hostname - Fill in hostname of the IMAP server. Typically the hostname of the server is mail.yourdomain.com (replacing yourdomain.com with your actual domain name). However, if you are using our email service, we recommend using the server's name directly. (e.g. de1.fcomet.com, inpro1.fcomet.com, etc.);
- Port - IMAP has two ports. 993 (secure) and 143 (unsecured). We recommend always using the secure port when possible;
- Connection Security - If you are using the secure port then select SSL/TLS. Otherwise choose None;
- Authentication Method - You can leave this on Autodetect. Thunderbird will pick up that you are using a password and set it as the default authentication method;
- Username - Input the email account you are going to use.
Hostname
The hostname for the incoming mail server for our services can be mail.yourdomain.com (where the yourdomain.com is your actual domain name). However, we always recommend using the name of the server your account is on. You can easily find it by logging into your account on FastComet.com. From the homepage, click on View Details next to the hosting plan that has the email account. You can find the server name in the FTP Server box. You will also find this information in the welcome email you got when you purchased the hosting plan.
When you are done the incoming mail server settings you can move to the outgoing ones.
Configure the SMTP Settings
Scroll down on the same page and you will see the Outgoing Server fields. To ensure that you are able to send and receive emails without any issues you must ensure that both server configurations have the correct information. The outgoing server uses the SMTP protocol and you can read more about it here.

As you can see for yourself, the fields are nearly identical to the ones in the previous section. Here is what each of them is for:
- Hostname - Type in the outgoing SMTP server hostname. If you are using our services it is the same as the IMAP one;
- Port - SMTP has two secure ports (465 and 587) and one unsecured (25). As before, use a secure port. We suggest 465;
- Connection Authority - Choose SSL/TLS if using a secure port. Otherwise, leave on None;
- Authentication Method - Leave on Autodetect. Again, Thunderbird will see your password and use that;
- Username - Finally, repeat the email address you are using.
When you are ready click on Re-test. Thunderbird will use the information you provided and try to reach the servers. If the connection was successful you will see a message informing you of it. Afterwards simply click on Done. Thunderbird will process the information for a moment after which you will see that your account was successfully added.
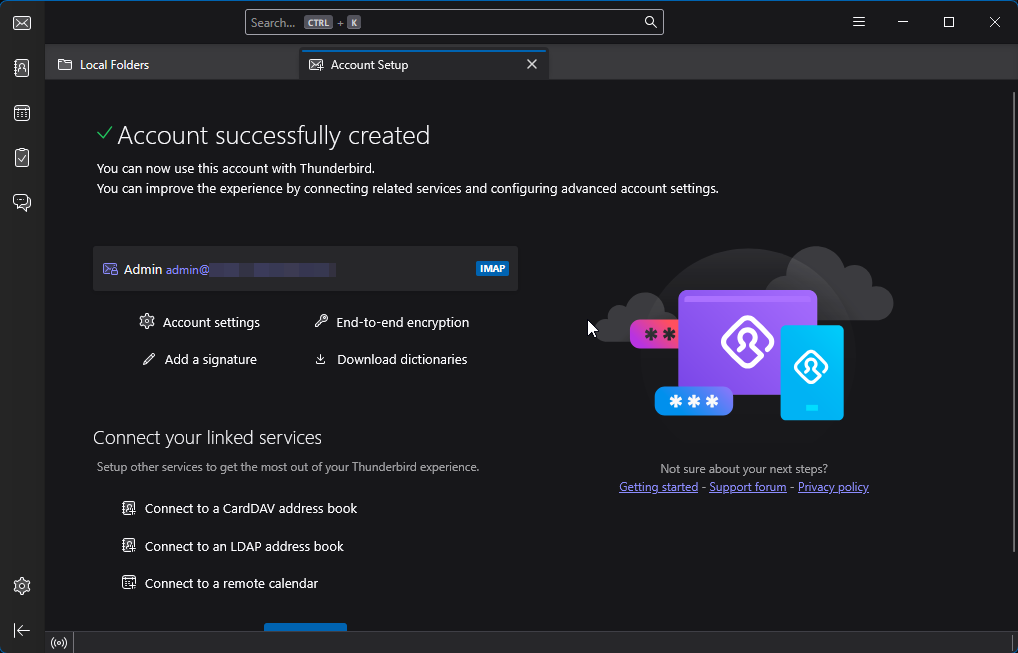
Congratulations! You have successfully added your email to Thunderbird via the IMAP protocol.

Mail Hosting
- Free Domain Transfer
- Unlimited Email Accounts
- 24/7 Technical Support
- Fast SSD Storage
- Hack-free Protection
- Free Cloudflare CDN
- Immediate Activation