Getting Started with Google Apps
Updated on Apr 23, 2018
Google Apps provides all of the Google services like email, contacts, calendar, drive and etc. Did you know that you will have the privilege of using your own domain in your Gmail address? For example you will be able to set [email protected] instead of [email protected].
However if you have already purchased your own domainname and/or web hosting package with us you still will be able to create [email protected]. If Google worldwide infrastructure across email, web and mobile platforms are not convincing enough, then you will be glad to understand that Google Apps provide also a 10 GB of email quota.
To start using Google Apps, you will need to:
Prepare a Domain
Google Apps provide two pricing plans: Google Apps (free 30 day trial) with a charge of $5/mo afterwards and Google Apps with unlimited storage and Vault for $10/mo. In this tutorial we will learn how to setup a plan with Google Apps.
Domain Name
Please note that you will need already registered domain to proceed further. If you do not have registered domain we would like to inform you that you can register one for free with every purchase of a web hosting package with us.
Also you will need to have access to your DNS records. We provide such access on the registered domains via us even on our shared hosting packages. You can check your DNS records via your cPanel account → Advanced DNS Zone Editor icon from the Domains section. The records that you will have to edit are the MX records and the CNAME records.
- MX records - this type of records defines which mail server is used via your domain
- CNAME records - this record is alias which will be used to access the Google Apps service
Register a Google Apps Account
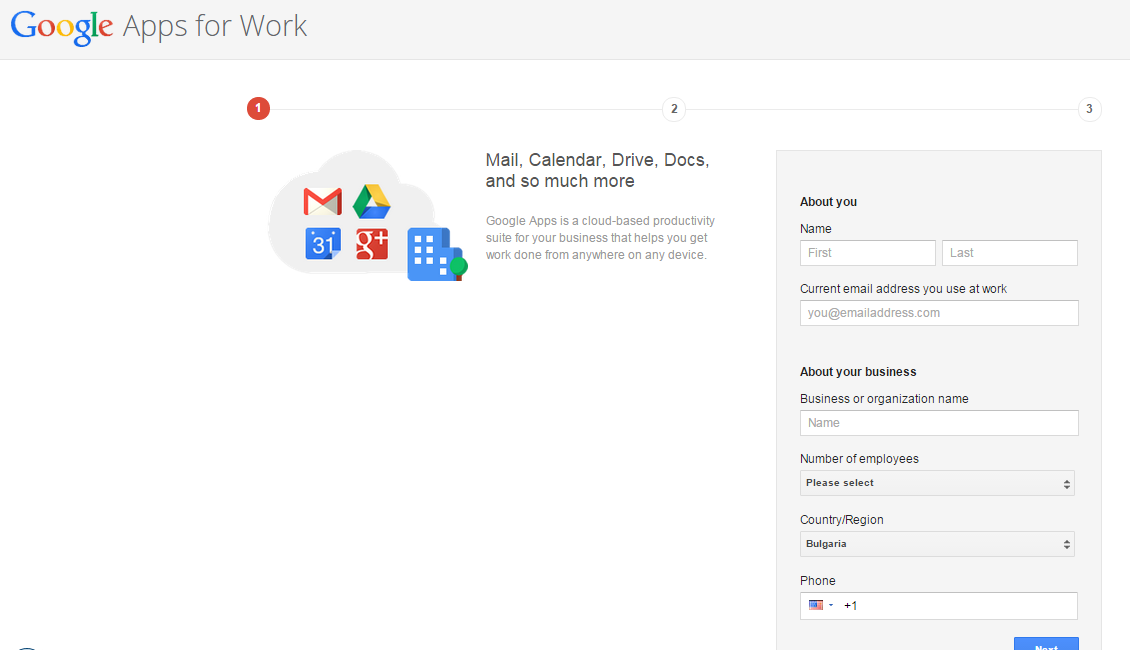
In this step we will review the whole process of registering Google Apps account. Access the Google Apps registration form. In step 1 you will need to fill the following fields:
- Name First - you should type your name
- Name Last - enter your last name
- Current email address you use at work - your current work email account
- Business or organization name - the name of your company
- Number of employees - If you would like to test the free trial do NOT select more than 10 employees
- Country/Region - in which country your company is
- Phone - personal/company phone address
After all of the credentials fields are filled press the Next button.
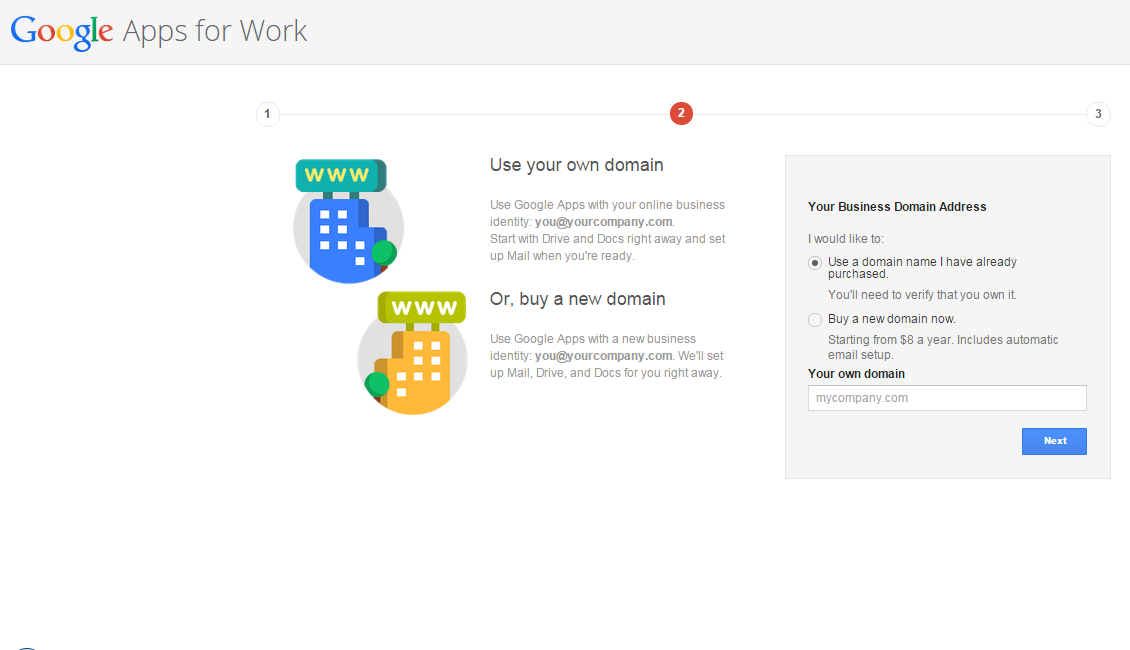
On the second step of registering your Google Apps account you will need to select between two options:
- Use a domain name I have already purchased - choose this option if you have already registered domain
- Buy a new domain - if you do not have domain you are able to purchase such
After an already existing domain is entered in the field or a new one is registered press the Next button.
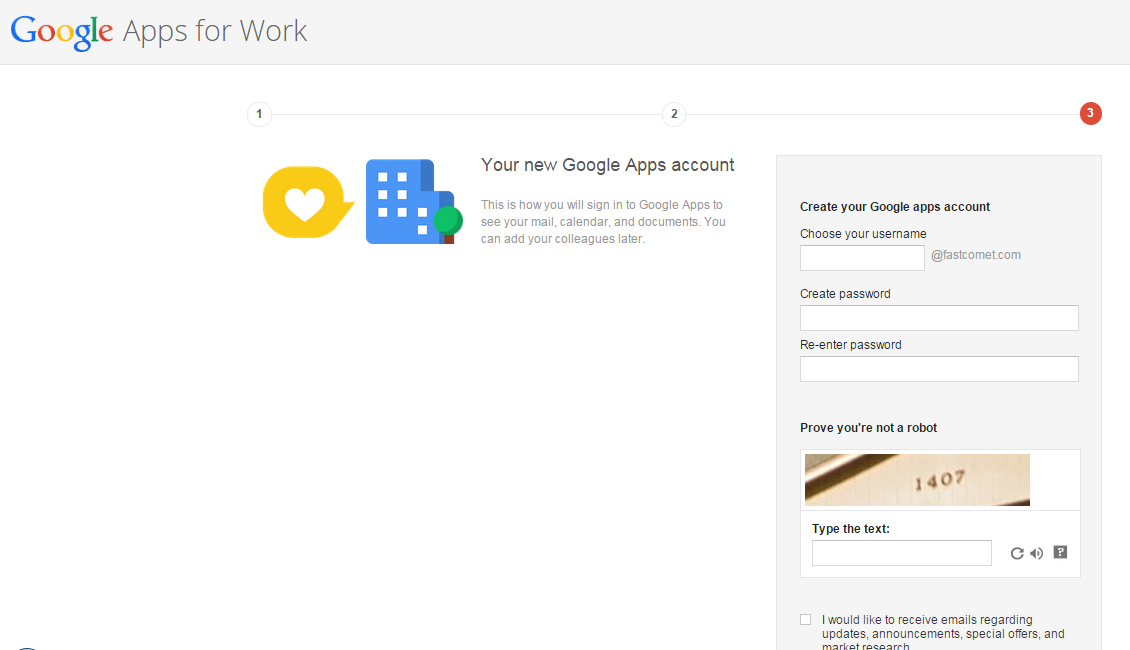
On the third last step from creating your Google Apps account you should enter the following credentials:
- Choose your username - type the your Google Apps username
- Create password - enter your password for your Google Apps account
- Re-enter password - enter your Google Apps password again
- Prove you're not a robot - enter the text/numbers in the input form
- I would like to receive emails regarding updates, announcements, special offers, and market research – check this box if you would like to receive emails from Google
- I have read and agree to the Google Apps for Work agreement - after you read the work agreement of Google Apps you should check this box
After all of the fields are filled with the required data press the Accept and signup button.
Configure Google Apps
After the registration is successfully completed you will have to verify that you own the domain you have registered with. In order to verify the ownership of your domain you should access the Admin console and you will check a pop up box where you should select your domain registrar. Note that if your registrar is not listed you should check the Other option. Afterwards press the BEGIN VERIFICATION button.
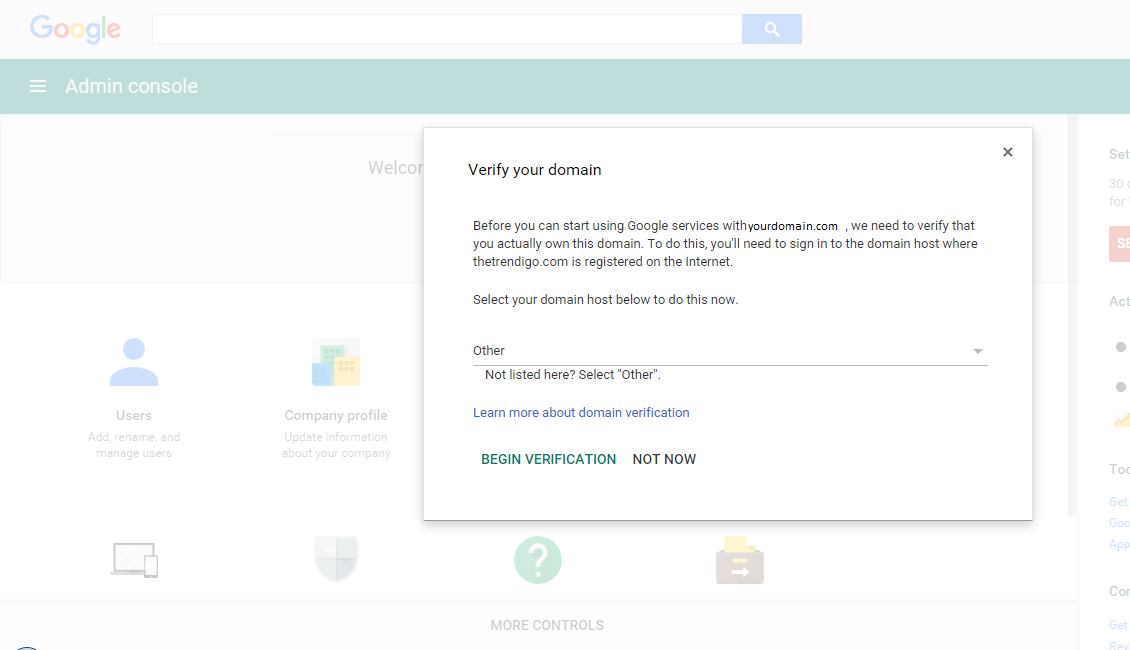
On the following page you should select your registrar again. The first step is to add a TXT record in your DNS zone of the domain. You are able to add such record from your cPanel account → Advanced DNS Zone Editor icon from the Domains section.
Note
If you are not sure how to add the TXT record, check our tutorial for managing the DNS zone records.
After the TXT record is set properly added return to the verification page and click on the red VERIFY button.
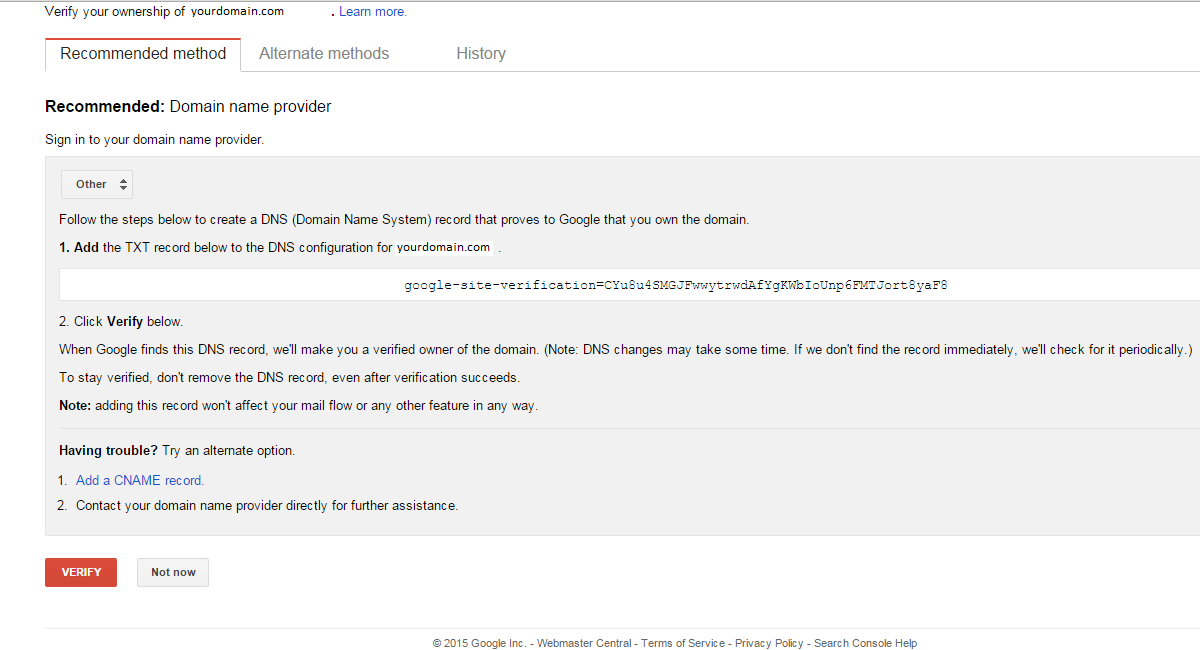
If the verification is successful on the following page you will receive the following message:
"Congratulations, you have successfully verified your ownership of yourdomain.com"
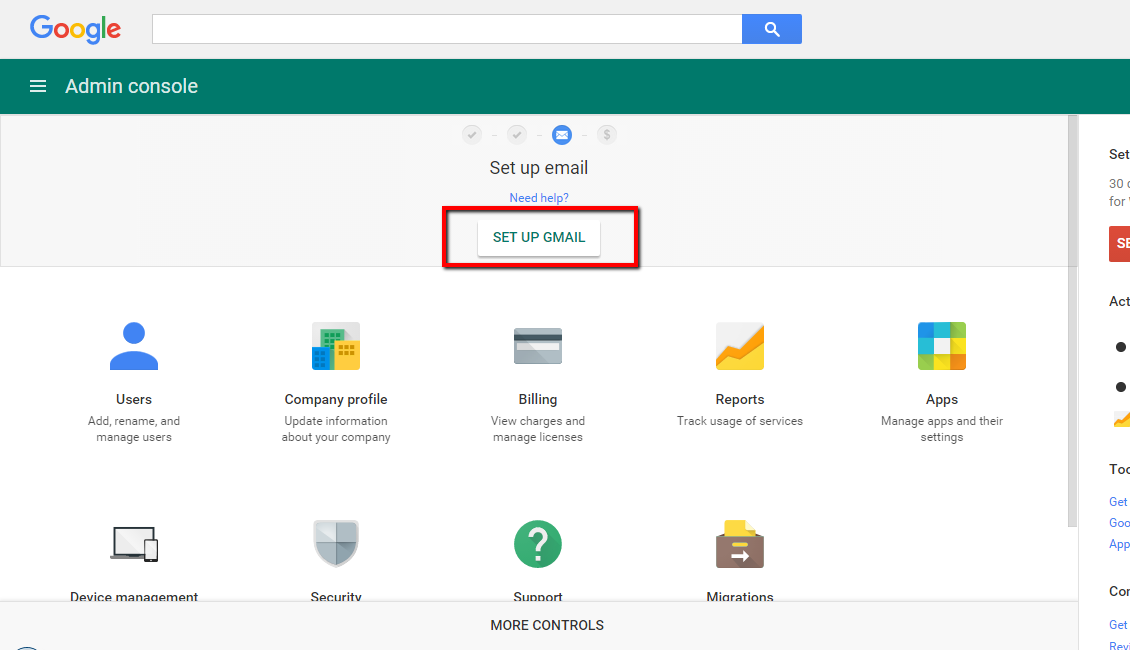
Now press the Continue link in order to proceed with the setup of the email. If you are not automatically redirected to the Admin console page you should navigate to the same where now will be visible a SET UP GMAIL button.
After the button is pressed you will be redirected to another page with pop up window where you should press the blue Set up email button. On the following page you will be asked to log in to your domain host website in a new tab, access the control panel for your domain, delete the existing MX records and set the new MX records.
Domain Configuration
If you would like to check more detailed information on how exactly to set your MX records for Google Apps email check our article on how to do that.
After all of the steps are followed and the MX records are set properly press the blue Verify button.
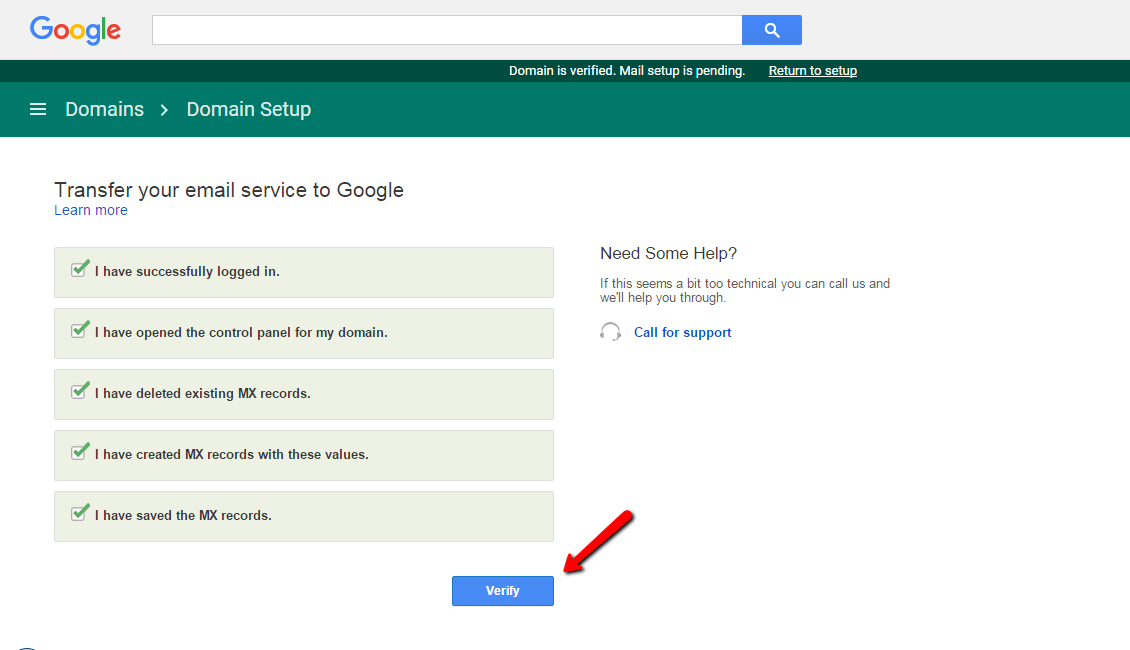
If all of the steps above are set properly you will check the following message:
"Email just got awesome. Gmail is ready! All emails sent to yourdomain.comwill now be routed here."
Click on the Continue Setup button in order to proceed with the final step of the setup for your Google Apps account which is to set up the billing (note that at the moment we have configured the Google Apps for the 30 days free trial period). If you would like to purchase the Google Apps services then you should set and the billing.
Congratulations! You have just successfully setup your trial Google Apps account and set the email address with your organization's domain name.

SSD Web Hosting
- Free Domain Transfer
- 24/7 Technical Support
- Fast SSD Storage
- Hack-free Protection
- Free Script Installation
- Free Website Transfer
- Free Cloudflare CDN
- Immediate Activation