How to Create a Temporary URL
Updated on Apr 23, 2018
A Temporary URL will allow you to test your website's functionality even when the domain name is not yet pointing to our servers. It is perfect for checking out the website's behavior when you are transferring your website to FastComet Hosting while your domain name still points to your previous provider or is propagating. For a more local solution in similar cases you can also try editing your Hosts file by checking our tutorial on the matter.
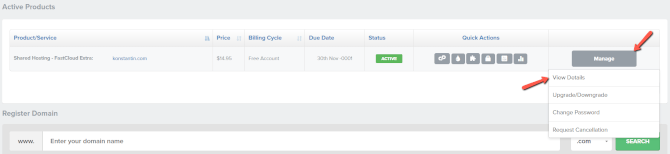
Creating a Temporary URL for your newly purchased hosting plan with us is very easy and can be done via your client area. After you log-in your account with us, simply scroll down till you get to the Active Products part of the client area where you will see all of your Products and Services and click on the Manage button. Then, click on View Details.
Once the Account information window has opened, you will be able to see your Nameservers, Server, cPanel credentials and a rectangular green button with which you can create your Temporary URL.
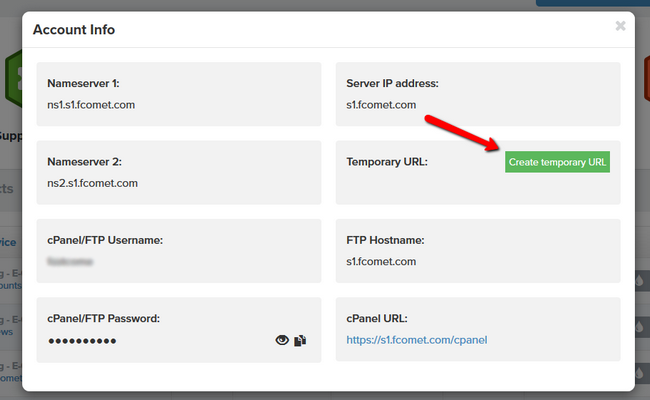
The temporary URL can be created only for the Primary Domain of your hosting plan. Now you can test to your heart's content, without having to worry about DNS propagation.
Note:
If the Temporary URL is disappearing from the Account information upon a refresh, you will need to navigate to Products → My Products and after selecting the correct product click on View Details to access the Change Password option. Then fill out your current cPanel password and click Save Changes. This will sync your cPanel password with our system and make it possible for the Temporary URL to be created.

SSD Web Hosting
- Free Domain Transfer
- 24/7 Technical Support
- Fast SSD Storage
- Hack-free Protection
- Free Script Installation
- Free Website Transfer
- Free Cloudflare CDN
- Immediate Activation