How to use Google Public DNS
Updated on Apr 23, 2018
Reasons to use Google public DNS
Switching DNS servers might speed up your experience, but there are a lot of factors to be noted, like your geographical location and how close the DNS server is to you. In order to check if you would benefit from it you can use a benchmarking software such as Namebench, which will compare your current server with Google's DNS servers. Also if your current ISP's DNS servers are unstable and you're constantly finding yourself unable to connect to a website or the load speeds become very slow at times, you would definitely see an improvement in reliability upon switching.
Google Open DNS provide additional protection against DNS cache poisoning, phishing attack, and overall better security than most ISP DNS servers.
Setting up Google Public DNS
What you are doing in order to use Google public DNS is essentially changing your DNS switchboard operator (what routes you to the domains address) from the one provided by your ISP, to Google's.
Usually the IP addresses that your current ISP's name servers are using are set automatically by the ISP through the DHCP (dynamic host configuration protocol). In order to change them to Google, you must clearly specify the DNS setting in your operating system or device (for routers) to use the Google Public DNS IP addresses. The steps for the different OS might vary but in their core the configurations are the same.
What you should do before you initiate the process
Before you start performing the instructions in this article we advise you to:
Write down the current server's addresses or settings. This is important, because this way you can always back up to your original DNS server.
The Google public DNS IP addresses
IPv4 addresses:
8.8.8.8
8.8.4.4
IPv6 addresses:
2001:4860:4860::8888
2001:4860:4860::8844
Both of the provided addresses can be specified, and there is no restrictions which one is set as a primary address and which as secondary, but never specify only one address as both primary and secondary.
Also if you would like you can configure the Google Public DNS for both the IPv4 and IPv6 protocol, the choice is up to you.
How to change the DNS server setting on your OS
Note
Based on your network's setup, it is possible that you would require administrator/root access in order to complete the specified configurations.
Windows
Normally the DNS settings can be specified in TCP/IP Properties window for the selected network connection that you are configuring with Google open DNS.
We'll provide a simple example how you can change your DNS setting on Windows 7. Just follow the steps and everything should be fine:
Enter the control panel (you can do that from the start menu)
Go to the network and internet and then to the Network and Sharing Center from then select Change adapter settings. There you will see all the connections currently available.
Choose the network connection for which you want to edit the DNS servers. Right click on it and select the Properties option. Here you might be requested with administrative details. Input them and proceed with the configuration.
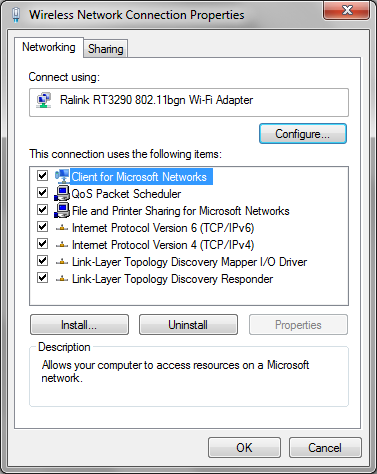
Go to the Networking tab, what you should see is something like this:
Then you must select the Internet protocol type that you wish to configure (either IPv4 or IPv6):
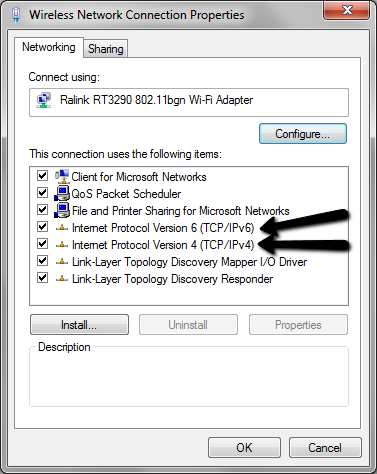
As we've said you can configure, the choice is up to you. To enter the configuration window you can either double click on the selected protocol or select it with your mouse, and then click on Properties.
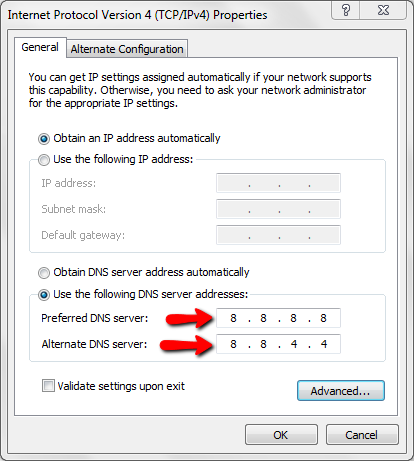
Go to the advanced tab and from there choose the DNS tab, if there you see any IP's listed under the DNS server addresses in order of use, write those addresses, so that you have the option to revert back to your original if any issues appear using the Google Public DNS. When you've written down the IPs remove them from there and click OK when you're done. After that go back to the previous window. Once there if there are any addresses specified in the "Preferred DNS server:" bar write them down, otherwise if "Obtain DNS server address automatically" is selected check the "Use the following DNS server address" and input the IP addresses mentioned earlier in the fields bellow:
For IPv4:
8.8.8.8
8.8.4.4
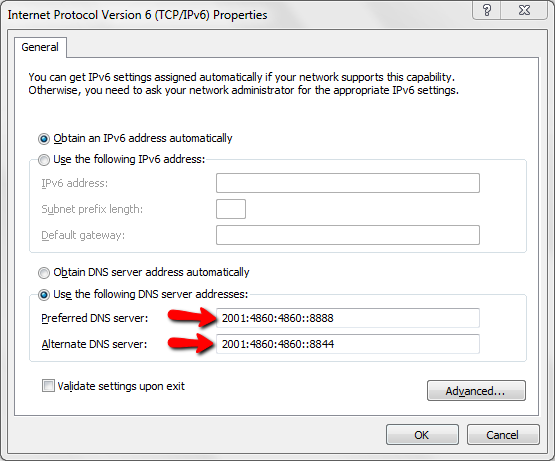
For IPv6:
2001:4860:4860::8888
2001:4860:4860::8844
The final step is to go and see if the applied changes are working (test connection to a web address).If wish other network connections to be reconfigured with Google Open DNS, you would have to repeat the same steps for them.
Mac OS
For Macintosh DNS settings are specified in the Network window. This example we are providing you with is performed on Mac OS 10.5. Click on Apple then go to System Preferences from there select Network
There you should see a lock icon at the lower left-hand corner of the window, if the lock is locked, click on the icon and it should now allow you to perform changes. If you are prompted to authenticate, enter your administrative details.
Then select the network connection that you wish to be set up with Google Public DNS.
Once you select the connection click on Advanced menu.
Select the DNS tab.
Click on "+" in order to add Google's addresses or replace any existing addresses with Google's. Then input the addresses mentioned earlier:
For IPv4:
8.8.8.8
8.8.4.4
For IPv6:
2001:4860:4860::8888
2001:4860:4860::8844
Then just apply the setting click OK and test to see if the applied changes are working accordingly (go and test if you can connect to an internet address). The procedure must be repeated for any other network connections.
Linux
To change the DNS server setting on Linux and Linux based OS you will need to go to Network Manager, to perform the configurations. The example that we are providing you with is executed on Ubuntu OS.
Firstly click on System, then select Preferences, from there go to Network Connections.
Then simply select the network connection for which you want Google Public DNS to be setup. Based on what connection you want to configure, you would either have to select the Wired tab or the Wireless tab.
Then you must click on Edit, a window will pop up. You will see that there are tabs with the different protocol's names. Just select the protocol for which you want to configure Google Public DNS.
If the selected method for connecting to the DNS server is Automatic (DHCP), from the dropdown select Automatic (DHCP) addresses only. Then input the values that we mentioned earlier.
For IPv4:
8.8.8.8
8.8.4.4
For IPv6:
2001:4860:4860::8888
2001:4860:4860::8844
The IP addresses must be separated by a space.
After you are done with the input. Apply the made changes, you might be prompted to enter your administrative details (administrator password), just input them and the changes will apply.
Now go and check if the new configurations are working accordingly (go to any web address). If you wish to apply these configurations for another network connection, you must repeat these steps for it.

SSD Web Hosting
- Free Domain Transfer
- 24/7 Technical Support
- Fast SSD Storage
- Hack-free Protection
- Free Script Installation
- Free Website Transfer
- Free Cloudflare CDN
- Immediate Activation