Ownerships and Permissions in Linux
Updated on Apr 23, 2018
Ownerships and Permissions
We"ve discussed permissions in our previous article but here we will go into further detail. As we"ve mentioned in the introduction permissions are the main way to limit what a user can do on the server. Each file and each directory has its own permissions and those permissions restrict the access to the user, the group and everyone else. The easiest way to see the permissions of a file or a directory is with the ls -l command which will list us all the information about the specified file or directory. Here"s a sample output from the ls -l command:
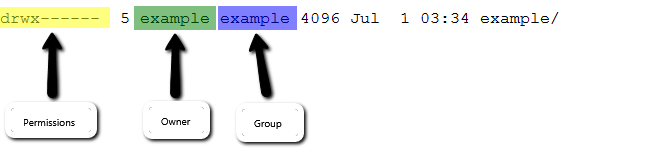
Now let's deconstruct the permissions segment in a more graphical way, so that we can get a more clear understanding on the information that it gives us.
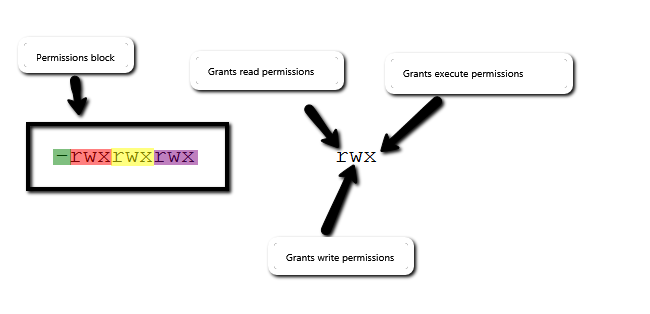
It's much easier to understand permissions once you deconstruct the long 10 symbol string into 4 segments. The segment highlighted in green indicates the file's type. The Next three segments are the actual permissions, presenting the three user groups, where the highlighted in red are the owner's permissions, the highlighted in yellow - the group's permissions and in purple - the permissions for everyone else(global/world permissions).
Furthermore we have to mention that in Linux a user can have 3 types of permissions on any given file. Those are read permissions, write permissions and execute permissions. As you can see by the diagram the permissions that a user has are indicated by the 3 letters, for the corresponding segment. However if one of the user types lacks any given type of permission, in place of the letter where the permission usually resides there will be a "-" symbol instead.
For example, if we had a file that had full permissions for the user, read and execute permissions for the group and none for everyone else the notation will be like this:
-rwxr-x---
Now let's review what exactly each permission allows:
Read
For a regular file, this permission grants the user the ability to view the contents of the file
For a directory file, this allows the user to view the names of the files contained in the directory.
Write
For a regular file, this grants the user with the ability to modify and delete the file
For a directory, this permits the user to delete the directory and modify the contents of the directory (deletion, creation and name manipulation of the files located in the directory)
Execute
For a regular file, what this does is, it permits the user to execute a file (! The user must also have read permissions), thus if you create shell scripts make sure that you change the permissions so that the user can execute them.
For a directory, the execute permission allows a user to browse the directory (using commands such as cd and ls)
After the permissions have been cleared, let's get back to the green highlight- the filetypes.
File Types
In Linux everything is considered to be a file, thus some differentiation must be made in order for the user to better deal with different file types, and for him to effectively manage them.
Regular files
Plain file are the most common files that the system creates and uses. They are indicated by a hyphen (-) in the beginning of the permissions. The following formats are considered as regular files:
•Readable file
•Binary file
•Image file
•Compressed file
Directory files
A directory file is the standard way for Linux to present folders. They are marked by a lower case "d" letter, that is placed just before the permissions block section.
Special files
In the Linux system there are various special file types that indicate files with more concrete use. Since this is not in our learning scope for the moment we'll just list them without going into detailed explanations:
•"l" - active ling file type; indicates that this is an active link to a file
•"s" - socket file type; indicates a socket
•"b" - block file type; indicates hardware
•"p" - pipe file type
•"c" - character device type
The indication letter is placed at the same place as the directory file type letter( right before the permissions string).
The second and third and fourth segments are the actual permissions, as the diagram implies the first one shows what the permissions for the user are while the second and third are for the group and the world respectively.
Changing permissions with octal notation
Upon changing your permissions you will need to use the octal notation. Octal notation allows you to concisely present the permissions for each user, by writing them in a 3 digit number, and providing them to the chmod command.
chmod 000 filename/dirname
Each digit of the number can have a value between 0 and 7, and each digit corresponds to the permissions that each user type has. We'll give an example so that you can have a clear understanding on how octal notation works. Let's examine the following example:
You have a file named demofile, that you wish to be accessible by only the user with full permissions on it but not by anyone else. In order to change the permissions we use the following command:
chmod 700 demofile
What the above command will perform is exactly what we wanted; full permissions for the user, and none for the group and world. Now let's examine why that is so. As we've said in octal notation each digit indicates the permission so intuitively the first permission represents the permissions of the user (7) while the next two indicate the permission of the group(0) and the world(0).
So now you might ask how is that 7 generated and why. Well in octal notation the 3 permissions that a user can be assigned - read, write and execute all have a numeric value:
•Read = 4
•Write = 2
•Execute = 1
Based on those numbers we can see that if we summed them up we get the number 7, which means that in order to give some sort of permission with octal notation we just have to remember the numbers and give the correct sum to the command in order to have the desired permissions set. As you might have guessed it, the 0 indicates no permissions.
If we, for example, want to set the default permissions for a file (-rwxr-xr-x) we have to input the following values in the chmod command 7 - for the owner(4+2+1=7); 5- for the group(4+1=5) and again 5 for the world(same calculation). Resulting in a this command:
chmod 755 defaultfile.txt
Changing file ownership
Changing file ownership is done in very simple way. This is the command that we must execute in order to change a file's ownership and group:
chown <newuser > <affected_file>
As you can see the command's name is pretty intuitive (chown - derived from change owner), the arguments that you need to provide are:
•Username which will become the new owner
•Name of a file or directory to which the changes should be applied.
Here's an actual example of the command:
chown exuser myFile.txt
Changing the group that can to which the file is assigned is relatively the same as changing the ownership, only difference is the command that we are going to be using - chgrp.
chgrp <group> <affected_file>
The syntax stays the same, the only change is that now the argument that you input is a group name.
Note
If you want to change the owner and groups simultaneously, you can use the chmod command but you simply add a semicolon after the owner parameter and add the group parameter after:
chown <newuser>:<newgroup> <affected_file>
As you can see the chown command is quite flexible, even moreso if you want to change the permissions to a file, so that the owner and the groups are the same, you can entirely omit the group parameter just input the filename in the following way:
chown: john: johns_file.txt
This will simultaneously change the user and group to "john"
Another case is when you wish to change the owner of a directory and all its contents, in that situation you would have to use the recursive flag -r in order for the changes to be performed recursively for each and every file that the directory contains.
Concluison
We hope that with this tutorial from the series "Introduction to Linux terminal" you were able to get a proper understanding of the permissions and their importance.
Further Reading
You can check the manual that is provided by the OS via the terminal, just execute these commands and navigate around the less command's reading interface as mentioned in our previous tutorials:
man chmod | less
man chgrp | less
man chown | less
Linux file types explained in detail - For those of you who would like to have a little more insight on file types.

SSD Web Hosting
- Free Domain Transfer
- 24/7 Technical Support
- Fast SSD Storage
- Hack-free Protection
- Free Script Installation
- Free Website Transfer
- Free Cloudflare CDN
- Immediate Activation