How to Configure the Payment Methods
Updated on Mar 13, 2019
Another important fragment of your Online Store built with AbanteCart is the ability to accept different type of payments. This is easily achievable thanks to the vast amount of payment extensions you are provided with. Some of those are included in the default installation package of AbanteCart and others need to be downloaded additionally. In the next few lines of this tutorial we will show you how to enable and configure some of the commonly used payment methods.
To configure different Payment Methods in AbanteCart, you need to:
Step 1 Access the Payment Extensions page
Every payment method in AbanteCart is presented as Extension and in order to access these you will need to login into the admin area of your installation. Then you should navigate to Extensions>Payments.
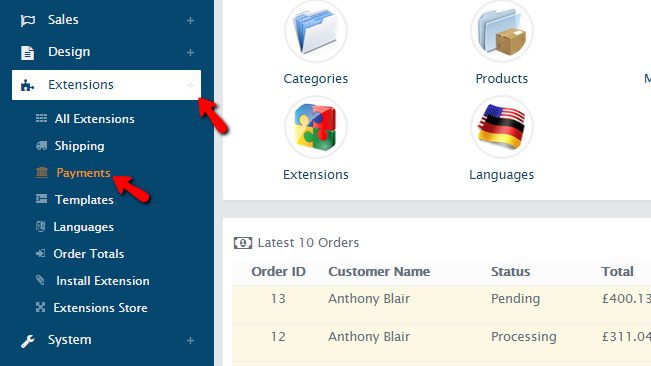
There you will see a complete list of all the supported by default extensions.
Step 2 Installa Payment Extension
For the purpose of this tutorial we will install the Default PayPal Standard extension which will allow you to accept PayPal payments on your account. Once you access the Extensions page you will find the PayPal Standard extension at the top of the list. Then you will need to click on the small “play” like icon under the Quick Actions column of the table view.
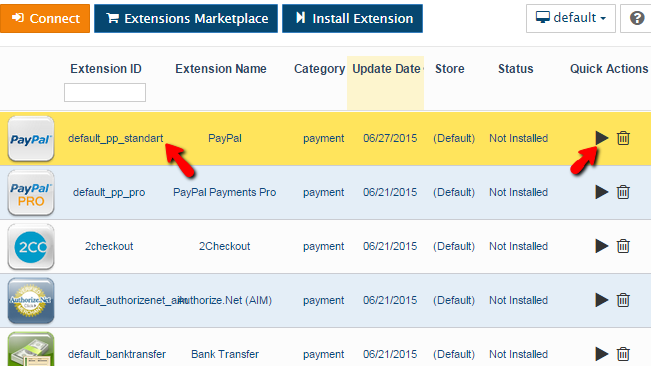
This action will install the extension and will lead you to the configuration page for the same where you need to configure few additional options separated in two groups.
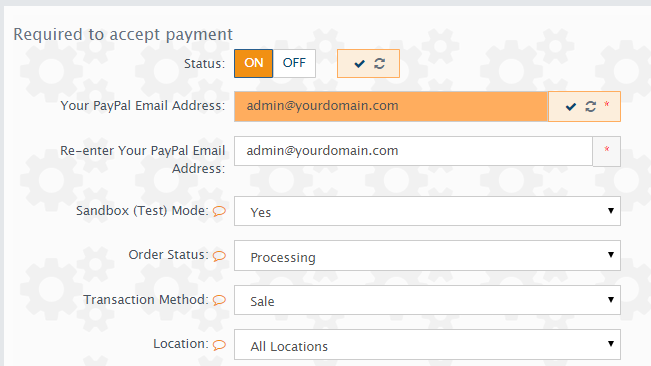
The first one is called “Required to accept payment” and there you will be able to find the following configurations:
- Status – If PayPal should be activated or no
- Your PayPal Email Address – The email address you are using for your PP profile
- Sandbox (Test) Mode – If the payment method should be in test mode
- Order Status – The status of the order when the customer submits it with the selected payment method
- Transaction Method – If transaction should take place before the checkout process
- Location – Here you can restrict only certain locations to use this payment method
- Storefront Icon – The icon of this payment method on the front store
- Total Order Minimum – The minimum cost of the order when this method can be used
- Total Order Maximum – The maximum cost of the order when this method can be used
- Auto Select – If this payment method should be auto-selected
- Sort Order – Where this method should be displayed among the other payment options
The second group of settings is called Optional Settings and there you will be able to mostly customize the checkout page.
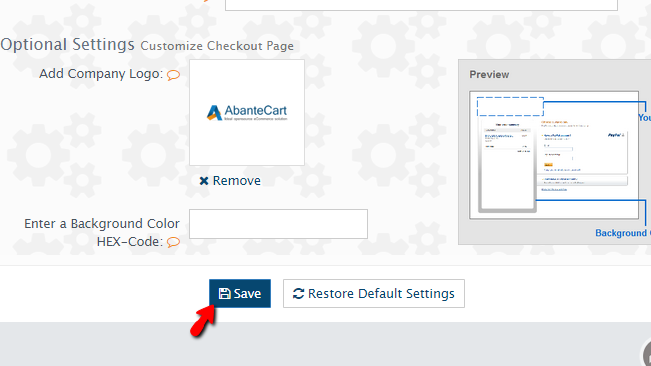
Once you are ready with the configuration please use the Save button located at the bottom of the page so you can save and activate the payment method. All other payment methods have similar configuration and you should be able to easily configure them.
In case the method you would like to use is not presented in the list of payment extensions you can always search for the same under the official AbanteCart Extensions store.
Congratulations! You can now setup every payment method you might need.

AbanteCart Hosting
- Free Installation
- 24/7 AbanteCart Support
- Free Domain Transfer
- Hack-free Protection
- Fast SSD Storage
- Free Cloudflare CDN
- Free AbanteCart Transfer
- Immediate Activation