How to Configure the Website Settings of ClipBucket
Updated on Mar 13, 2019
Now that you have successfully installed the Clip Bucket application it is time to configure it. The application offers wide variety of configuration and in this tutorial we will discuss the Website Settings.
The“Website Settings page is located in the admin area of your application which can be easily accessed by simply adding /admin_area at the end of the URL of your website. Then you will need to input the username and password for the admin user of your website and to login successfully.
Once you have logged into the administration area of your website you will need to navigate to Stats And Configurations > Website Configuration.
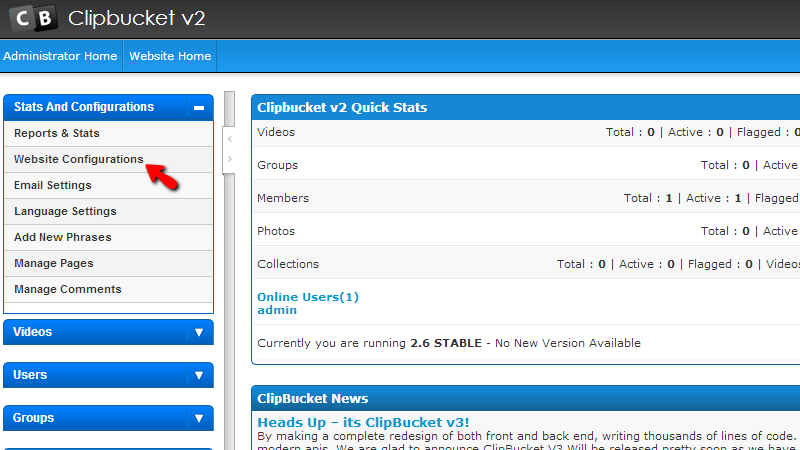
Once clicked you will be redirected to the Website Settings tab of this configuration type. There you will notice how the settings are separated in different groups. The first group is with no actual tittle as the settings in it are general settings.
- Website title – The Title of your website
- Website slogan – The Slogan of your website
- Website closed – Determinates if your website should be open for public or not
- Closed message – Message to be presented for the visitors of your website while it is closed
- Meta Description – The meta description for SEO purposes
- Meta Keywords – The meta keywords of your website for SEO purposes
- SEO Urls – Determinates if the SEO URLs should be enabled or not
- Allow template change – Allow or disallow changes in the template of your website by the users
- Allow language change – Allow of disallow changes in the language by the users
- Date Format – Configuration regarding the date format of your website
- Default Time Zone – Choosing your default Timezone
- Default Country – Choosing the default country of your website
- Use Sub-Categories – Determinates if there should be sub-categories on your website
- Collpase Category Checkboxes – Determinates if the categories should be displayed upon media upload.
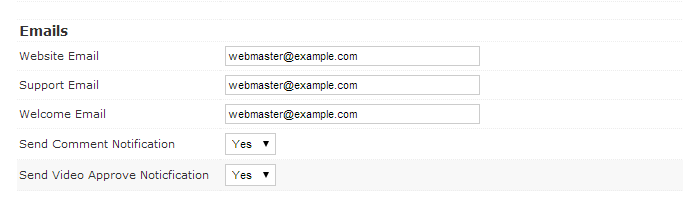
The next section of settings is related to the Emails of your website. There you will be able to configure the following options:
- Website Email – The official email of your website
- Support Email - The support email of your website
- Welcome Email – The welcome email address of your website
- Send Comment Notification – If notifications regarding comments should be send
- Send Video Approve Noticfication – If video approve notifications should be send
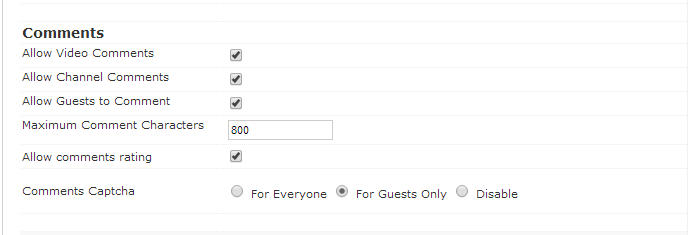
The next section is called Comments and there you will be able to find the settings regarding the comments displayed for media content on your website. The available settings here are:
- Allow Video Comments- If video comments should be allowed
- Allow Channel Comments – If channel comments should be allowed
- Allow Guests to Comment – If not registered users should be able to comment the uploaded media on your website
- Maximum Comment Characters – The length of the posted comments
- Allow comments rating – If the rating system should be allowed for comments
- Comments Captcha – If captcha should be included as a condition for a comment posting
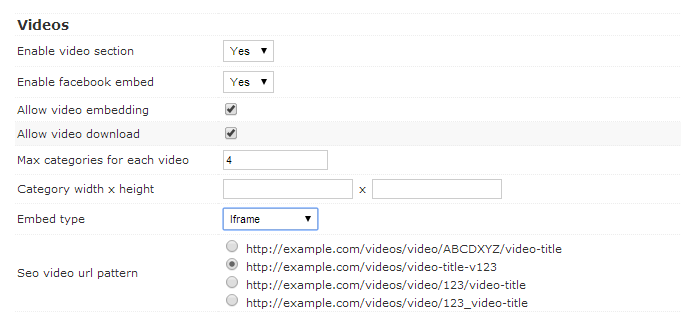
The next section of settings is called Videos and as the name suggests you will be able to configure the settings for the videos displayed on your website. The available settings here are:
- Enable video section – If the video section should be enabled
- Enable facebook embed – Enables the Video Facebook embedding
- Allow video embedding – Allows for embedded videos to be uploaded by the users
- Allow video download – Allows for a video to be downloaded
- Max categories for each video – In how many categories this video can be added to
- Category width x height – The width and height of category
- Embed type – The embedding code which will be presented
- Seo video url pattern - The SEO URL structure for the video
The next section of settings is called Channels and there is a single setting there which is for the enabling of the channels or not.
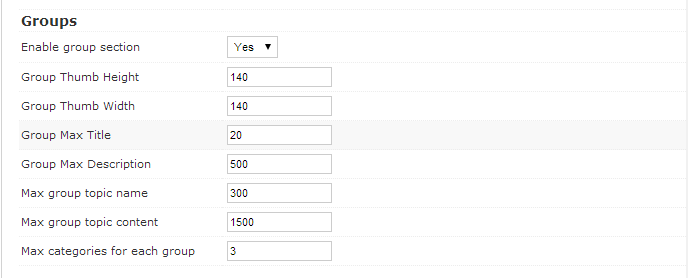
Another section here is the Groups section where you will be able to configure different settings for the groups of your website. The available options in this section are:
- Enable group section – If the group section should be enabled at all
- Group Thumb Height – The height of the group thumb
- Group Thumb Width - The width of the group thumb
- Group Max Title – The maximum amount of characters a group name can be
- Group Max Description – The maximum amount of characters a group description can be
- Max group topic name – The maximum amount of characters a topic name can be
- Max group topic content – The maximum amount of characters a topic content can be
- Max categories for each group – The maximum amount of categories in each group
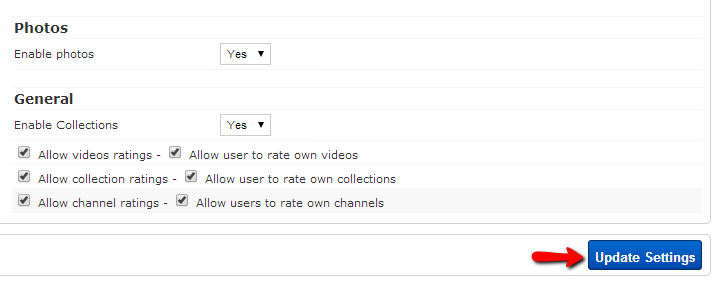
The final two sections of options are the Photos options which is actually a single option for enabling the photos on your website and also the General section where you will find the following options:
- Enable Collections - If collections should be enabled at all
- Allow videos ratings – If video ratings should be allowed
- Allow collection ratings – If collection ratings should be allowed
- Allow channel ratings – If channel ratings should be allowed
- Allow user to rate own videos – If users should rate the uploaded by themselves videos
- Allow user to rate own collections – If the users should rate the created by themselves collections
- Allow users to rate own channels – If the users should rate their own channels
That are all of the available settings for your website on this page. Please configure these based on the functionality you would like your website to present the users with.
Once you are ready with all of these settings please use the Update settings button displayed at the bottom of that page so the performed settings can be saved.
Congratulations! You have successfully configured the Website Settings of your Clip Bucket website!

ClipBucket Hosting
- Free Installation
- 24/7 ClipBucket Support
- Free Domain Transfer
- Hack-free Protection
- Fast SSD Storage
- Free ClipBucket Transfer
- Free Cloudflare CDN
- FFmpeg Support