How to configure the settings of the Video Player
Updated on Mar 13, 2019
As many other components Clip Bucket provides you with the Video Player is fully customizable when it comes to its configuration. In this tutorial we are going to show you how to configure the Video Player settings for your Clip Bucket website.
This tutorial assumes that you have already logged into the admin area of your Clip Bucket application.
Now let’s begin by accessing Template and Players > Player settings.
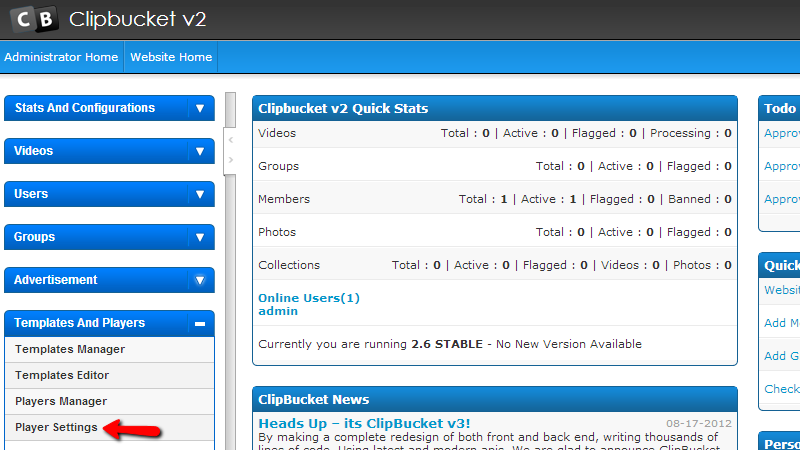
Then you will be redirected to the page where all of the settings for the player of your website can be found. In the next lines of this tutorial we are going to discuss each and every setting so you can better understand what these settings are used for.
From the top to the bottom the settings displayed on this page are:
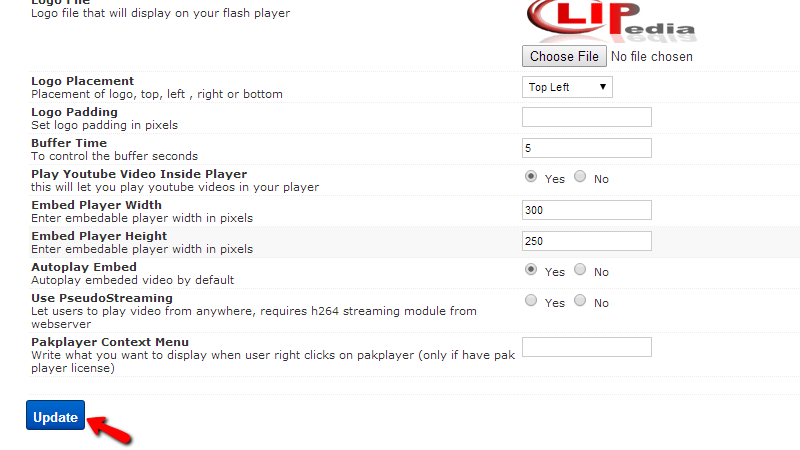
- Pakplayer license – Pakplayer is an additional player Clip Bucket comes with, however in order to use it you will need a license. If you already have a purchased license please enter it into this field.
- Autoplay – This setting will enable the autoplay for your videos when a video is opened.
- Use Playlist – This setting will allow the display of playlist directly in the video player.
- Logo File – Here you will be able to change the logo of the player displayed when a video is played.
- Logo Placement – The location of the logo in the player.
- Logo Padding – Any padding you would like your logo to have from the corners of your player.
- Buffer time – The time a video will be buffered forward.
- Play youtube video inside player – If the embedded youtube videos should be played via the website player.
- Embed Player width – The width of the embeddable player.
- Embed Player height - The height of the embeddable player.
- Autolay Embed – When an embedded player is accessed for the same to be played automatically.
- Use Pseudo Steaming - This option will allow for the video to be played from anywhere the user clicks in the seek line.
- Pakplayer Context Menu – The text that will be displayed when a user right-click on the pakplayer.
When you configure all of these settings you can click on the “Update” button to save them.
Finally at the bottom of the page you will notice two additional settings called respectively “Main Website Player Size” and “Channel Player Settings Size”. Both of these are for the size of the players which you should be able to change if you would like to of course.

Congratulations! You now know how to configure the video player of your website!

ClipBucket Hosting
- Free Installation
- 24/7 ClipBucket Support
- Free Domain Transfer
- Hack-free Protection
- Fast SSD Storage
- Free ClipBucket Transfer
- Free Cloudflare CDN
- FFmpeg Support