Manage Product Catalog in Arastta
Updated on Dec 10, 2015
The product catalog is the main part of any store. It is very important that know how to manage your store’s products and provide your customers with the information they need to make a purchase. Arastta gives you the options to manage and describe your products in details. Make sure you also check our Category and Attributes creation tutorials.
To Add a Product in Arastta, please follow these steps:
- Step 1: Add Product in Arastta
- Step 2: Configure General Settings
- Step 3: Setting up Data Options
- Step 4: Configure Discount and Image Preferences
Step 1 Add Product in Arastta
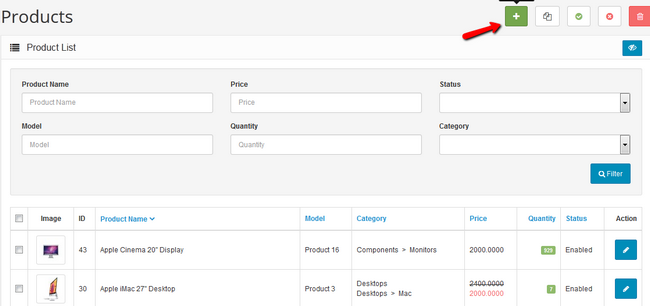
Firstly you will need to access your Arastta admin dashboard and navigate to Catalog>Products.

Please click on the green Add New button located at the top of the page.
You will see a lot of tabs, but only few of them hold very important information.
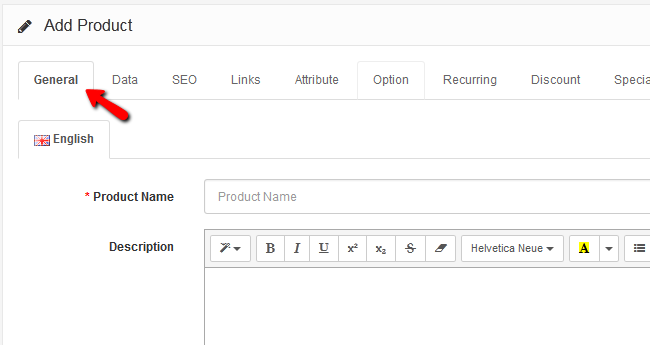
Step 2 Configure General Settings
In the general tab for example you will write the product’s name, a description of the product and add tags to make it easier to find.
Step 3 Setting up the Data Options
In the data tab, you will be able to specify all of the characteristics of a product.
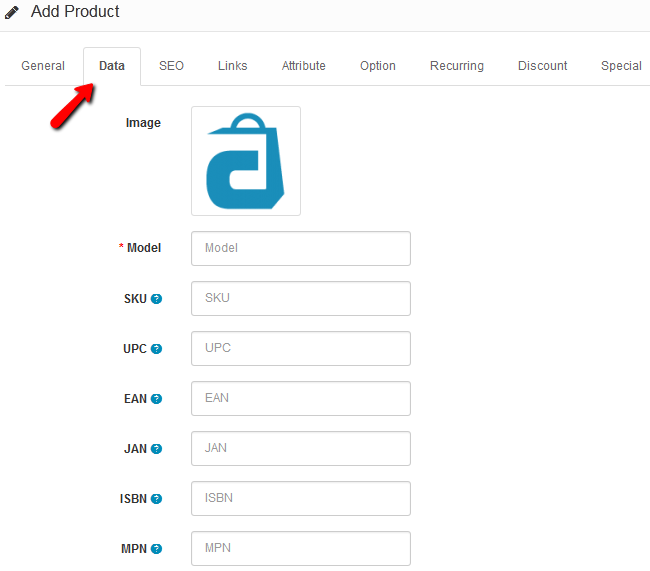
- Image – Here you can choose the main image for the product via the Image manager
- Model – The model of the product
- SKU – The Stock Keeping Unit is used by suppliers within their data management systems, to help track a certain product and its availability in the stock
- UPC – The Universal product code is the product’s barcode (12 digits)
- EAN – Another type of barcode (European/International Article Number, 13 digits)
- JAN - Another type of barcode (Japanese Article Number, 7/9 digits)
- ISBN – A unique numeric commercial book identifier (International Standard Book Number 10/13 digits) used for books, e-books etc
- MPN – The Manufacturer Part Number is a type of identifier used to more easily catalog different part designs in a particular industry
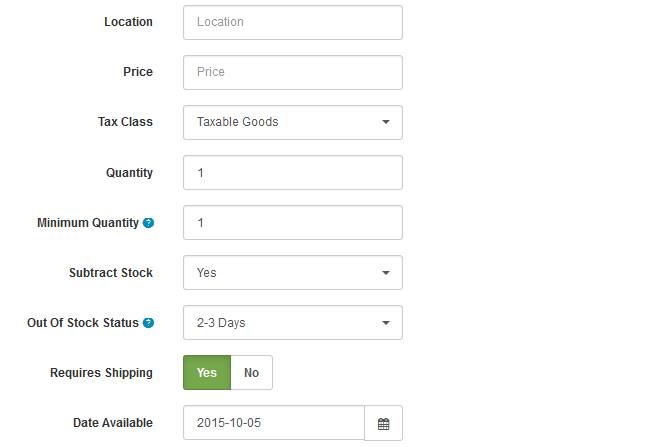
- Location – The location of the product
- Price – The price the customer has to pay for this product
- Tax Class – Here you can select a certain Tax class if you wish to put taxation on this product
- Quantity – The amount of available stock for this product
- Minimum Quantity – The user will have to buy a certain amount of this product in order to checkout with it (can be used in promotions like 2 for the price of one)
- Subtract Stock – Selecting Yes will subtract the amount the custom purchased from the total stock of that product
- Out of Stock Status – The message shown when a product gets out of stock
- Requires Shipping – If the product is digital and no shipping is required select No
- Date Available – The date on which the product will become available (this can be used for pre-orders)
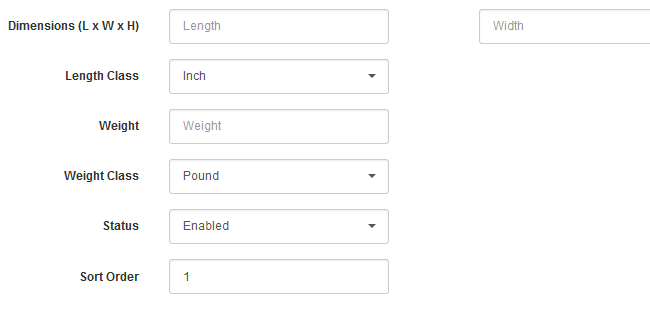
- Dimensions(L x W x H) – The dimensions of the product
- Length Class – The unit used to measure dimensions of the product
- Weight – The weight of the product (must be specified if you wish to use weight shipping)
- Weight Class – The unit used to measure the weight of the product
- Status – Here you can enable/disable a product from the front-end
- Sort Order – You can sort a product to show as a first result by placing a lower number to it (1 will show above 2 or 3)
Step 4 Configure Discount and Image Preferences
In the discount and special tabs you can set lower prices for the product for specific user groups. The difference is that one will be shown as a discount and the other as a special offer. To provide your users with discount of an item you must go to the discount tab and configure:
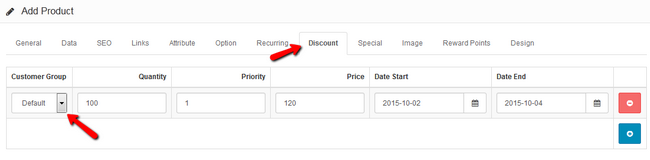
- Customer Group – The group of users for which the discount will be valid
- Quantity – The amount of products that will be discounted
- Priority – Adding a number will change the priority of this discount compared to other discounts or coupons you may have on available at the moment. The lower the number the higher the priority will be
- Price – The discount price
- Date Start - The date from which the discount will be active
- Date End - The last date on which you can use the discount
In the Image tab you can choose additional pictures for your product. The main image will always be the one configured in the Data tab so these additional images can show different angles of the product.
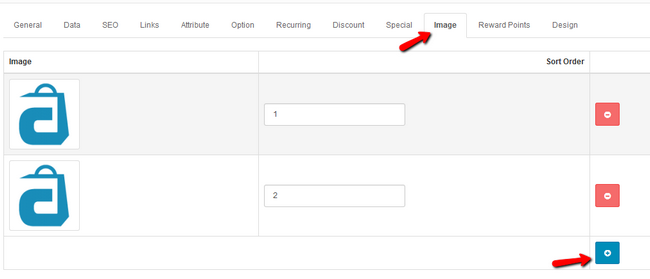
You can add more image slots by clicking on the blue Add Image button and then you can change the sort order for each image so they can be shown in the sequence you choose. If you want to remove an image, just click on the red Remove button.
When you are done with filling in all of the information regarding your product, click on the Save button at the top of the page. This will save all changes in all of the tabs and add your product to the front-end of your Arastta Store.

Arastta Hosting
- Free Installation
- 24/7 Arastta Support
- Free Domain Transfer
- Hack-free Protection
- Fast SSD Storage
- Free Cloudflare CDN
- Free Arastta Transfer