How to Transfer Product Data from Naver to WordPress
Updated on Jun 30, 2025
At FastComet, we understand the importance of having complete control over your webstore. That includes safely switching to a new platform and having the freedom to host it on your own. In this guide, we will focus on that and answer a question we have seen many times from our Korean customers: how do I transfer my product data from Naver Smart Store to WordPress?
If you own and operate a store on the Naver Smart Store Platform and want to develop and manage it independently, switching to an open-source platform like WordPress is a wise decision.
WordPress is a flexible and highly customizable CMS that allows you to build the store you want. You can design it precisely the way you imagine it and add any necessary functionality to ensure its smooth and profitable operation. The first step, however, is to install WordPress.
This post includes:
Install WordPress and WooCommerce
The process of installing WordPress and WooCommerce is straightforward. However, you will also need a space to host your website. Our hosting plans are ideal for new WordPress users, as they come with everything you could ever need. From database and DNS management to automated installers for WordPress. For our Korean customers using Naver, you will be pleased to know that cPanel is now available in Korean for your convenience.
How to Install WordPress
Once you have the hosting space for your website, you can take a look at our WordPress tutorials. We have guides on how to install it manually, through the automated Softaculous installer, or the WP Toolkit that can handle a lot more than just installation. You will also need a database; if you are not familiar with creating one with cPanel, you can read our tutorial on the topic.
How to Install WooCommerce
If you are familiar with how WordPress works, then you already know how easy it is to install plugins. Find it, click Install, then Activate, and you are done! Of course, with WooCommerce, you will have to set it up as well, but we have you covered!
Our WooCommerce tutorial covers everything from installing the plugin to configuring it. If you are unfamiliar with how the plugin functions, you can follow the instructions or read WooCommerce’s documentation for more information.
Once you have installed WordPress and WooCommerce and your site is online, you can begin the product transfer process. We will show you two methods.
Transfer via a .CSV File
The Naver Smart Store enables its users to export their product data as a .CSV file, which can then be easily imported into WooCommerce. The steps are straightforward.
- Go to the Naver Smart Store Center and log into your account;
- Then head to the Product Management (상품 관리) section;
- There, click on Product Search/Modify (상품 조회/수정);
- Finally, use the Excel Download ( 엑셀 다운) option. From there, you can export your product data to a file that downloads to your computer.
For complete documentation in Korean on the process, you can visit Naver’s official page.
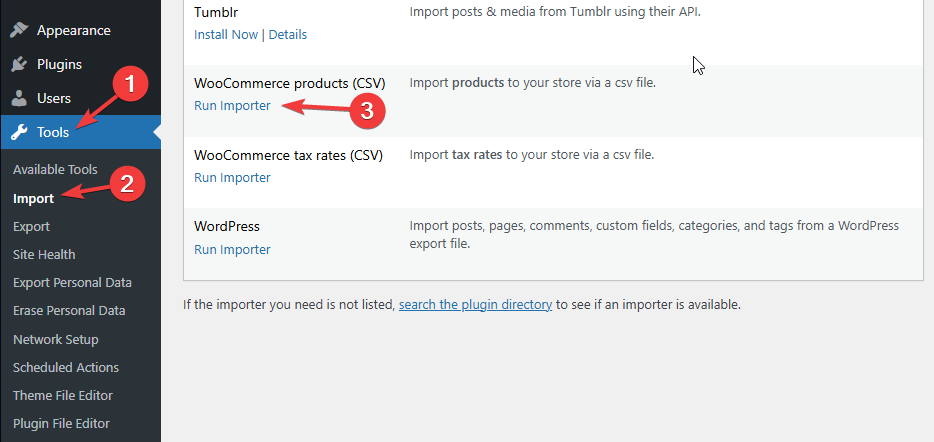
Once you have the file, log into the WordPress admin dashboard. You can access this by going to Tools > Import and selecting the WooCommerce Products (CSV) importer.
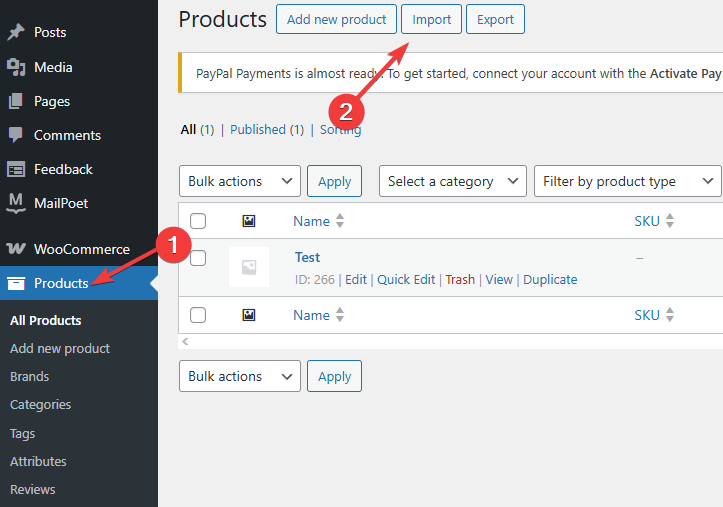
Alternatively, head to Products and click Import at the top of the screen.
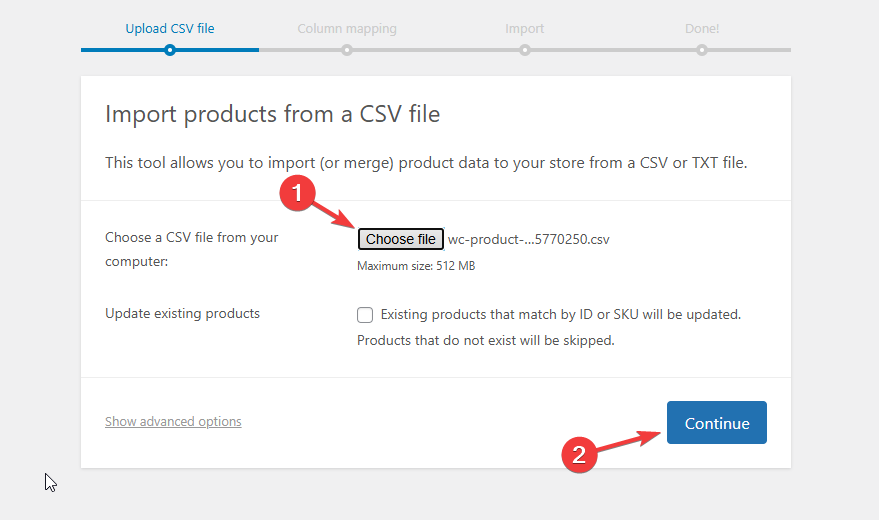
Both methods will take you to the WooCommerce CSV importer. Once there, click on Choose File. Locate it on your computer and then click Continue.
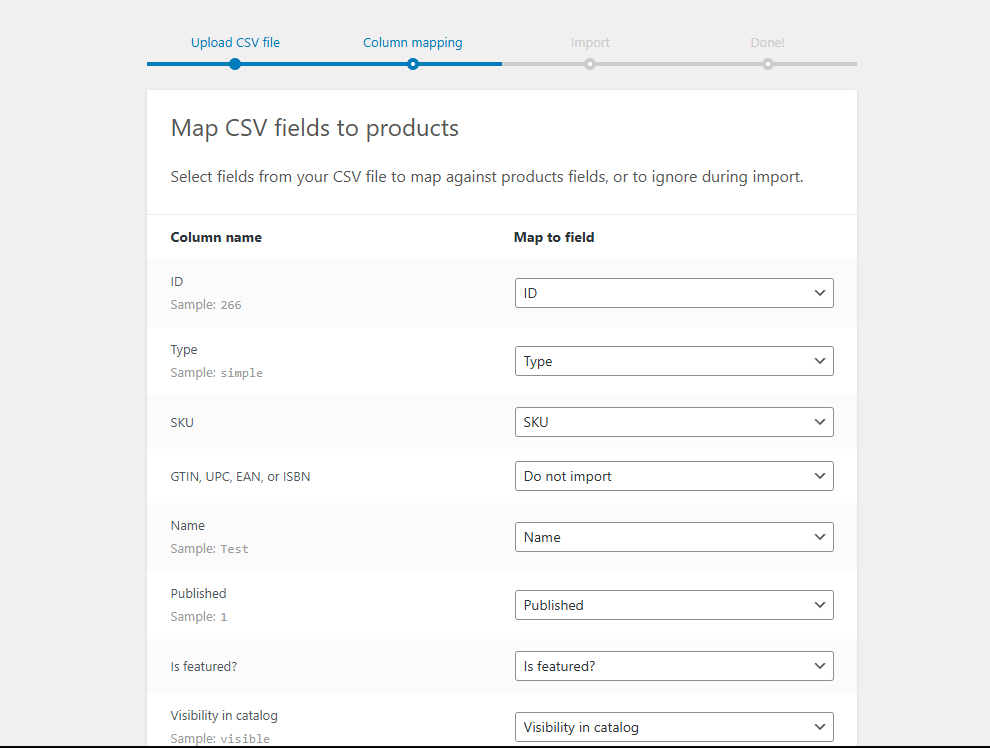
The next step is vital. Depending on where you exported the .CSV file from, the columns and their names may not match WooCommerce’s formatting. Take some time on the Column Mapping screen to ensure everything is aligned correctly. Once done, click Run the Importer at the bottom.
You will see a progress bar, and if there are no errors, a message will appear informing you that the import is complete. Click View Products to access your catalog and review the quality of the import.

That’s all you need to do to import a product catalog via a .CSV file into WordPress and WooCommerce from the Naver Smart Store.
Transfer via Naver’s Commerce API
For most users, the previous method should be sufficient. However, Naver also offers an API that can be used to move product catalogs between stores.
Since WooCommerce also can import and store data via the REST API. Advanced users can utilize both APIs to transfer data between their stores easily. However, the process requires more technical knowledge.
You will need a custom Python or PHP script (as no plugin can do this for you) that authenticates your requests and then fetches data from the Naver API. This tutorial will assume that you already have such a script. If you do not, the previous method is likely more suitable for you. This is what it must be capable of:
- Authenticate with Naver API - The script must be able to send a POST request to Naver’s OAuth token URL and provide your client ID, client secret, and whitelisted IP address. That will give you an access token that lets you call the API for about twelve hours;
- Fetch Product Data - It must also be capable of using GET requests to the Smart Store product endpoint, pass the access token, and receive a JSON response with the data;
- Transform Data - Since Naver is a Korean store, the product data might have different formatting. The data has to be converted to a format that fits WooCommerce;
- Send Data - Finally, the script should also be capable of authenticating with your WooCommerce REST API and sending data via POST or PUT requests.
Back to setting up the Naver Smart Store Commerce API. There are two requirements to use it.
- You must first have a Smart Store account as an Integrated Manager (not just a user) and follow all the requirements that come with that;
- Then, you must apply for API access via Naver Developers. You can refer to the >FAQ section for more details on how to obtain this access.
Once you have access to the Naver Commerce API, you can proceed with setting it up.
- Go to My Applications (내 애플리케이션). There, click on Register Application (애플리케이션 등록);
- Fill in the fields below with this information:
- App name;
- Platform;
- Redirect URI (for OAuth);
- API Permissions - select Smart Store API access here;
- Note down the Client ID and Client Secret you will receive at the end of this process. They are vital.
- Since the Naver API accepts requests only from recognized IPs, head to this page;
- There, click on Seller Info > API Access Info (판매자정보 > 인증 정보);
- Enter the IP address that will be accessing this IP.
Now that you have set up the Naver API let’s do the same on the WooCommerce side of things. Log into WordPress and go to WooCommerce. There, click on Settings and the Advanced tab. Finally, go to REST API.
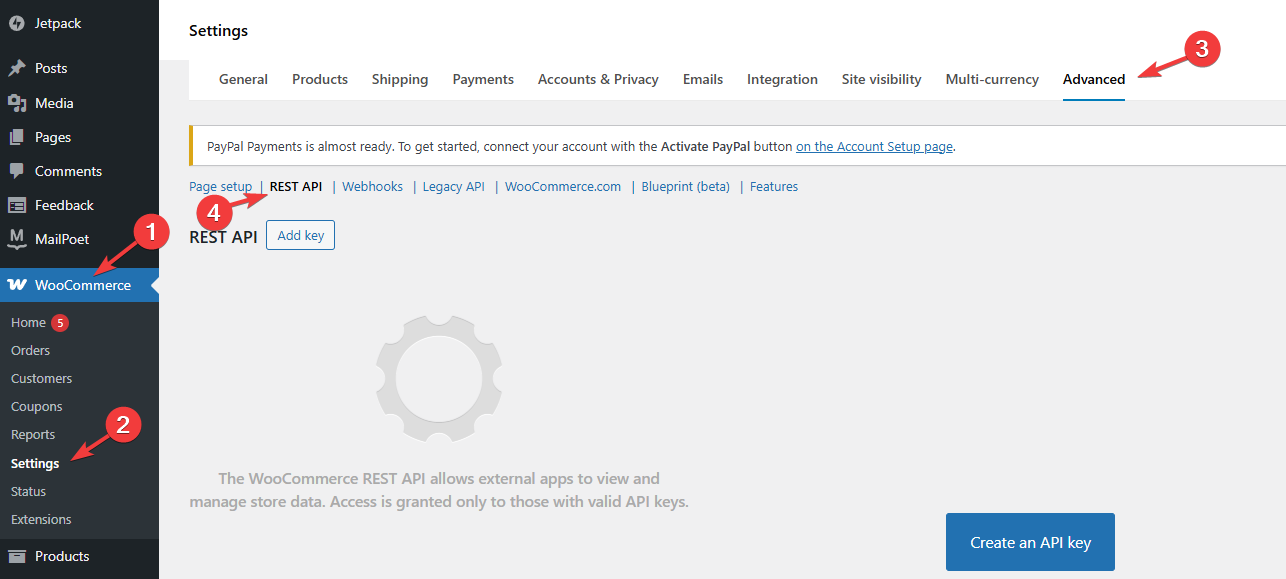
Click on Add Key. You will see a few fields that you need to fill in.
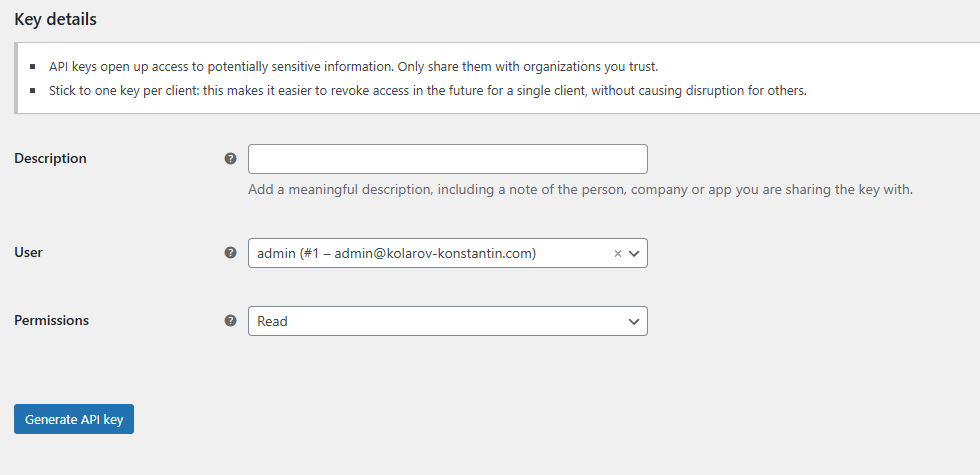
- Description - Write a description so you know what this key is for;
- User - Select your admin user;
- Permissions - Assign read/write permissions to the key.
When done, click Generate API Key. This will provide you with a Consumer Key and Consumer Secret. Save those as they are vital since you will need them for your script.
Next, navigate to WordPress Settings > Permalinks. There, ensure that the permalink structure is anything except Plain. That will ensure the REST API endpoints work properly.
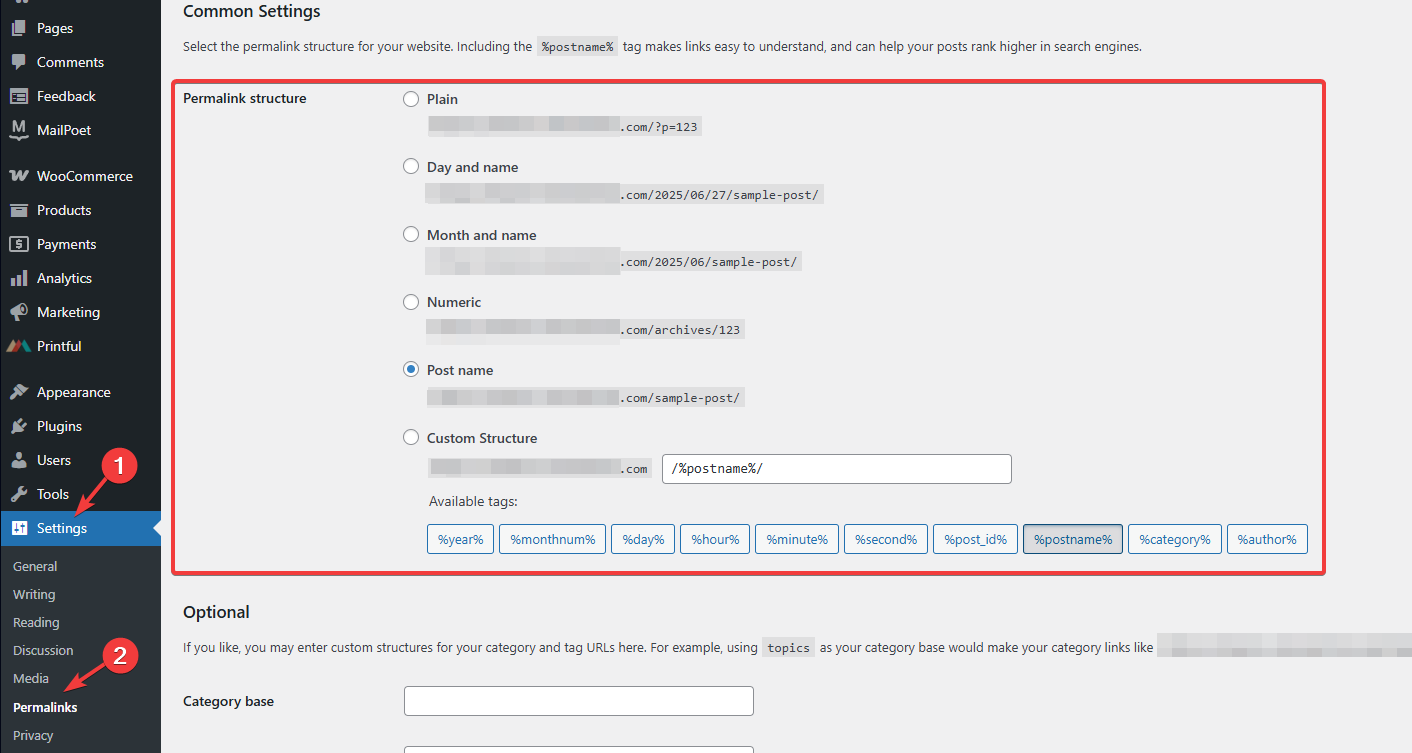
That is all you need to do to set up both the Naver Commerce API and the WooCommerce REST API. Now, all that is left is to fetch the data. Here is a quick overview of how the process works and how the script will transfer the data between the two APIs.
- Authenticate With Naver - Send a request to Naver’s OAuth token URL with your client ID and client secret. Receive an access token;
- Send an API Request to Naver’s Endpoint - Once you are authenticated, make an HTTP GET request to a specific Naver API endpoint (/products, for example). You will receive a JSON response with the data from that endpoint. Repeat for all other relevant endpoints;
- Parse and Store Data - Once you have the data, parse, and store that data in the script so it can be transformed;
- Transform the Data - Next, the script transforms the data so it abides by WooCommerce’s format requirements;
- Push the Data - Finally, use a POST or PUT request to push the data to WooCommerce’s REST API, authenticating with your key along the way.
As you can see, this method is significantly more complex and requires coding and technical expertise. We strongly recommend everyday users first try the previous method by exporting their product data as a .CSV file. It is much more straightforward.

WooCommerce Hosting
- Free Installation
- 24/7 WooCommerce Support
- Free Domain Transfer
- Hack-free Protection
- Fast SSD Storage
- Free WooCommerce Transfer
- Free Cloudflare CDN