How to Install Visual Themes for WooCommerce
Updated on Dec 8, 2022
To have a successfull online business you will need to think for quite a number of things. One of the most important however, is the design of your website and in the next few lines of this tutorial we will address exactly the installation of visual themes for your website. If you are feeling inconvenient of performing the installation of a theme our WooCommerce Hosting package will provide you with the assistance of our experienced Technical Support team and they will gladly handle the installation for you.
To be able to install Visual themes on your Store, you need to:
Step 1 Find the best Theme for your Store
In order to find the best theme for your Store you will most probably search the WooThemes database. Assuming that you have found a theme there, you have purchased it and you have downloaded the installation archive for the theme you are all set to get started with the theme installation which we will discuss in Step 2 of this tutorial.
If you are looking for Free WooCommerce Themes, you should be able to find such on their official website. Keep in mind that the themes there are included in regular updates so most probably you would like to purchase/download a theme from there.
Installing WooCommerce themes
Suppose you have downloaded the theme installation archive you have done half of the theme installation. The other half is related to the normal installation process of themes in WordPress.
First and foremost you will need to access the administration area of your WordPress installation - it is usually located under youdomain.com/wp-admin . Once you log in successfully please navigate to Appearance > Themes.
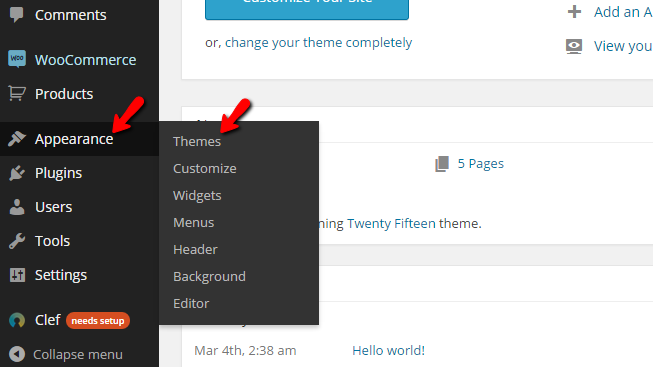
There you will be presented with a short list of the already installed themes, and of course, the button Add New for adding a new theme that we are looking for.

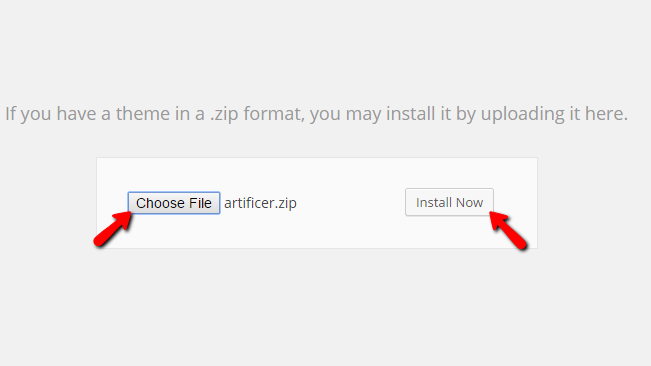
Once you click on that button, you will be redirected to the Add Themes page, where you will typically search for WordPress themes. However this time you will need to click on the Upload theme button located at the top left corner of the page (as the theme will be added by you and not searched over the suggested themes).

Next, you will be redirected to a simple one-section page with the Choose File button and the Install Now button. Respectively the actions you will need to perform here are to first upload the installation package of the theme you downloaded earlier from WooThemes.
And then click on the Install Now button, which will enable you to install the theme you have chosen. After a brief period of time, the theme will be installed, and the last step is to simply activate it from the Activate link provider after the installation log you will be presented with it on the next page.
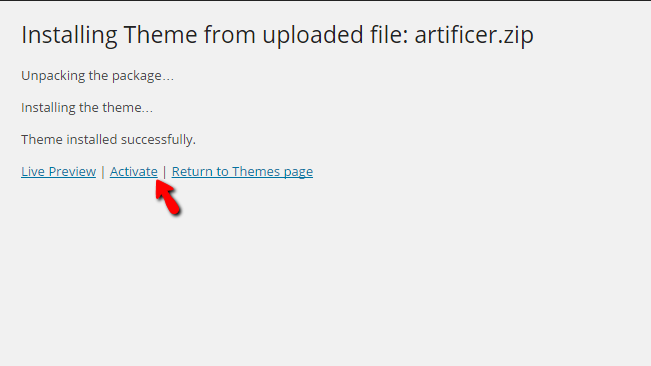
On the next page usually, you will be presented with the home page of the theme as all of the themes purchased via WooThemes have their own backend and configuration pages.
Congratulations! You now know how to install themes on your WooCommerce-based Online Store!

WooCommerce Hosting
- Free Installation
- 24/7 WooCommerce Support
- Free Domain Transfer
- Hack-free Protection
- Fast SSD Storage
- Free WooCommerce Transfer
- Free Cloudflare CDN