Installing a new style for your board
Updated on Jan 6, 2016
The style of your Board is one of the most important things you need to consider after of course its contents. The styles your applications uses is the way how its design get changed and generally managed.
So basically in order to have the style of your phpBB 3 Board changed you will need to install a new style and in this tutorial we will show you how this process should be handled in few easy to follow steps.
For the purpose of this tutorial we will use a style provided from the phpBB 3 team officially. You can find more styles from the authors of the script at their official website.
We will use the WoWMaevahEmpire style for illustrating the installation process.
To install a new style in phpBB3, you need to:
Step 1 Download and upload the files of the Style
Assuming that you have downloaded the style you have selected you should receive an installation archive containing the files required by the template. These are conveniently packages into a single folder within the downloaded archive which is usually with the same name as the style you have selected.
Once you extract the content of the archive you will need to upload the template main folder on your hosting space. The folder you will need to upload the content of the archive (e.g. The template folder) at is located in the installation directory of your phpBB 3 platform and it is called styles. So basically if your phpBB 3 platform is installed into the public_html folder you will need to upload the style’s folder into the public_html/styles folder.
In order to upload your style we recommend using the FTP service for your account. If you are not quite sure how to connect to that service or how to use it please check our FTP tutorial series for full information on the matter.
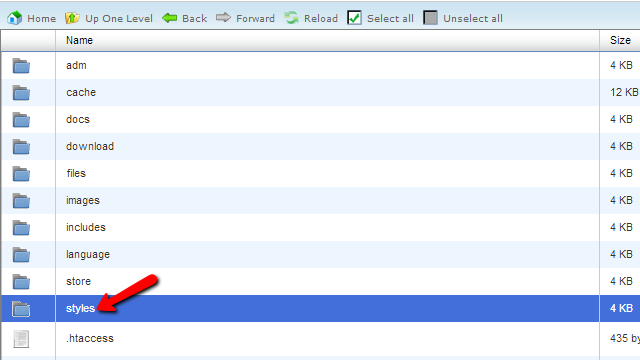
In the styles folder by default there will be 2 folders which are related to the already existing styles on your Board – Prosilver and subsilver2. Once you have uploaded the new style you are currently installing you will be able to see it in the same folder.

We are done with the uploading part and in Step 2 we will move forward with the installation via the Administration Control Panel of your phpBB 3 Board.
Step 2 Activate the new Style
Now that you have the style uploaded you will need to activate it. In order to do so you will need to login into the Administration Control Panel of your Board and to navigate to Styles.
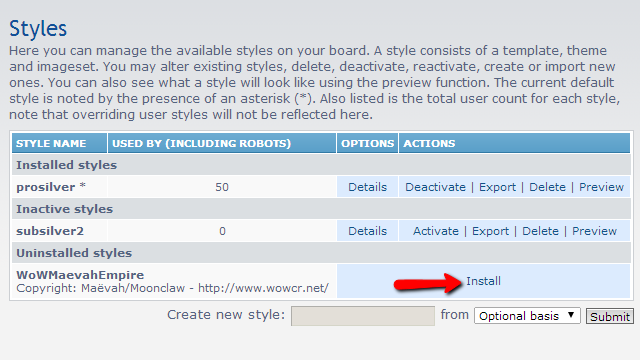
There you will be able to find the newly uploaded template in the table view as the last one. Now you will need to click on the Install button so the template can be installed.
The next page you will be redirected to is a simple confirmation page where you can directly activate the installed style as a default one by changing the last option on the page – Make Default Style.
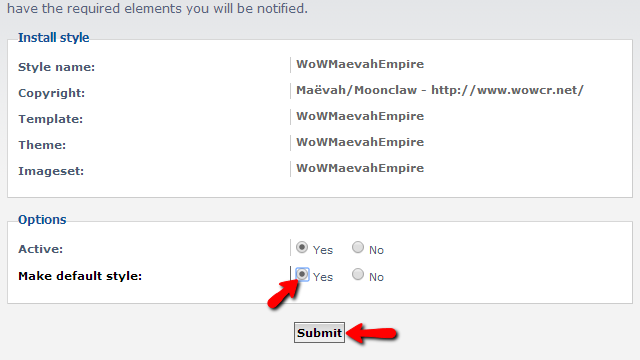
Once you hit the Submit button these settings will be saved and you will be presented with a message indicating the successful installation.
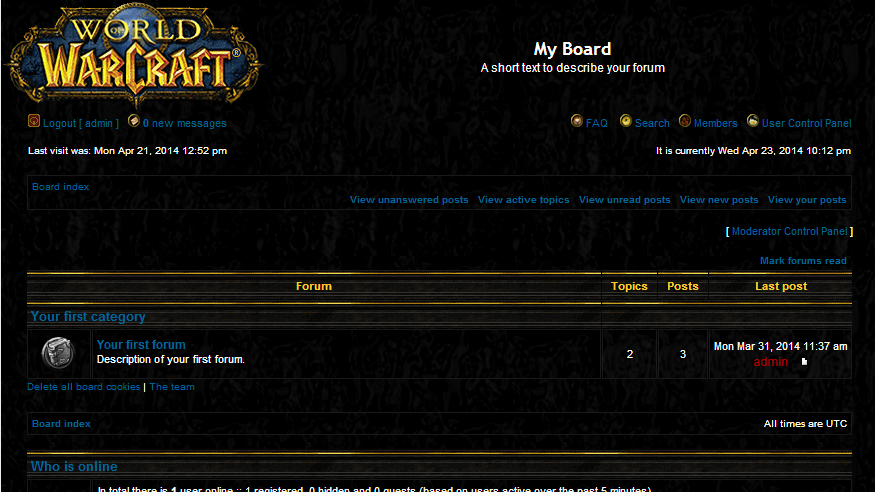
Now if you check your Board’s home page you will notice how the style has been changed to the one you have just added.
That is all you will need for installing a style on your phpBB 3 Board.

phpBB3 Hosting
- Free phpBB3 Installation
- 24/7 phpBB3 Support
- Free Domain Transfer
- Hack-free Protection
- Fast SSD Storage
- Free phpBB Transfer
- Free CloudFlare CDN
- Immediate Activation