How to Manually Install OpenCart
Updated on Dec 10, 2015
If your hosting provider does not have any OpenCart auto installers such as Softaculous or Fantastico you will need to manually install OpenCart on your hosting account.
To manually Install OpenCart, please follow these steps:
Download and extract the Installation Archive
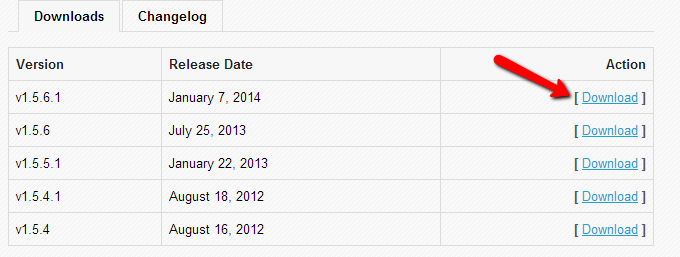
To manually install OpenCart under your hosting account you will need to download it first from the official OpenCart website. You can use this direct link to the OpenCart download page.
Unless you need a specific OpenCart version we highly recommend to download the latest stable version for optimal performance and security. To download the OpenCart installation archive, please click on the download available on the OpenCart Download page.
After you have downloaded the installation archive, please unzip it on your local computer and navigate to the 'Upload' directory. You need to rename 2 files in order to successfully complete the installation process. The first is located under the Upload directory and it is called 'config-dist.php'. You should rename this file to 'config.php'. The second file is located under the 'upload/admin' directory and it is also called 'config-dist.php'. Please rename this file to 'config.php' as well.
Upload the files to your hosting account
When you are done, please start your favorite FTP program in order to upload the OpenCart installation files. If you are not sure how to use a FTP program you can check our FTP tutorial or upload and unzip the OpenCart installation archive via your cPanel → FileManager following our cPanel tutorial. The files that should be uploaded on your hosting account are located in the 'upload' folder included in the OpenCart installation archive.
If you would like to have your store accessible directly via your domain name (ex: http://example.com) then you should upload the OpenCart files under the public_html directory. In case you would like to have your OpenCart store accessible via any subdirectory (ex: http://example.com/store/), please create the desired directory under your public_html and upload the OpenCart files in it.
When you have your OpenCart installation files placed in your desired account folder, please create a database via your web hosting account control panel. You can perform this by following our tutorial on How to create MariaDB database via cPanel.
Access the Installation Wizard
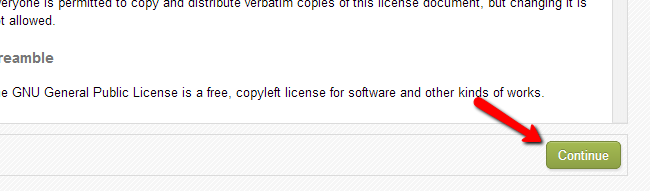
Next, you should access the address of your store via your browser (ex: http://example.com/store). This will load the first page of the installation process to accept the OpenCart license. Click on the Continue button to proceed with the next step of the installation.
On the next step you should include several important configuration settings in order to proceed with the installation further. First, please enter your Host, Database Username, Password and database name. These settings should be provided to you during the database creation process or by your hosting provider.
Next, you need to input the desired username and password, as well as the administrative email address for your main OpenCart admin user.
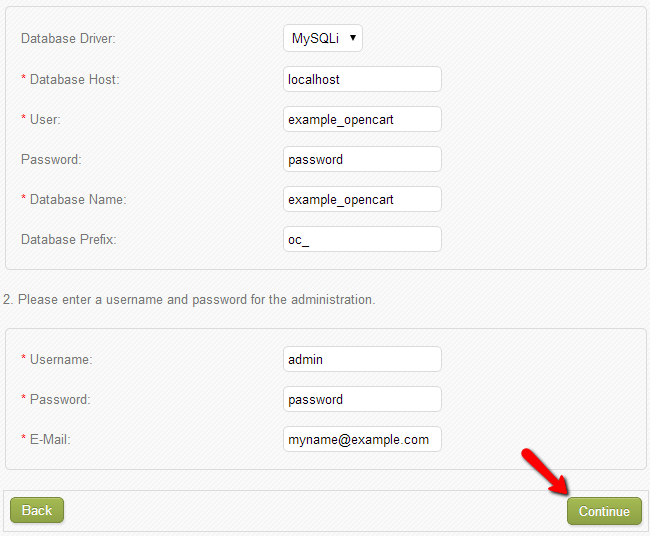
When you are done, please click on the Continue button. This will direct you to the last page of the installation process.
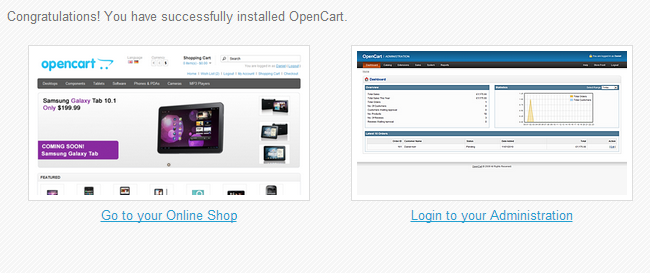
Congratulations, you have successfully completed your OpenCart installation process and you can access your store frontend or the OpenCart admin panel via the links provided on the final page of the installation process.
Remove Installation Directory
Please remember to remove the Install directory from the OpenCart folder under your account for security reasons. You can perform this via your FTP or use your cPanel>File Manager.

OpenCart Hosting
- Free Installation
- 24/7 OpenCart Support
- Free Domain Transfer
- Hack-free Protection
- Fast SSD Storage
- Free OpenCart Themes
- Free OpenCart Transfer
- Free CloudFlare CDN