Installing Prestashop via Softaculous
Updated on Dec 10, 2015
Softaculous is a web based auto installer located inside your cPanel > Softaculous. Its purpose is to provide you with a fast, secured and bug free installation of one or more of the applications it supports.
n this tutorial we will show you how with few clicks to have a full installation of the PrestaShop application on the desired location.
To install PrestaShop via Softaculous, you will have to:
Find PrestaShop in Softaculous
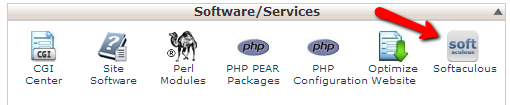
First you will need to access the Softaculous auto installer via your cPanel → Softaculous. The installer is usually located under the Software/Services section.
Once you click on the Softaculous icon you will be redirected to the home page of the installer where from the left navigation menu you should be able to locate the E-Commerce section where the PrestaShop application is located.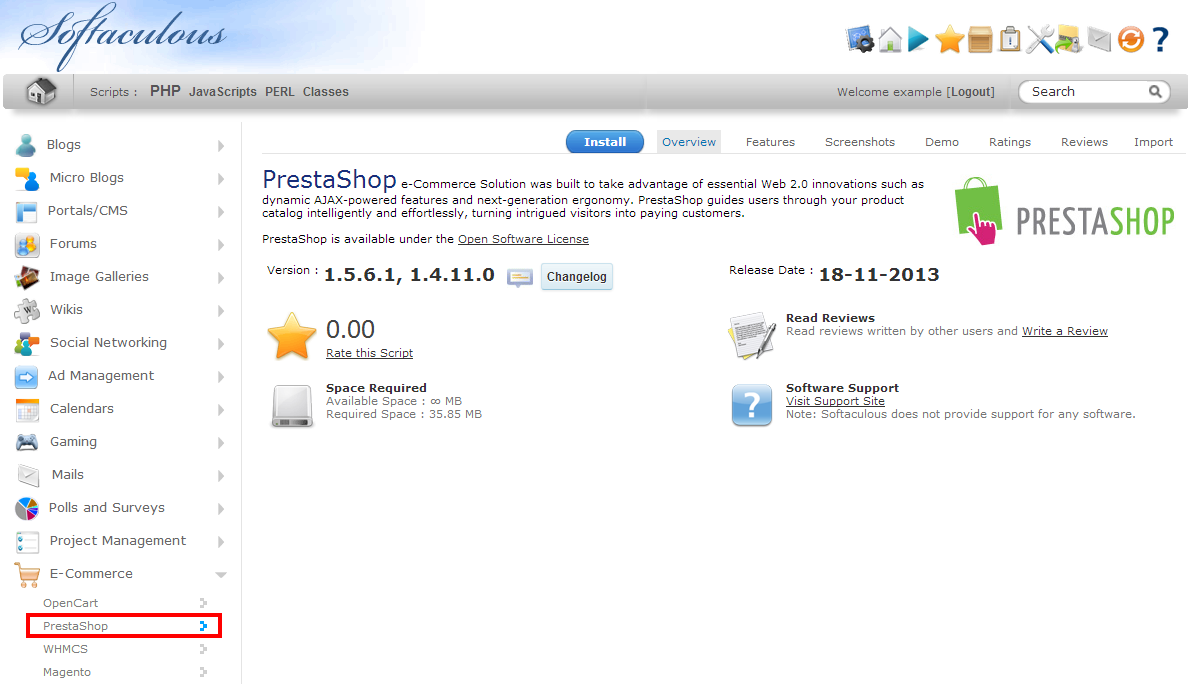
Once you click on the name of the application you will be redirected to the “Overview” page of the application where you will be presented with detailed information for the supported versions of the application and other additional options you may consider.
Configure the Installation
In order for the installation process to begin you will need to click on the "Install" tab which is a blue colored button at the top navigation pane.
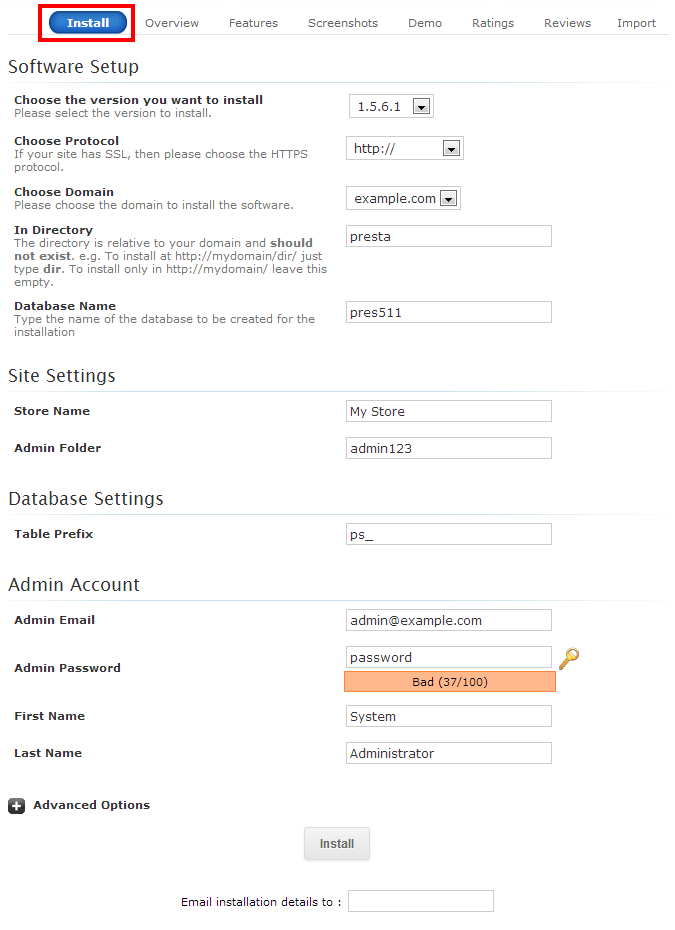
The installation process of the application will require from you to fill the installation fields displayed on that page.
- Choose the version you want to install - From the drop down menu next to this option you can choose the version of PrestaShop you would like installed.
- Choose Protocol - This option is for you to choose the protocol which the application should use (https/https) and also if the application should be installed with or without the www prefix.
- Choose Domain - If you are having large amount of subdomains/addon domains and you would like the application installed on some of them you can easily choose which one should be used for the installation to be performed from the drop down list next to this option.
- In Directory - This option is presenting the actual directory you would like the application installed in. Note that by default the value of this field is set to presta which basically men that the application will be installed in the folder named presta which will be automatically created in the home folder for the above chosen Domain/Subdomain/Addon domain.
Note that if you would like the application directly installed on the selected Domain/Subdomain/Addon Domain you should delete the content of this field and leave it blank. - Database Name - The name of the database your application will be used. By default Softaculous will fill that field with an automatically generated value. The value will be considered with the existing databases you have so it can be unique. Change this field only if you would like to install the application with a specific database name.
- Store Name - The name (tittle) you would like displayed under the home page of your PrestaShop application.
- Admin Folder - The admin folder value is the actual name of the folder where your Store's admin backend will be located. PrestaShop have the option to support different admin folder names due to security measures. Thus you can set the name of the admin folder to anything you would like.
- Table Prefix - The value of this field is the actual prefix PrestaShop will use to populate the names of the tables in the database. It is recommended for the default prefix to be changed due to security reasons, however not changing that field will not cause any impact on the functionality of the application.
- Admin Email - The admin email field is used for the admin email account to be configured. This email account will not only serve as a default email account for your Store but it will also be used for the admin username when you are logging into the admin backend of your application.
- Admin Password - Fill this field with a strong password type containing letters, numbers and special characters like !@#$%^&*() due to the fact that this will be the password you will use in order to access the admin backend of your store.
- First Name - The first name of the owner of the store.
- Last Name - The last name of the owner of the store.
Last but not least before the installation can begin there are few Advanced Options you can consider.

- Disable Update Notifications - This option as its name suggest will disable the notifications sent from Softaculous, related to the available updates for your application once it is installed.
- Automated Backups - By choosing from the drop-down list a period your application should be backed up for, you will ensure that the Softaculous auto installer will generate a complete backup for your Store once every day/week/month.
- Backup Rotation - The number of backups Softaculous should keep for your Store depending on the period you have chosen your backups to be generated for.
Initiate the Installation
As soon as all of the required fields are filled properly you should simply click on the Install button and Softaculous will begin the installation process.
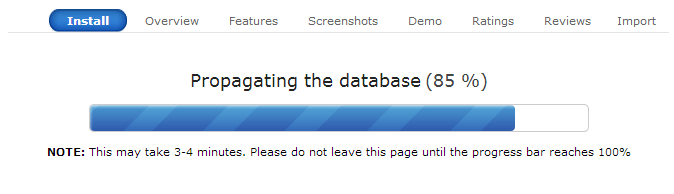
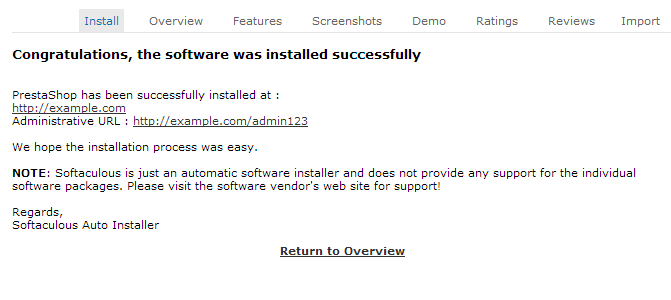
Once the installation process is finished the auto installer will display a successful message letting you know the main URL of the installation along with the Store's admin backend URL.
That is it! You have a clean, secured and reliable installation method for easy PrestaShop installation!

PrestaShop Hosting
- Free Installation
- 24/7 Tech Support
- Free Domain Transfer
- Hack-free Protection
- Fast SSD Storage
- Free CloudFlare CDN
- Free Website Transfer
- Immediate Activation