Backing up and restoring your Store's database
Updated on Dec 10, 2015
PrestaShop is MySQL/MariaDB driven application and as such sometimes there is the need for the database of the application to be restored from previously taken backup. In this tutorial we will completely cover this process and you will be able to easily handle this task on your own.
To protect and restore your DB, you need to know how to:
Generate Database Backup
PrestaShop provides a feature which allows easy the database directly from the application. This feature is named DB Backup and it is located at your PrestaShop Admin area → Advanced Parameters → DB Backup.

Once you access that feature you will be presented with a warning message related to the fact that PrestaShop is not responsible for the database, its backups and/or recovery.
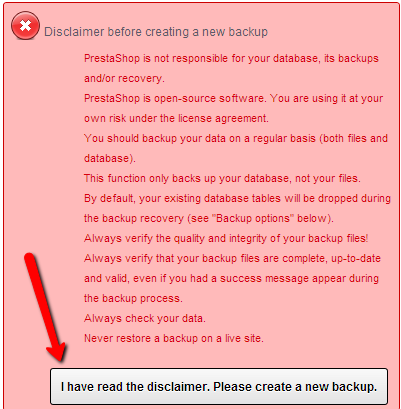
At the bottom of this message you will be able to notice a button indicating your agreement to these terms and for the automatic generation of a backup for the database of your application.
Once pressed this button will automatically generate a backup for your database which will be listed in the table located bellow this Declaimer.
From this table you will be able to download the backup by simply clicking on it once you locate it. You will then be presented with an archived version of your database which will be automatically downloaded on your local computer the same as stored on your hosting account.
Restore Database Backup
In order for an existing backup to be restored the process is fairly simple and we outline it as points below:
- Ensure that you have downloaded the backup on your local computer and you have extracted it so you can receive the .sql file of the archive. In order to download the backup you can either click on it from the table located on the DB Backup page mentioned earlier in this tutorial or directly via FTP from the files located inside your admin/backups folder. Note that the name of the admin folder can be different.
- Activate the Maintenance mode of your store via your Store's admin area → Preferences → Maintenance by simply changing the Enable Shop value to No.
- Access the phpMyAdmin application provided in your cPanel and select the database for your application. If you are not aware what is the name of your database you can simply check it by viewing the code of the settings.inc.php file located inside the config/ folder of your application.
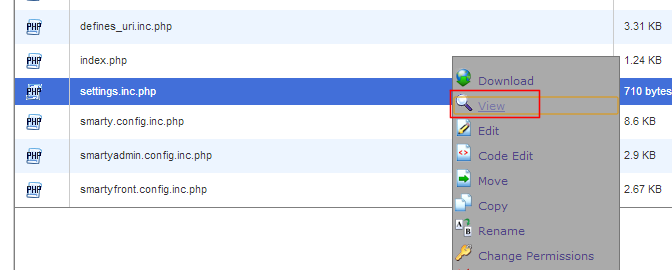
You can either download this file via your cPanel → File Manager or you can directly choose the View option of the File Manager feature which will present you with the code of this file directly in your browser.
The name of your database is shown on the 3rd line of the file under the following code:
define('_DB_NAME_', 'example_database');
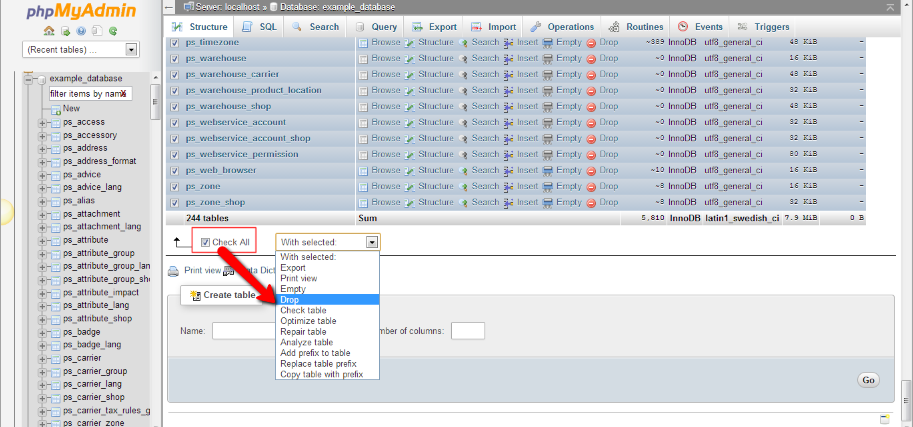
As soon as you access the database of your application via the phpMyAdmin feature you should select all of the tables and drop them using the Drop command from the "With Selected" drop down menu.
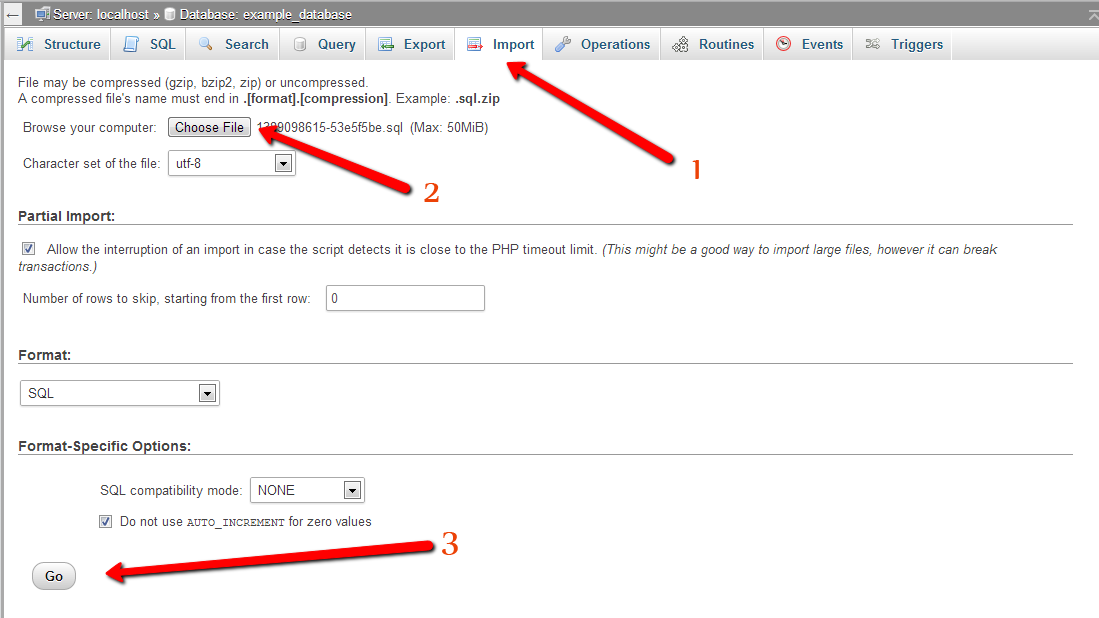
The restoration process proceeds with the import of the backup you have on your local computer after you have dropped the tables from the database of your application. In order for the backup to be imported you should access the import feature of the phpMyAdmin application and select the backup file from the Choose File button of the import feature.
Upon a successful import you will be presented with message that the import was finished or respectively with an error message if there was any error with the import.

Once this process is finished your database restoration process is completed and your application should be accessible and you should simply perform the final step.
Enable your shop via the Maintenance section located inside your Store's admin area → Preferences → Maintenance by simply changing the Enable Shop value to Yes.
Congratulations! You can now backup and restore the database of your Store!

PrestaShop Hosting
- Free Installation
- 24/7 Tech Support
- Free Domain Transfer
- Hack-free Protection
- Fast SSD Storage
- Free CloudFlare CDN
- Free Website Transfer
- Immediate Activation