How to install PHPFox Neutron manually
Updated on Nov 1, 2018
This tutorial will review the manual process of installing and configuring PHPFox Neutron(v 4.0.x) on your account. This is the first thing you need to complete in order to use the product for the development of your website.
Start a PHPFox Neutron website in just 3 minutes:
To help you get started with PHPFox Neutron our Technical Support team provides Free PHPFox Neutron Installation.
- Free PHPFox Neutron Installation by our Support Team
- Free Domain Name for Life
- 24/7 Technical Support team
- Optimized SSD PHPFox Neutron Hosting
- Fast and Secure Servers
The installation of PHPFox Neutron includes the following steps:
Step 1 Purchase PHPFox Neutron
First of all, you need to make sure that you have a valid PHPFox license. If you have not yet purchased PHPFox Neutron, now is the time to do so from the official PHPFox website.
Step 2 Download and Prepare Files
After you complete the purchase of the script you will be given a link to download the latest version.
Download the file to your computer and unzip its content.

Install PHPFox in public_html
Let us say that your domain name is called example.com and you would like to access your new PHPFox installation directly through it. In order to achieve that, simply access your account over FTP and navigate to the public_html/ directory. You need to upload all of the contents of the upload/ directory directly within that directory on your account.
Install PHPFox in a subfolder
This option will allow you to install the script in a subfolder of your choice. For example, if your domain name is called example.com and you would like to access your PHPFox website via example.com/neutron/, you will need to create a new folder called "neutron" directory within the public_html/ directory of your account. Then simply upload the contents of your PHPFox script within the "neutron" directory.
Note that you can upload the contents of your PHPFox website to the server with your favorite FTP client or directly usign the File Manager service within your cPanel account.

Upload Files
There are two ways of uploading your files to the server - using an FTP client, following our FTP tutorial, or uploading directly through your cPanel account > File Manager, following our cPanel tutorial.
Step 3 Initiate the Installation
To initiate the PHPFox installation, you need to open your favorite web browser and visit your website.
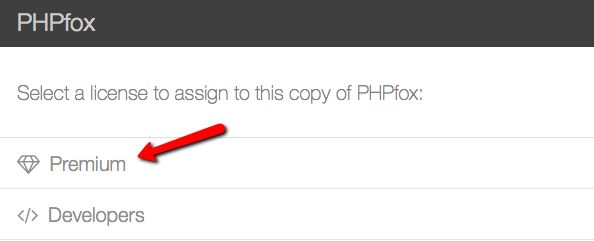
The first step of the web install will be to select what type of license to assign to this copy of PHPfox.
As you have purchased the script you will need to select Premium/Licensed.
You will need to enter your PHPfox Neutron License ID & Key. Those were sent to you via an email directly after your purchase.

Step 4 Create a Database
You will need to create a clean database for your new website.
MariaDB Configuration
You can create a new database and a user assigned to it via cPanel. Simply follow our Database Wizard tutorial for information on that.
- Database Host - localhost
- Database Name - Enter the name of your database
- Database User Name - Enter the name of your user.
- Database Password - Enter the password.
- Database Port - 3306
- Database Prefix: - phpfox_ (or another prefix of your choice)
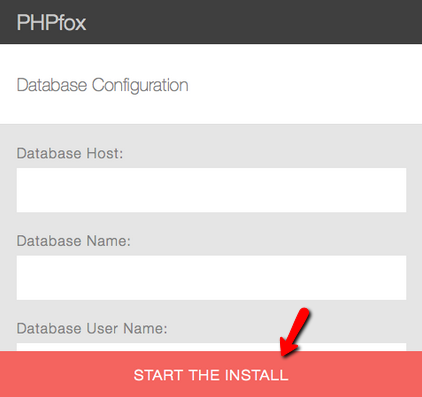
After you have filled all of the correct details, click on the Start the Install button.
Step 5 Create an Administrators Account
Thsi is an important step as this user will have full privileges to your website. You need to use it for the actual development so make sure that you keep a note of the details you enter here and especially the email and password. Note that you can change your Administrators Account credentials later via the Admin Dashboard of your website.
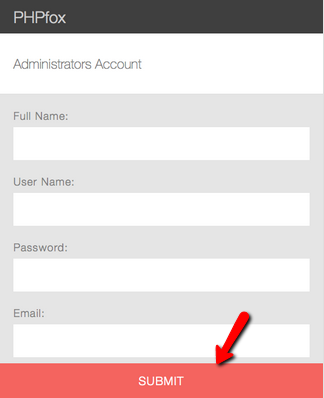
Clicking the Submit button will mark the end of the installation process. Congratulations!

PHPFox Neutron
- Free Installation
- 24/7 PHPFox Neutron Support
- Free Domain Transfer
- Hack-free Protection
- Fast SSD Storage
- Free Cloudflare CDN
- Immediate Activation