How to manually install Oxwall
Updated on Dec 10, 2015
If your host does not provide Oxwall auto-installer you can still install Oxwall by downloading the Oxwall installation package from the Oxwall official website.
Start an Oxwall Social Network in just 3 minutes:
To help you get started with Oxwall our Technical Support team provides Free Oxwall Installation.
- Free Oxwall Installation by our Support Team
- Free Domain Name for Life
- Optimized SSD Oxwall Hosting
- Fast and Secure Servers
To complete the Oxwall Installation, please follow these steps:
Step 1Download Oxwall
By the time of this tutorial the latest stable Oxwall version is 1.7.1. We highly recommend to always install the latest version of Oxwall for optimal performance. To download the Oxwall installation package click on the download link.
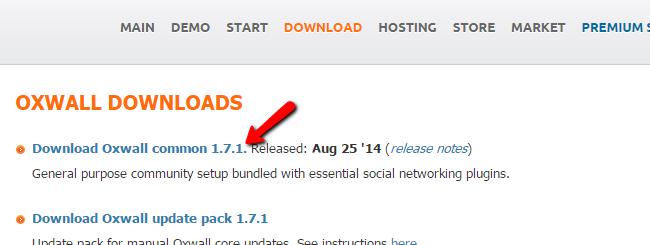
The download process will begin in just a few seconds. When you have the installation package downloaded on your local computer unzip the archive and open the folder. You should see a number of files and folders.
Step 2Upload Oxwall Installation Files
In order to begin the installation process on your hosting account you will need to upload the content of the installation archive under a directory accessible via your browser. If you have a cPanel-based hosting account this is the
public_html folder.
If you would like to have your Oxwall directly accessible via your hosting account main domain name, please upload the Oxwall installation files directly under the public_html directory. In case you would like to have the application accessible via a subdirectory, create the desired folder on your account first and upload your files.
You can upload files and folders of your hosting account using your favorite FTP client. For more information on how to manage your files via FTP, please review our FTP tutorial.
Step 3 Start Oxwall Installation
When the upload process is complete, access your Oxwall directory via your browser. You will be directed to the Oxwall installation page.
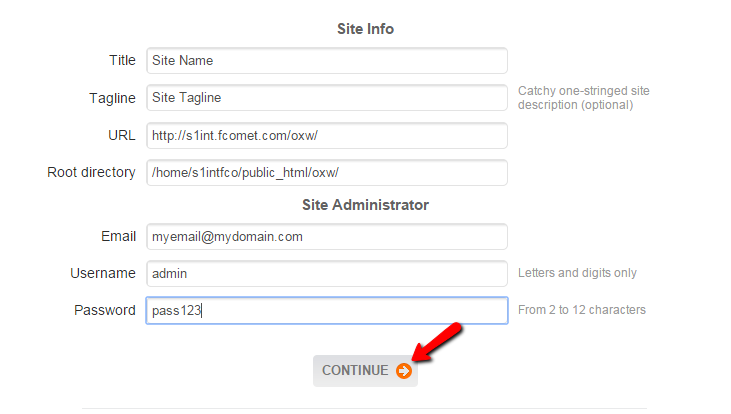
On this page you should input your Oxwall preferences as well as your Oxwall admin account username, password and email address. When you are satisfied with your settings, please click on the Continue button.
Step 4Configure Oxwall Database
Next, you should configure your Oxwall database, username and password as well as your MariaDB Hostname.
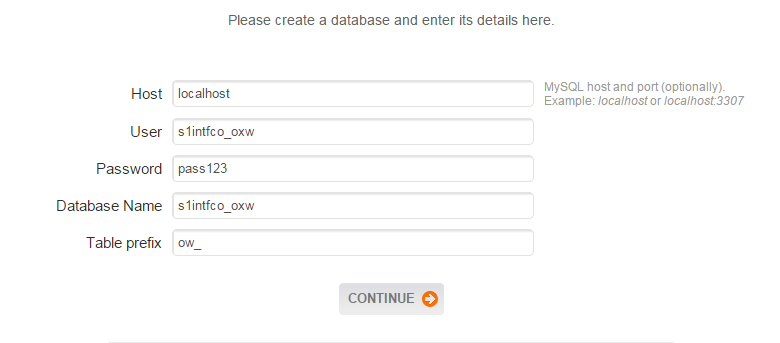
Create MariaDB Database
For more information on how to create a MariaDB database and username, please check our cPanel tutorial on How to create MariaDB Database.
Step 5 Setup Oxwall Cronjob
When you are ready, click on the Continue button to proceed. The next step will require to create a cron job for your Oxwall website.

You can create such via your cPanel → Cronjobs using the following command:
wget -q -O /dev/null http://www.yoursite.com/ow_cron/run.php
Remember to change 'yoursite.com' with your actual domain name. If you experience any difficulties to setup your Oxwall cron, you may skip this step for now and read our tutorial on how to setup Oxwall cron after the installation.
Step 6 Install Oxwall plugins
When you are ready with the cronjob setup click on the Continue button to install your Oxwall Plugins.
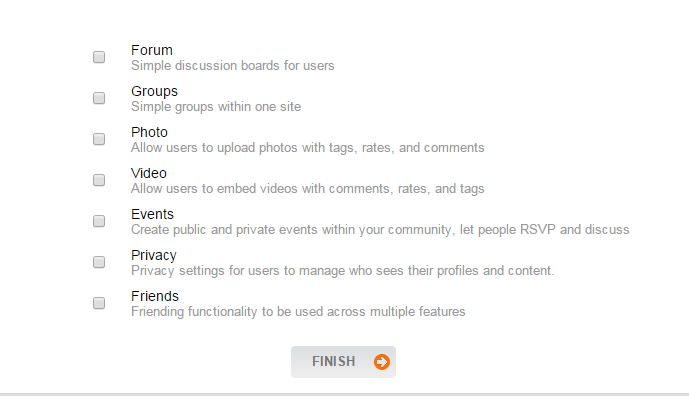
Select the desired plugins and click on the Finish button to complete the installation process.

Congratulations! Your Oxwall has been successfully installed. You can access your Oxwall admin panel now via the Oxwall Admin area link.

Oxwall Hosting
- Free Oxwall Installation
- 24/7 Oxwall Support
- Free Domain Transfer
- Hack-free Protection
- Fast SSD Storage
- Free Cloudflare CDN
- Free Oxwall Transfer
- Immediate Activation