How to Install vBulletin
Updated on Jan 6, 2016
This tutorial will review the process of installing vBulletin. The process is not complicated and we will review each and every step of it, so you can get a full understanding on how to complete it.
To install vBulletin, you need to complete the following steps:
Step 1 Download vBulletin
The first step is to download vBulletin. As the script is paid, you will have to purchase a valid license for it first. You can register and purchase it via the official vBulletin website.

Step 2 Create a new Database and Prepare the Files
To use vBulletin, you will have to create a new database, which will be used for your website. You can easily complete that with the use of your cPanel account.
MariaDB Configuration
You can create a new database and a user assigned to it via cPanel. Simply follow our Database Wizard tutorial for information on that.
Extract the contents of the vBulletin archive on your local computer. When you complete that, you will notice a folder called "upload". It contains all of the files that you need for a clean installation of vBulletin. Before you upload the files to your account on the server, you will have to edit the two main configuration files of vBulletin.
Configuration files
In vBulletin, there are two configuration files and you can read more information on the options they provide by reading our tutorial on how to locate and edit the vBulletin configuration files.
For the purpose of the script installation, there are three changes that you need to complete first:
- Locate the config.php.bkp file within the upload/ directory and rename it to config.php only.
- Locate the config.php.new file within the upload/core/includes/ directory and rename it to config.php only.
- Edit the upload/core/includes/config.php file and enter your database details, created in the previous step of this tutorial. You only need to edit the dbname, username and password fields for a clean installation of the script.
Once you complete the changes that we have described above, it is time to upload the vBulletin files to the server.
Upload Files
There are two ways of uploading your files to the server - using an FTP client, following our FTP tutorial, or uploading directly through your cPanel account > File Manager, following our cPanel tutorial.
The important thing here is to make sure that you upload the contents of your vBulletin website to the directory, where you would like to install it. There are three options for that and to review them with an example, we are assuming that your domain name is example.com. The options for the new vBulletin installation are:
- Root installation: For this option, you will be accessing the new forum directly via example.com. To achieve that, you need to upload the contents of the vBulletin script directly to the public_html/ directory of your account
- Subfolder installation: For this option, let us say that you wish to install the script in a folder called "forum", which will make the link to your website example.com/forum/. To achieve that, you need to create the "forum" subfolder within the public_html/ directory of your account and upload vBulletin in it
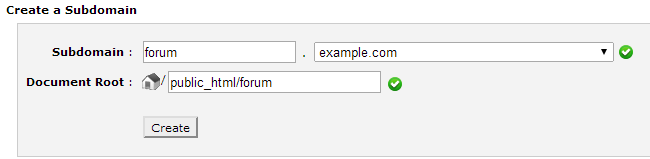
- Subdomain installation: For this option, let us say that you wish to install the script on a subdomain, such as forum.example.com. To achieve that, you can simply create the subdomain via your cPanel account > Domains > Subdomain. During that process, you will be able to state the root document, which will create the folder on the server. In our case, we have created the "forum" subdomain folder within the public_html/ directory
Step 3 Configure the Install
To initiate the installation of vBulletin, you need to access your domain and then core/install/install.php. For example, in our case, we are using example.com and uploaded vBulletin within the public_html/ directory. Thus, to initiate the installation script, we need to access example.com/core/install/install.php.
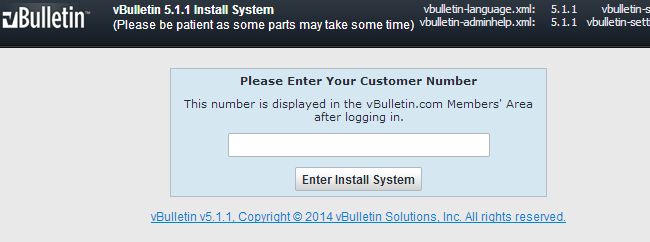
The initial installation screen will request your vBulletin customer number. This information can be seen by accessing your Members Area at the official vBulletin website.
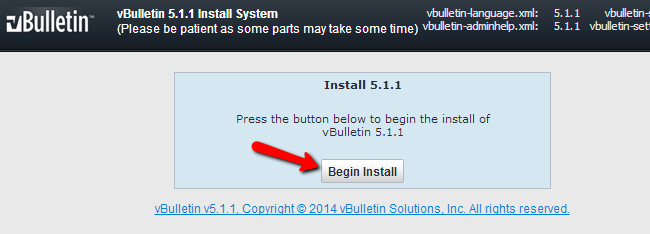
The next screen will inform you about the vBulletin version you are about to install. To proceed further iwth that, simply click on the Begin Install button.
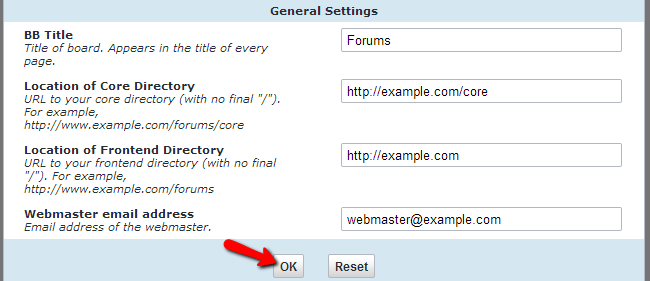
The installation will start performing automatically. Sometimes, pop-up messages will stop the process to request more information about the setup of your website. The first such stop is the General Settings option, which will request more information about the title of your website, location, email address, etc. The system will pre-define those for you so you can leave the default values.
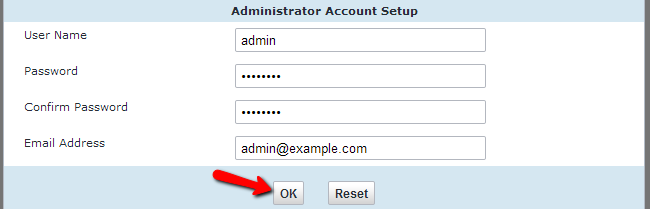
The next such stop is the Administrator Account Setup. This will request information about the administrative user on your website and it is important as this user will allow you full access to your new website for management. Set the details that you wish to use and click on OK to proceed.
Once you enter those details, there is no more information to be entered during the installation. Simply allow the process to complete fully.
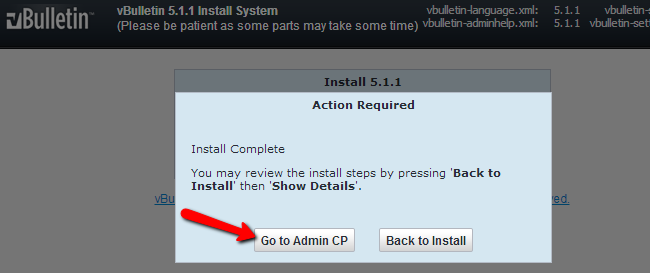
The installation of vBulletin is now successfully completed. A message will be displayed on the screen and inform you about the successfully completed process. You will have the options to review the report of the installation or to access the admin area of your website directly. Click on Go to Admin CP

vBulletin Hosting
- Free Installation
- 24/7 vBulletin Support
- Free Domain Transfer
- Hack-free Protection
- Fast SSD Storage
- Free Cloudflare CDN
- Free vBulletin Transfer
- Immediate Activation