How to Restore a Full Backup of vBulletin
Updated on Jan 7, 2016
Sometimes, if something goes wrong with our website, we need to restore a working backup copy. This will resolve the issue and get your website back into a working state.
To restore a backup of your vBulletin website, you need to follow three steps. They are not too complicated and once you complete the process once, you will not have any issues performing it again.
To restore a backup of your vBulletin website, you will have to:
Step 1 Restore the Files
The first step is to restore the files of your vBulletin backup. You can achieve that using your favourite FTP client or directly via the File Manager service within your cPanel account.
The important thing here is to make sure that you restore the backup of your vBulletin files directly within the folder, where you wish to make your website operational. This is usually the public_html/ directory of your account, but if you are restoring your backup on a subdomain or a subfolder, you need to choose the location carefully.
Step 2 Restore the Database
The second step is to restore the backup of your vBulletin database. For that purpose, you will need a clean database created on your account and a user assigned to it with full privileges.
MariaDB Configuration
You can create a new database and a user assigned to it via cPanel. Simply follow our Database Wizard tutorial for information on that.
When the new database is created, you can proceed with the restore of your backup. You need to access your cPanel account, locate the Databases section and then click on the phpMyAdmin service.

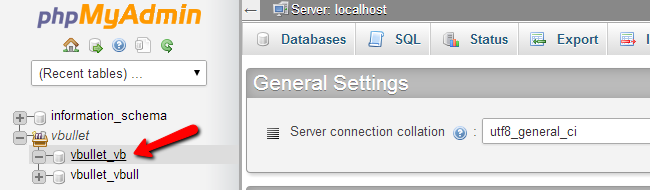
You will notice a list with all the databases on your account. This list will be placed on the left side of the screen. Simply select the new database that you created above.
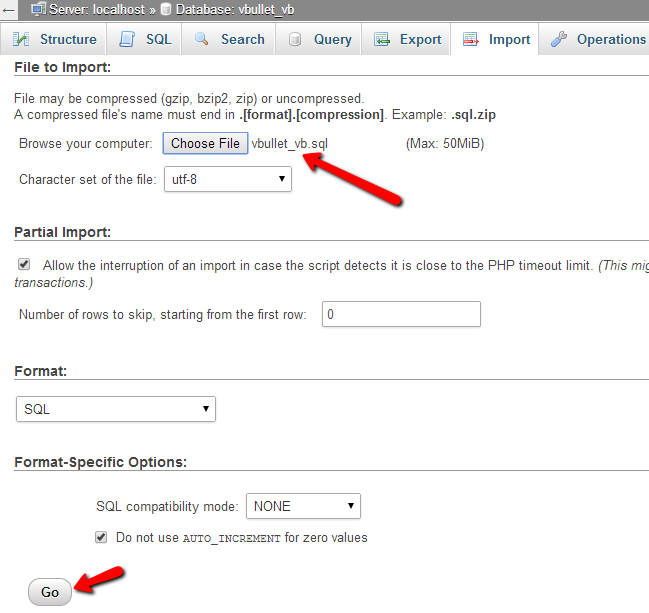
As the database is now empty, you will not be able to see any tables listed on the next page. What you need to do in order to change that is to click on the Import button at the top-menu.

Click on the Choose File button and select the dump backup copy of your vBulletin database from your local computer. Then simply hit Go to start the import.
Step 3 Link the Files and Database
When you complete both of the steps above, you will have a location on your account, which contains all of the files of your vBulletin backup. You will also have a brand new database, which contains all of the data from your vBulletin database backup. However, in order for your website to be fully restored and to start working again, you will have to link them both together.
For that purpose, you need to edit the configuration file of your vBulletin installation and apply the required changes.
Configuration file
If you are not aware how to locate or edit the vBulletin configuration files, you can check that information by reviewing our tutorial on the matter.
When the configuration file of your vBulletin installation is edited properly and you have entered the details of your new database, you can proceed further and access your already restored website. The whole process is now over and it should load vBulletin at the exact stage, as when you created the backup.

vBulletin Hosting
- Free Installation
- 24/7 vBulletin Support
- Free Domain Transfer
- Hack-free Protection
- Fast SSD Storage
- Free Cloudflare CDN
- Free vBulletin Transfer
- Immediate Activation