How to Manage the Customer Accounts
Updated on Mar 13, 2019
In order to manage your customers base you will need to know how to fully manage their accounts. SugarCRM CE is conveniently structured in 3 major modules and in the next few lines of this tutorial we will review the Accounts of the Sales module.
In this tutorial, you will learn how to:
Step 1 Access the Accounts page
In order to fully manage the accounts on your website you will need to first access the dedicated page for all of those. Once you login that page is located under Sales > Accounts.
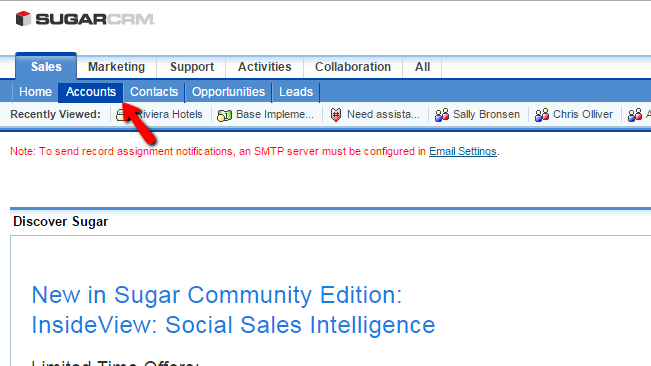
Once you click on that link you will be redirected to a page where you will be presented with a table view with all of the customers you have created accounts for already.
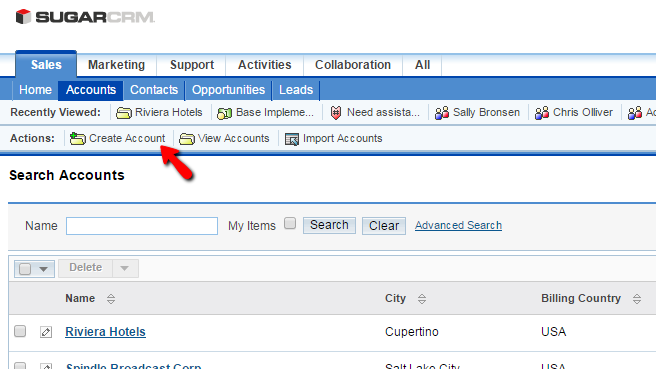
Step 2 Create a new Account
In order to create a new customer's account you will need to simply click on the Create Account button from the top action bar.
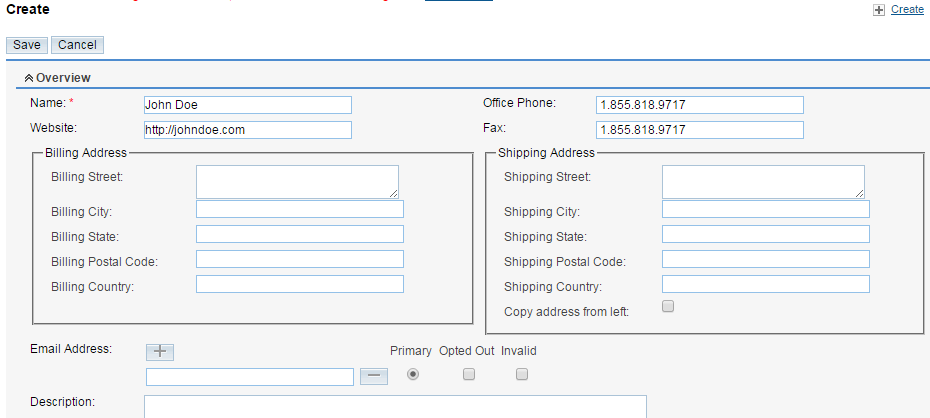
This link will redirect you to a page where you will be able to see few sections of settings you will need to configure. Let's begin with the Overview section. There you will be able to configure the following options:
- Name - The name of the customer
- Website - The website of the customer
- Office Phone - The office phone of the customer
- Fax - The FAX number of the customer
- Billing Address - The Billing Address of the customer
- Shipping Address - The shipping address of the customer.
- Email Address - The email address of the customer. You can add multiple email addresses per customer
- Description - The description for this customer
Once you are done with this section of settings you can proceed to the next one which is called More Information and indeed there you will be able to configure some additional information for your customer like:
- Type - The type of the customer
- Industry - The type of customer
- Annual Revenue - The Annual revenue from this client
- Employees - If there are any employees associated with that customer
- SIC Code - The Standard Industrial Classification code of that customer
- Member of - If the client is a member of another account
- Ownership - The ownership of that account
- Campaign - If the account was retrieved by some campaign
- Rating - If you would like to add some rating for the account

The last section is called "Other" and it has a single field called "Assigned to". There you will be able to configure if this account should be assigned to a representative of your company.
Step 3 Edit and Delete Customer Accounts
The editing of accounts created for your customers in the SugarCRM CE application is relatively simple. Once you access the Accounts page of your CRM you will be able to search all the accounts using the search module at the top of the page.
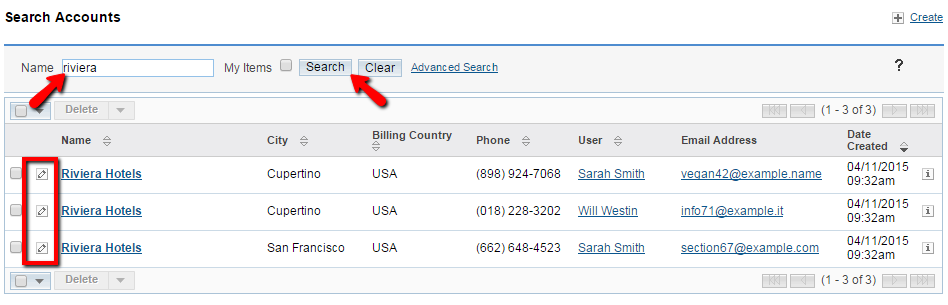
Once this has been done and you have found the contact you need to edit, you should click on the small pencil-like button before the name of the contact so you can be presented with the editing page for this contact. The editing page is nothing more than the accounts creation page, however with most of the options already configured. Once you are done with the editing please press the Save button so you can be able to save the information.
Last but not least we will review the deleting action which is quite simple. Once you find the contact you would like to delete you will need to select it and then simply use the Delete button located at the top of the accounts table view.
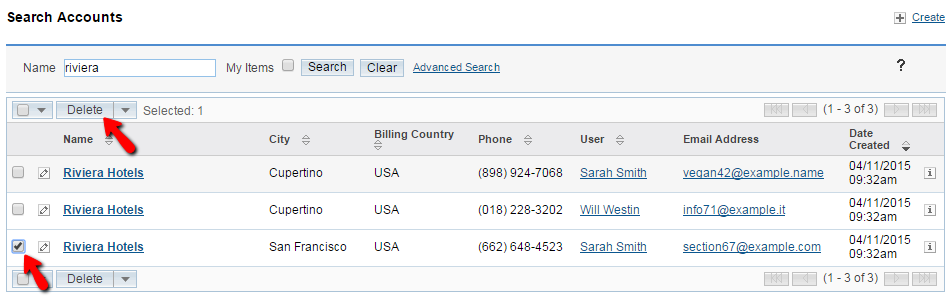
Next you will need to simply confirm the deletion and the account will be properly deleted.
Congratulations! You now know how to fully manage the Custommers' Accounts on your SugarCRM CE installation!

SugarCRM CE Hosting
- Free SugarCRM CE Installation
- 24/7 SugarCRM CE Support
- Free Domain Transfer
- Hack-free Protection
- Fast SSD Storage
- Free Ghost Transfer
- Free Cloudflare CDN
- Immediate Activation