How to Transfer WordPress.com to WordPress.org
Updated on Feb 3, 2020
WordPress.com is one of the most popular website building platforms, and thus many beginners start off with it. WordPress.org is an open source software, which offers the user full control over their website. This freedom for customization is exactly why people move from WordPress.com to WordPress.org. The whole process is pretty much straightforward, especially if you follow the correct steps when doing it. In case you currently found out about all the benefits and still haven't made the move, this post will help you with your migration to the self-hosted version of WordPress.
At FastComet, we offer our clients free WordPress migrations, performed by technical support experts, but we do not perform the transfers for sites from different platforms, such as WordPress.com. That is mainly because those types of migrations require additional settings and, ultimately, some form of development work. Nevertheless, we have resources with thorough instructions on how to proceed on your own.
Here is what we will cover:
WordPress.com vs. WordPress.org
The differences between the two versions of WordPress are often confusing for beginners. Some users are not even aware that there is an actual difference. Frankly, WordPress.com is not a bad entry point for bloggers, but everyone wants to evolve. That's where the self-hosted version of WordPress (WordPress.org) steps in. With it, you will have a much higher level of control over your website.
WordPress.org is a fully-featured web content management system. In addition to giving you full control over your site, the .org version of WordPress lets you customize the way your site looks, which is essential when it comes to user experience (UX). You can also add and manage third-party tools. And if you are still wondering what exactly are the differences between WordPress.com and WordPress.org, you can read more about them in our article.
Purchase The Right Web Hosting
When you decide to move from WordPress.com to self-hosted WordPress, the first thing you should do is choose the right web host. Until now, WordPress.com was your host. With WordPress CMS, as "self-hosted" implies, you will need to sign up with a web hosting provider and have your own web hosting. Keep in mind that you will also have to install and manage WordPress and your website on your own.
Hosting is the service that powers your website, providing the storage for its files and allowing visitors from across the globe to access the public-facing pages. Getting the right host is crucial because picking a bad host will most likely result in a slow website with poor security, or even worse, one that doesn't load at all.
Ideally, you'll want to start off on a budget – probably with a shared hosting plan that can be easily upgraded to the next tier once your website grows.
Register a New Domain Name or Transfer your Existing One
In addition to hosting, you will also need a domain name for your self-hosted WordPress site. A domain name is the web address people use in order to visit your website. As in the first scenario, if you have used the free website at WordPress.com, your domain was probably something like example.wordpress.com. In that case, you will have to register a new domain name. Before you do that, consider checking our tips on how to choose the best possible domain name—such that fits your online business or project.
You can use the FastComet Domain Portal and find out if your desired domain name is available. Snatch it before someone else does.
The second scenario is when you already have a registered custom domain that is mapped to your WordPress.com website. This means that the domain name is registered with another provider that is not WordPress.com. If you prefer to keep your domain name where it is, you can simply point its nameservers to FastComet. To do that, you need to edit your DNS information at WordPress.com.
There's a third scenario - you can decide to transfer your already existing domain name to where your new website will live. This way, you will be able to manage both your domain name and hosting from one place. Here at FastComet, we offer a Free Domain Name Transfer as a bonus to our services. We will also renew your domain for one year, free of charge.
Install WordPress
Following your purchase of a hosting plan and doing everything you needed regarding your domain name, the next step is to install WordPress. When using cPanel, you get to use Softaculous and its one-click WordPress installer. After you have completed the installation process, log into your WordPress site by adding /wp-admin to your URL. It will look something like http://example.com/wp-admin, with the login screen looking like:

Export your Content from WordPress.com
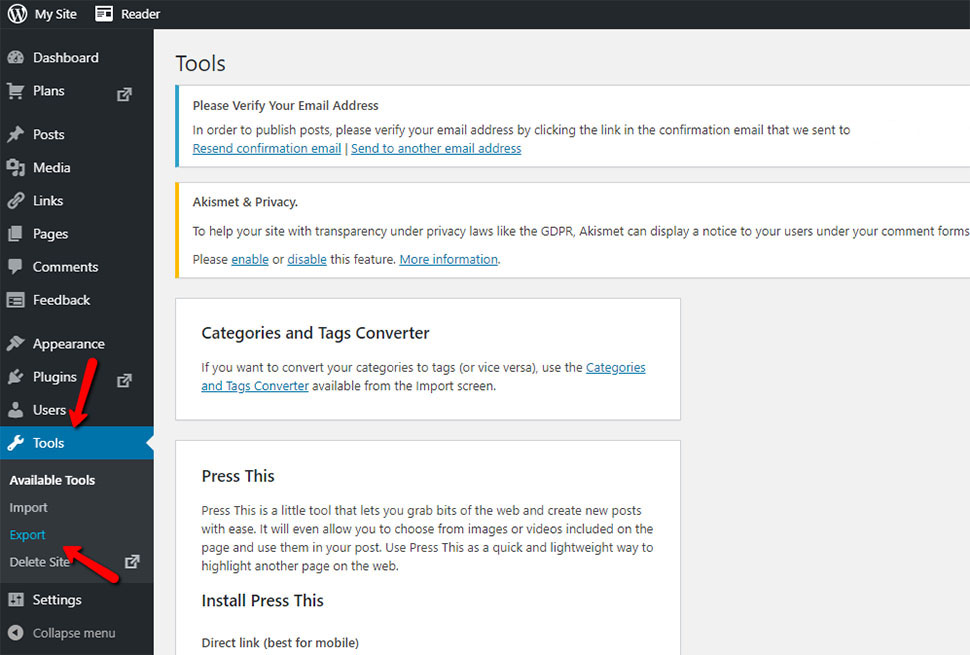
To export your WordPress.com content, you will need to start by logging in. You do that by adding /wp-admin to your WordPress.com site's URL (www.example.com/wp-admin).
Now that you are inside your WordPress.com Dashboard, here is what you do:
- Go to Tools → Export:
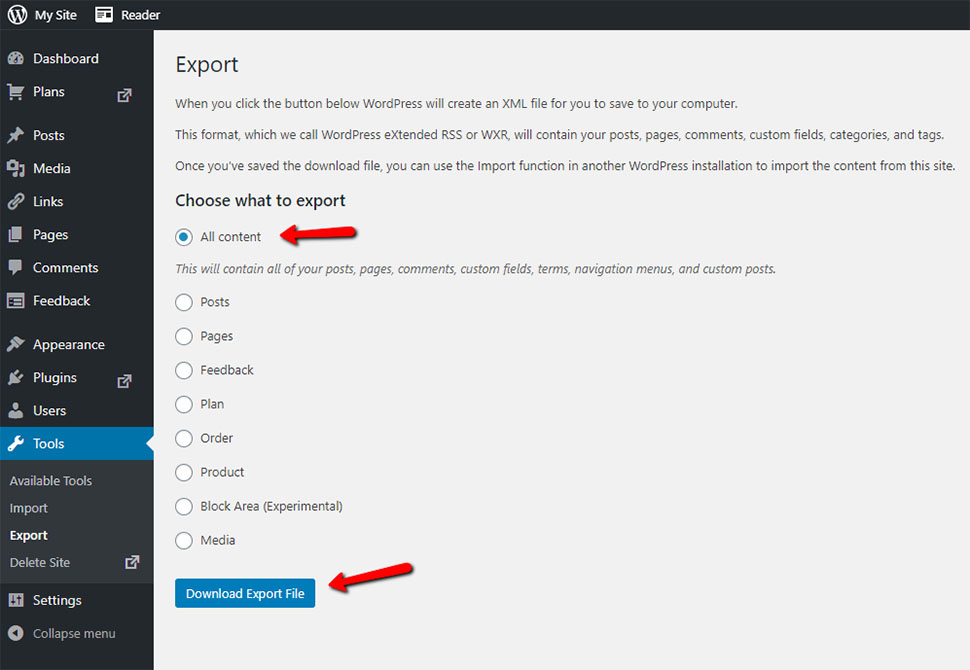
- If you are using a paid service, you will get two options - guided transfer and free transfer. If you are using a free version, this step will be skipped.
- Next, you will get to choose exactly what to export. Your choice should be All Content followed by clicking on Download Export File:
Import your Content into Self-hosted WordPress
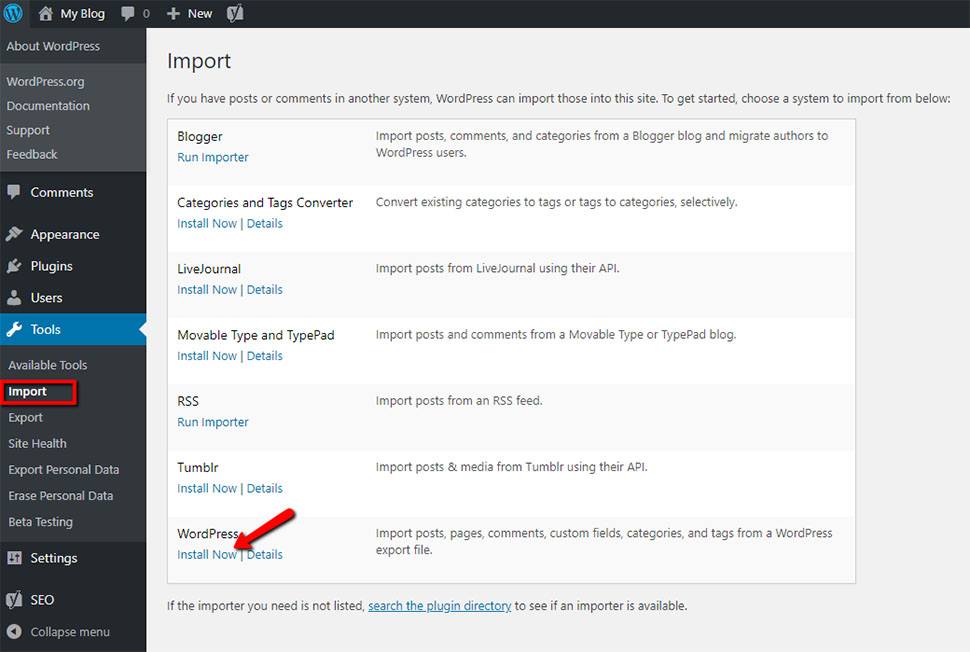
You already have your WordPress.com content exported. Now you need to import it to your new self-hosted WordPress site. Here are the steps to do that:
- In your Dashboard, go to Tools → Import, and then click on Install Now (the link right below WordPress):
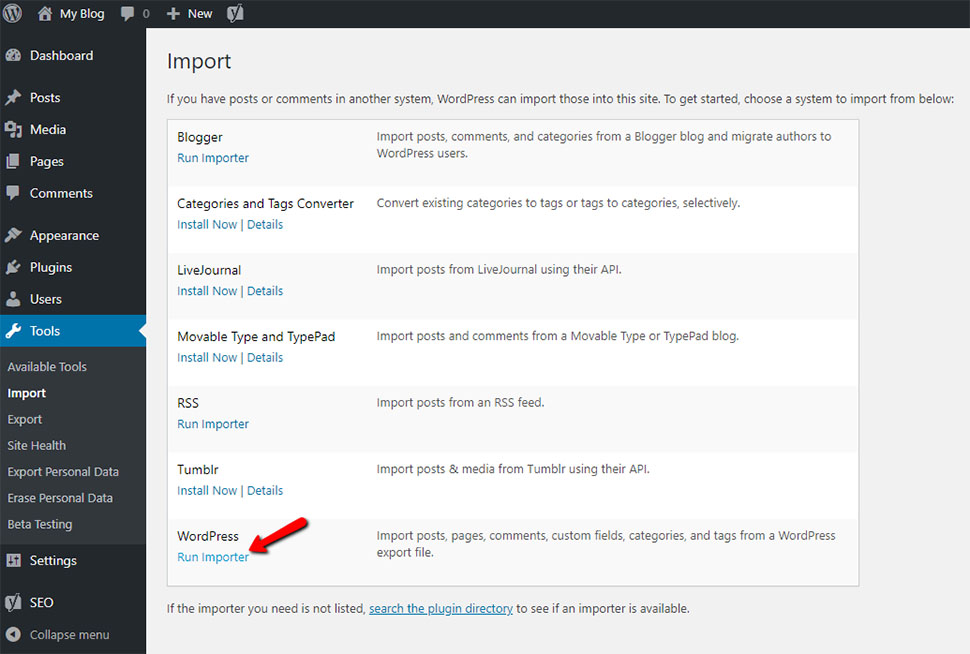
- Once the installation of the plugin is completed, click on Run Importer:
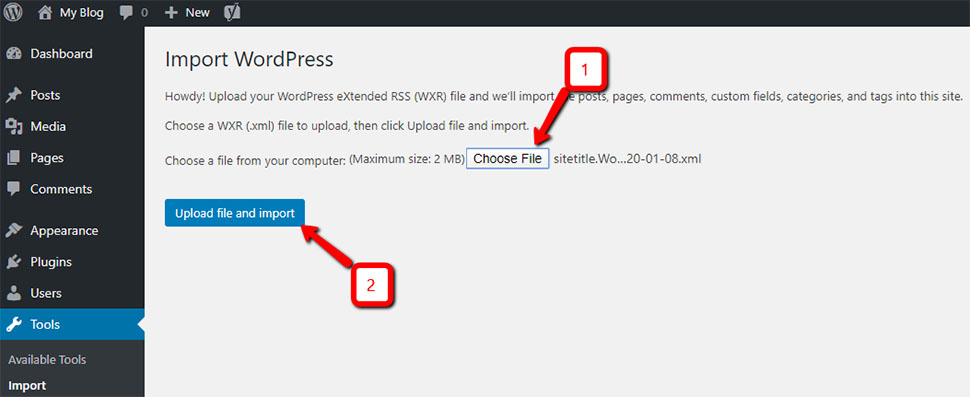
- You will get to the point where you have to upload the WordPress.com XML file which you downloaded previously:
Note:
If your file size is larger than the upload limit shown when importing, then you have two options: You can either request your web hosting company to increase your upload limit temporarily or split your file by using a WXR file splitter.
Luckily, with FastComet, you can extend your WordPress memory limit by yourself.
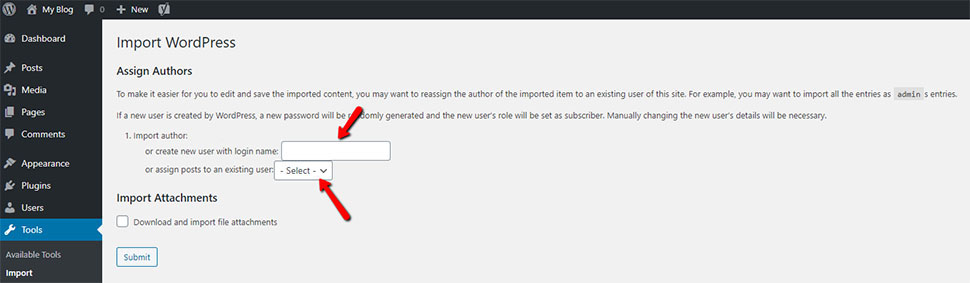
Once you start importing, you get the option to assign imported content to one of the current users or to create a new user:
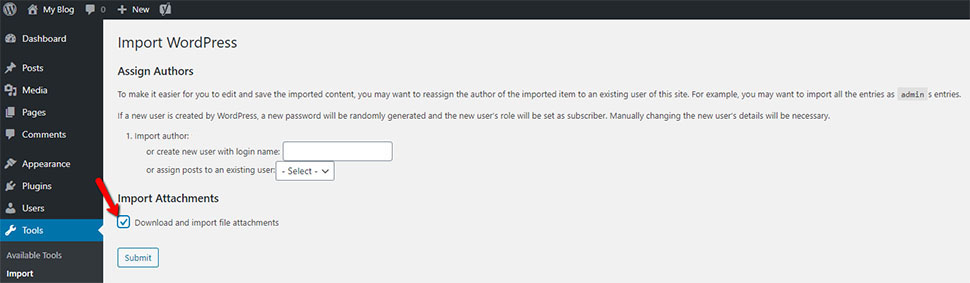
Additionally, you can import old attachments:
Install your WordPress Theme
While it is possible to move your content (posts and pages) and retain a bunch of other functionality offered by plugins - it is not possible to automatically migrate your theme, custom fonts, or plugins you have used with WordPress.com.
Even with countless possibilities, you may want to be consistent in the eyes of your visitors and use the theme that you have been using with WordPress.com, making your site appear as close as possible to its previous look. To accomplish your goal, you should look for the same theme, make the same configurations, and add the needed widgets and plugins. So, you were either using a free theme or a premium one that you purchased separately.
First Scenario: Free Theme
If you are using one of the free WordPress.com themes, there is a high chance that you will be able to find the same theme for your self-hosted WordPress. In case you are not completely sure about the name of your theme, you can find it by just going to your WordPress.com Dashboard and click on Themes. There you will see the name of your Current Theme.
Check if your theme is available by typing its name into the WordPress.org repository. If it's there, just install it and activate it. If you cannot find the theme, try looking for one that is similar to yours. After installing your theme, go on with performing the needed customizations, adding widgets, and plugins.
Second Scenario: Premium Theme
If you've been using a premium theme on WordPress.com, the process of getting it for your self-hosted WordPress is slightly more complicated than with the free one. Since themes on WordPress.com have special requirements, you will not be able to simply transfer a premium theme. In this case, you have to find the self-hosted version of the specific premium theme and re-purchase it for use.
The easiest way to find a premium theme is to search for it in the WordPress repository. If you don't find it there, head on to Google and search for the theme's name, while also adding WordPress in the search bar. This way, you will find the theme's developer website and purchase it from there. If you cannot find your premium theme, it's most likely available only for WordPress.com.
Note: Before you buy the same theme a second time, try contacting the theme's developer and let them know you've already purchased the theme once. You might get a discount. Also, for both methods of installing a WordPress theme—we have a tutorial on WordPress Themes Installation. Again, make the needed customizations, as well as plugin and widget installations afterward.
Set your WordPress.com to Private
In case you have been using a custom URL at WordPress.com and you have decided to keep using it for your WordPress.org site, what you have to do is make your old WordPress site private.
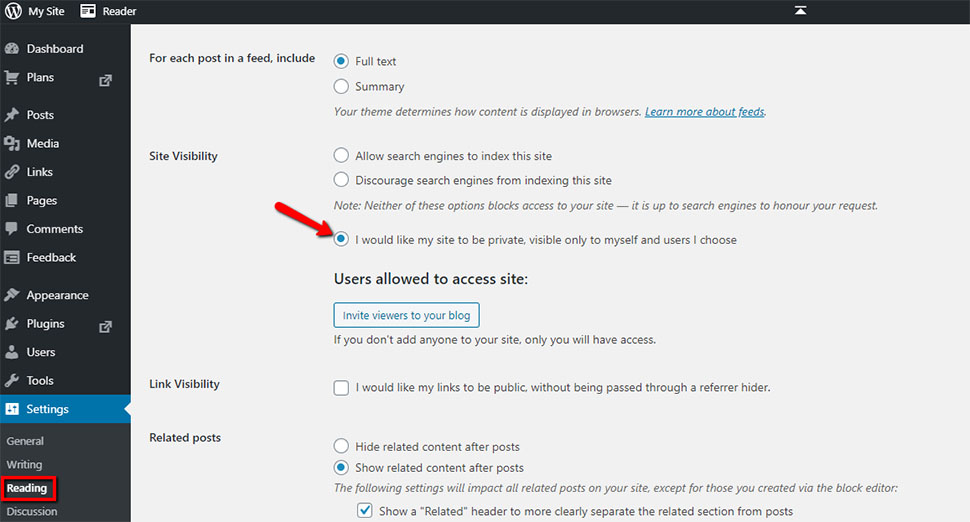
Go to your WordPress.com dashboard and then go to Settings → Reading. Under the Site Visibility section, select the last option, "I would like my blog to be private, visible only to users I choose."
If your WordPress.com site has been in existence for some time, then there's a high chance that it has been indexed by the search engines (Google, Bing, Yandex, etc.). This makes it a good idea for you to redirect your old users to the new site, in addition to keeping your SEO rankings. You can easily do that via your WordPress.com dashboard, However, bear in mind that this is a paid feature for which they will charge you $13 per year.
Make Sure All Your Images Are There
When migrating a site from WordPress.com, the image transfer is where most errors occur. So, if you have lots of images on your site, chances are some may not transfer properly to your self hosted WordPress CMS. While this does not happen all the time, we need to cover the possibility and help you with the matter.
If you don't find your images as you should, you can use a plugin called Auto Upload Images. This plugin is free, and here is how you use it:
Once you have installed and activated the plugin:
- Go to Posts in your WordPress Dashboard;
- Choose all checkboxes, followed by choosing Edit from the drop-down;
- Click on Apply. Doing this opens a new interface;
- Click on Update in the bottom-right corner.
Redirect Visitors and Preserve SEO Score
One of the most basic methods of redirecting our old pages is by adding a 301 redirect. This is usually done by editing your .htaccess file. But with WordPress.com, you do not have access to edit the .htaccess file, therefore you cannot make any changes on your own if you want to keep your search engine rankings. However, WordPress.com offers a paid solution (Site Redirect) that offers the functionality you need.
What you need to do is:
- Go to your WordPress.com site dashboard and click on the Settings menu item. Under the Site Address option, click on the redirect link:
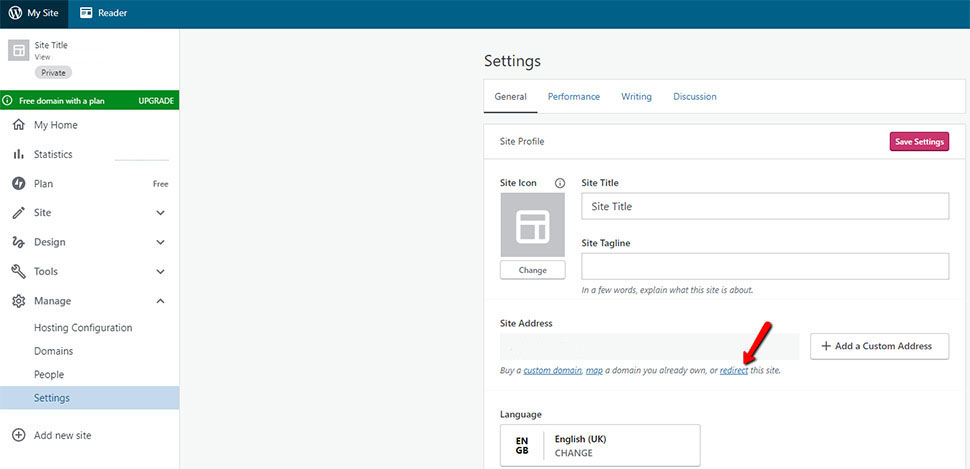
- The following screen will ask you to input the domain name (the WordPress.org site) where you want to redirect your visitors from now on:
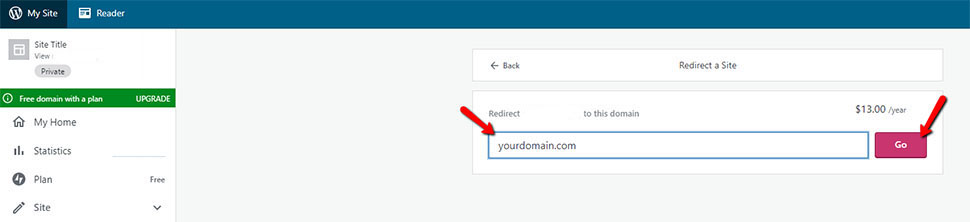
As we already mentioned and as you can see from the screenshot, Site Redirect is a paid upgrade. It's necessary if you want to add a 301 redirect, which redirects your WordPress.com visitors and search engines to your new site.
If you are wondering for how long you should pay for the feature, the answer is: For as long as you see fit. However, two years should be more than plenty for your visitors to memorize your new domain name.
When changing domains, you also have to update all your in-post URLs. If you've ever inter-linked posts, the links also need an update.
Note:
If you had a custom domain with WordPress.com, you wouldn't have to worry about redirecting. All you need to do in that case is change the DNS records. This way, you will keep your SEO benefits without spending additional money.
Additional Functionalities and Extras
On top of customization freedom, with the self-hosted version of WordPress also come some additional functionalities and extras.
Set Permalinks
To ensure a seamless transition, you’ll want to make sure that your new self-hosted WordPress.org installation uses the same permalink structure as your WordPress.com website. WordPress Permalinks are the URLs of your pages and posts. A permalink is what would be used to link to your article (or section), or what you may send as a link to your story in an email message. The URL to each post should be permanent — hence the name permalink.
When setting WordPress permalinks, you are creating the basic URL template that your site's content is going to follow.
Use the Free Jetpack Plugin
It's entirely possible that you have grown accustomed to some WordPress.com features. Generally, Installing the Jetpack plugin brings over such features into your new self-hosted WordPress.
Some of those features are:
- Traffic stats;
- Protection from brute force attacks;
- Faster loading times;
If you do decide to stick with Jetpack, all you have to do is go to your Dashboard → Plugins → Add New. Find Jetpack, install it, and activate it.
Note:
Jetpack is developed by Automattic – the company behind WordPress.com. This way, it can seamlessly add many WordPress.com features to your new WordPress.org website. Screenshot of the Connect to WordPress.com button.
Install SSL
When you have and SSL-encrypted website, you will avoid having browser "not secure" warnings, while also improving your site's trust and search engine ranking. You will stay protected against phishing, assisted by security experts. We will install your SSL certificate, fix redirect errors and even renew your certificate before - free of charge. Issuing an SSL Certificate with cPanel via Let's Encrypt is a quick and straightforward process.
With WordPress, you can use a plugin called Really Simple SSL, which automatically detects your settings and configures your website to run over https. Keep in mind that you will need an SSL-certificate already installed on your site. The plugin setup is very easy, and we even have a tutorial on How to Enable SSL in WordPress.
Final Thoughts and Summary
Migrating your site from WordPress.com to WordPress.org may take some of your time, but in general, it's a pretty straightforward process. The time you spend will be worth every second, especially when you see how many more possibilities have opened for control over your WordPress site. You will be able to customize and monetize it in your own way.
Just remember the key steps:
- Make sure that you have chosen a great WordPress managed web host like FastComet;
- Export your content;
- Install the WordPress importer plugin on your new website and then use it to upload the previously exported file;
- Set your WordPress.com to private;
- Use redirect if you are changing your domain name, and you want to preserve your search engine rankings;
Now that you have completed the transfer of your WordPress.com site to WordPress.org, the next thing you want to do is follow WordPress best practices to keep your site secure and further grow your audience on the self-hosted WordPress platform. If you need help in regards to the CMS, feel free to check our thorough WordPress tutorial.
We hope you find this article useful. Discover more about FastCloud - the top-rated Hosting Solutions for personal and small business websites in four consecutive years by the HostAdvice Community!
Related articles

WordPress Hosting
- Free WordPress Installation
- 24/7 WordPress Support
- Free Domain Transfer
- Hack-free Protection
- Fast SSD Storage
- Free WordPress Transfer
- Free CloudFlare CDN
- Immediate Activation