How to Add Featured Posts in WordPress Sidebar
Updated on May 18, 2023
Displaying your top content in the sidebar as featured posts can help drive more traffic to your pillar articles. This article will demonstrate how to easily display featured posts in the WordPress sidebar using various methods.
This post includes:
- Why you Should Add Featured Posts in the WordPress Sideba
- Featuring Posts in WordPress Sidebar
- How to Add Featured Posts in WordPress Using Gutenberg
- How to Display Featured Posts via Plugins
- Conclusion
Why you Should Add Featured Posts in the WordPress Sidebar
Sidebars represent your website's non-content area. Most users use this area by including an email newsletter form, social media buttons, banner ads, and so on.
Another way to use the sidebar is to display your most popular articles as featured posts. That increases traffic to those articles, and your users can discover your best content without having to search for it.
Featuring Posts in WordPress Sidebar
There are two ways to do this without using the Gutenberg block editor. One is via a widget, and the other is via a menu. Both methods are relatively simple and do not require installing any plugins on your website. Your theme must support widgets, menus, or both, for these methods to work.
Using a Widget
After you have logged in to your website's administrative dashboard, please follow these steps:
- Go to Appearance → Widgets and add a Paragraph widget to your WordPress sidebar.
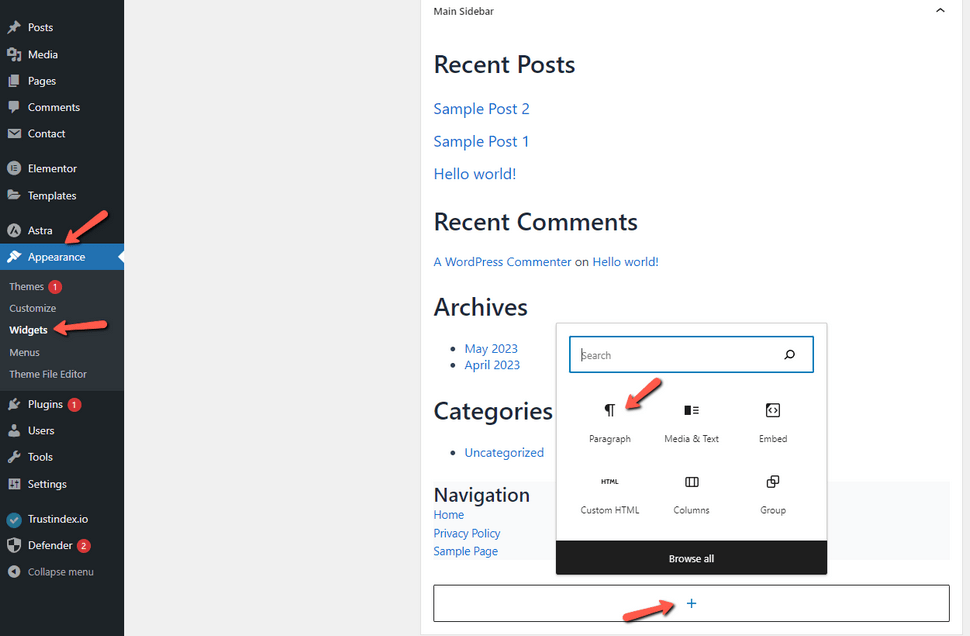
- Depending on your theme, this widget should include a visual editor with formatting buttons. Enter the titles of the posts you want to highlight and format them to your preference. Then, choose the post title and click the link button to add a link to the blog post.
- When you're finished, remember to click the Save or Update button (depending on your theme) to save your changes.
You should now be able to see your featured posts in action by visiting your website.
It is important to note that how the featured posts appear when adding them this way depends on the theme your website is using and the widget formatting itself.
Using a Menu
This method is more indirect but allows you to manage your featured posts more effectively. Rather than putting the featured post list in a Text widget, we'll make a navigation menu and place it in the sidebar. The benefit of this method is that you can easily add new posts without editing the widget and reorganize the list using a drag-and-drop interface.
- First, you need to visit Appearance → Menus and click on the 'create a new menu' link.
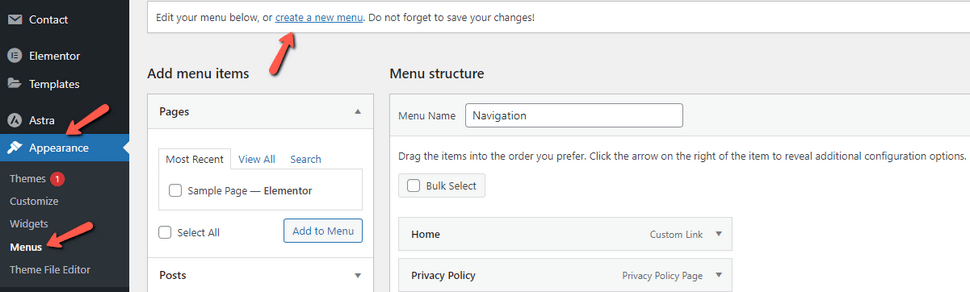
- Next, give your menu a name to help you identify it whenever you need to add it somewhere. Then, to proceed, click the 'Create Menu' button. WordPress will now generate a new empty menu for you.
- Now, click the 'Posts' tab in the left column to expand it. From here, you must choose which posts to highlight. You can find them in Recent, All, or by using the search function to find and select them.
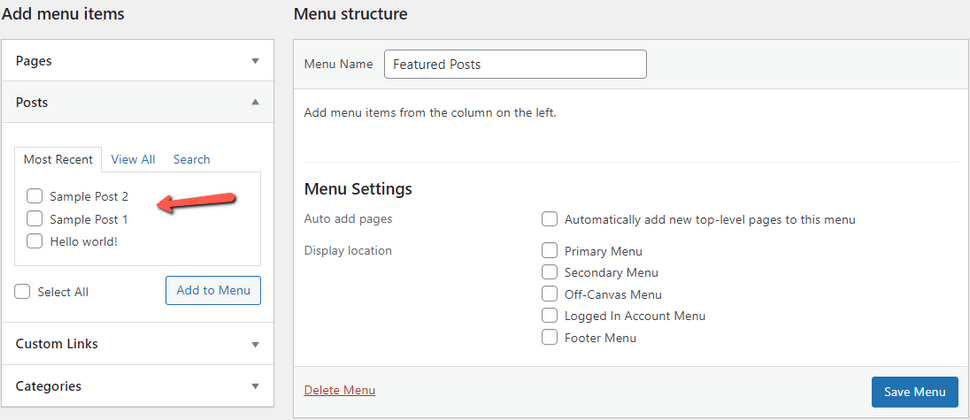
- After you've chosen the posts you want to include, click the 'Add to Menu' button. Your posts will now appear in the right column, and you can change the title of each one by clicking on it. You can also reorder them by dragging them up and down.
- When finished, click the 'Save Menu' button to save your changes.
Your menu is now complete and ready for use. All that is left is to include the menu in the Sidebar.
- Go to the Appearance → Widgets and add the 'Navigation Menu' widget to your sidebar, as you did with the Paragraph menu earlier.
- Next, give your sidebar menu widget a title and select the featured posts menu from the dropdown menu you created earlier.
Remember to save your widget settings. You should now be able to see your featured posts list by visiting your website. This method allows you more freedom when it comes to adding or rearranging your featured posts.
How to Add Featured Posts in WordPress Using Gutenberg
This method takes advantage of the Gutenberg block editor. This editor gives you many more options when it comes to building your website. It also makes building your website much more straightforward.
To begin, edit a WordPress post or page to display your featured posts. Then:
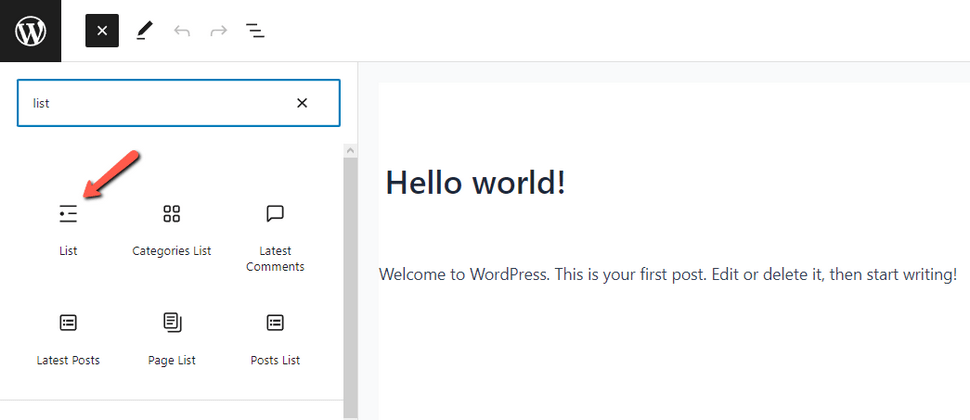
- Click the add new block button (+) at the top of the post edit screen, and then add the 'List' block to your content area.
- Enter the title of each blog post you want to include in the list. Then, select the text and use the toolbar's link button to create a link to the article.
- When finished, save your changes and update or publish the post.
Reuse The Feature Posts Block
One helpful feature of the block editor is the ability to save a block as a 'Reusable block' and reuse it in as many posts or pages as you want.
- Click the three-dot menu icon in the block toolbar and select Create reusable block to make your feature posts block reusable. Next, you'll be asked to provide a name for your reusable block. Give it a name that helps you quickly identify it later.
- To save your reusable block, click the Save button.
Now, you can do so whenever you edit a post or page where you want to re-display the featured posts. Click the add new block button and type the name of your reusable block to find it. You can also edit reusable blocks; the changes will be reflected everywhere.
How to Display Featured Posts via Plugins
The methods we discussed above all required a more hands-on approach from the user. However, some plugins can make featuring your popular posts a more straightforward experience. Here are four free ones which will display your most popular posts in your website's sidebar:
- Trending/Popular Post Slider and Widget
- Top 10 – Popular posts plugin for WordPress
- WordPress Popular Posts
- Relevant
Each of these plugins approaches the task in a similar way. We recommend you look at each of them individually, test them, and select the one that best suits your specific needs.
Conclusion
We hope this article has shown you how to feature posts in the WordPress sidebar easily. As you can see, it is a simple task to add the posts to the sidebar, especially when there are plugins that can do that for you. Having your most popular posts in the sidebar should help user engagement on your website, which should, in turn, help your website grow. It also looks professional.
We hope you find this article useful. Discover more about FastCloud - the top-rated Hosting Solutions for personal and small business websites in four consecutive years by the HostAdvice Community!

WordPress Hosting
- Free WordPress Installation
- 24/7 WordPress Support
- Free Domain Transfer
- Hack-free Protection
- Fast SSD Storage
- Free WordPress Transfer
- Free CloudFlare CDN
- Immediate Activation