How to Edit your WordPress Footer
Updated on May 11, 2023
A typical WordPress website has three parts: a header, the main body, and a footer. The main body of the page is usually different on each page, whereas the header and footer are usually the same. When you install a theme to begin building your WordPress website, you will notice that the footer contains WordPress-branded copy. That text may appear unprofessional to your visitors, so we'll show you how to edit the footer in WordPress.
Before publishing your website, you must edit the footer in WordPress. It makes no sense to use default styling and text on your WordPress website if they do not fit well together. Similarly, you may want to change your site's footer later on as you rebrand your company or products.
This post includes:
Is it Legal to Change or Remove the Footer Credits?
That's something you can do. Because WordPress is an open-source CMS, you have the freedom to modify any of the default templates as needed. You will not be breaking any laws by doing so. You should also make a backup of your website before beginning the modification process. If you do this, you will be able to restore your site to its original state if you make a mistake.
To be able to edit the footer of a WordPress website, you must first understand how to select and edit various footer elements. You can accomplish this in a variety of ways, including:
- Changing the theme setting
- In the footer widget, Using a plugin;
- By editing the code in the
footer.phpfile.
How to Modify Footer Content Using Theme Customizer
Your WordPress website's theme customizer is a part of its backend, from which you can easily make changes to your site's footer. To change the content of your site's footer, follow these steps:
- Log in to the WordPress Dashboard;
- Click Appearance → Customize:
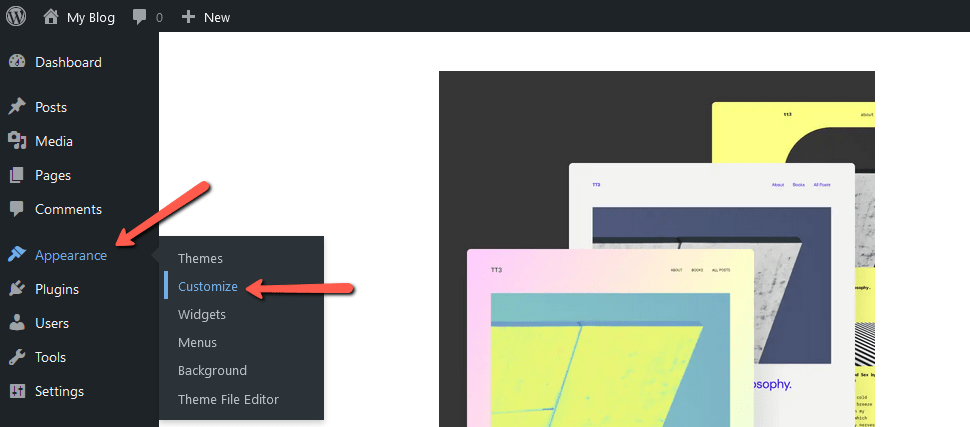
Following these two steps, you will be taken to the theme customizer for the theme that has been installed and activated on your site. Among many others, you can easily find a section called 'Footer' or 'Footer Settings', for example, here. The name of the section and the editable elements in may differ between themes. In the Astra theme, for example, you get the Footer Builder.
In general, you can change the footer layout, background color, and any content without knowing how to code. If your theme allows it, you can customize the footer for different viewing devices such as desktop, mobile, and tablet.
How to Change Copyright in WordPress
WordPress themes include a copyright text that includes the Site Title and Year. If you want to Add, Edit, or Delete this Copyright text, use the Theme Customizer in the Footer Bar, as previously mentioned.
How to Change Credits in WordPress
So you've created an interesting website with a distinct header and business-related content in its body. Before you could even consider revealing your website to users, you noticed the text "Proudly Powered by WordPress" in the footer of your website. If you dislike it, you can either disable it from appearing in the footer or change the text to represent your company rather than WordPress.org.
This is a simple task. Begin with the two preceding steps to get to the 'Footer Settings' section. There, you should be able to see the Footer, alongside its settings. There, you can make the necessary changes.
How to Edit Footer Widget in WordPress
Rather than using a theme customizer, some WordPress theme developers use widgets to define and edit footer content. It means that you can change the footer and content of your website using widgets. The following are the steps to take:
- Enter the WordPress Admin Dashboard for your website;
- In the dashboard menus on the left, click Appearance → Widgets.
Here, you will find widget sections as provided by the theme you are using. If there is no Widgets, then your theme likely does not support them.
You can edit the footer using the footer widgets such as Footer Bar 1, 2, 3, and Footer Widget Areas 1, 2, 3. Click on the down arrow in the top right corner of the sections to expand them vertically
Now, you can add Text, HTML, Images, Videos, and more using the available widgets provided by various plugins and theme you are using. Make the changes in the footer and then click Save.
Once the changes are saved, make sure you check that they are visible on the front-end of the website. Other than editing the existing content in these widgets, you can even add sub-sections using the easy drag-and-drop method, if available.
How to Edit Footer in WordPress using Elementor Pro
The Elementor Pro page builder includes a Template Builder that allows you to create and apply custom Headers and Footers. You could use this Elementor's Template Builder, especially if you want to use different Headers and Footers for different pages on your site. Normally, WordPress themes do not allow you to customize the footers of individual pages and posts.
Follow these steps to edit the footer in WordPress using Elementor:
- Go to your site Admin Dashboard;
- Under the Elementor settings, go to Templates → Theme Builder;
- Here you have to click the Footer tab and Add New Footer;
- In the New Template page, select the type of template as Footer, give the template a name, and click Create Template.
You can choose from the range of Footers in Elementor Template Library and click "Insert" to get the footer template of your choice.
Then you can modify the footer template to add your Content, Links, Logo, and Colors to match your brand.
After making the changes go to the arrow button near Publish and click Display Conditions. Here you can apply the footer that you have just designed to any or all pages on your site
How to Edit the footer.php Code
In terms of code, the footer is defined in the template file as footer.php. You can edit this file to change to the footer in your WordPress website with the following steps:
- Go to Appearance → Theme File Editor;
- Click on Editor, and you will see a list of theme files on the right-hand side;
- Select Theme Footer or
footer.php, which will display the coding lines next to it - Find the PHP Code:
get_template_partusing CTRL+F; - Update text in the double quotes next to echo.
Pro Tips:
- Don't make any edits in the footer.php code if you lack enough experience in PHP coding.
- Comment on any line of code in the
footer.phpfile instead of removing it. - Create a child theme first and make changes to it before making it live.
How to Add Custom CSS in WordPress Footer?
Another way to remove the branded content in the WordPress site is to add custom CSS to your theme. The steps are as follows:
- Go to Appearance → Customize → Additional CSS;
- Within the theme customizer, you will find a dedicated section for Additional CSS or a subsection in General Settings, depending on the theme you have chosen;
- You need to fill the blank space in the "Additional CSS" section with the code:
site-info {display: none}; - Click the Publish button to save the changes;
- You can then check the changes by visiting your website's footer or refreshing the webpage if the site is already open in the browser.
More Modifications in WordPress Footers
You can also change some other things in the footer to make it more professional and stylish.
Edit Footer Content
If your WordPress website has considerable content in the footer, be it a brief "About Us" section and contact information, you can edit it all by following the ways mentioned above.
Change Footer Color
Since the footer is also a significant part of your website, you do not want it to look odd in comparison to the overall website theme color combinations. Unless you want the footer section to have images or apply the color gradient, it is quite easy to change the default color as per your choice. Make sure you pick an appropriate color that complements your overall website's design.
Edit Footer Links
Using the theme customizer, you can also reach out to the link settings and can update them as required. In the footer, you might have links like that of other website pages or social media accounts represented in the form of small icons.
Adjust Footer Height
Not all websites have the same kind of content or links in their footer section. It depends on the website admin's preferences and needs. If you want to insert more elements into the footer, you need to increase its height accordingly. This can be best done by making changes in the footer.php file.
Conclusion
When you have a website, it's only natural that you would like for it to look exactly as you wish. The footer is one of many parts that is absolutely necessary for a modern website. That's why you should not neglect it and edit it to look perfect. We hope our guide helped you with that task.
We hope you find this article useful. Discover more about FastCloud - the top-rated Hosting Solutions for personal and small business websites in four consecutive years by the HostAdvice Community!

WordPress Hosting
- Free WordPress Installation
- 24/7 WordPress Support
- Free Domain Transfer
- Hack-free Protection
- Fast SSD Storage
- Free WordPress Transfer
- Free CloudFlare CDN
- Immediate Activation