Manage Posts
Updated on Aug 9, 2023
Creating quality blog posts is always good when you want more attention to your website. Even if your main goal is to sell goods, having a Blog section will help your site grow in popularity. In this section of our Website Builder tutorial, we will review the Blog menu and explain how to use it. It’s seamless, and you should have no trouble managing your blog, primarily if you have already used a CMS like WordPress.
The Blog menu has the following subsections:
We will go over each of these subsections in detail so that everything is crystal clear.
All Posts
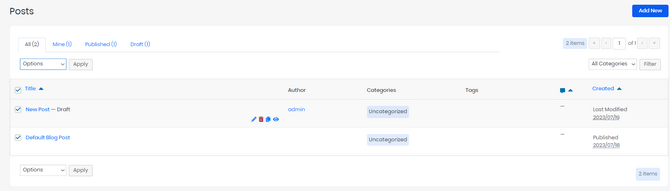
In this subsection, you can see all the posts on your blog. There are a few tabs you can use to filter your posts. There is also a search bar and a proper filtering function. Below we will list out everything you can do on this page.
- View a list of All Posts - View all your posts, including drafts and private posts;
- View a list of “Mine” Posts - View only the posts that are published under your account’s name;
- View a list of Published Posts - See only the posts that have been published;
- View a list of Drafts - Check out a list of all the drafts that haven’t been published yet;
- Search Posts - Search posts by name to quickly find them;
- Filter Categories - Filter categories when you want to see only a specific type of posts.
Hovering over a post will show several icons with options, as well.
- Edit a specific post - Go into your post’s content with the options to edit it;
- Move a post to Trash - Move a post to trash, which is reversible, similar to your pages;
- Clone a specific post - Create an exact copy of any post of your choosing;
- Preview any post - See how your post would look when published.
With that out of the way, let’s move on to how to create new posts.
Add New
Adding new posts using the FastComet Website Builder is similar to adding new pages. The interface is nearly identical. You start by pressing Add New in the bar on the left. That can also be done while you are in the All Posts tab, with a blue button in the top right. Just like how it is with adding a new page, you will have to add widgets to your new post. For instance, you can add a Title widget to write your post's title, and then add a Rich Text widget to write the actual text. You can even add media widgets if you want to add images or videos to your post, for instance. Additionally, you will see several buttons in the header of the page. They will also be present when adding a page, so what we describe here applies when creating or editing pages. The first three are self-explanatory: Publish, Update, and Close. We will focus on those now, since the rest of the interface is almost the same as when adding a page, as we mentioned earlier.
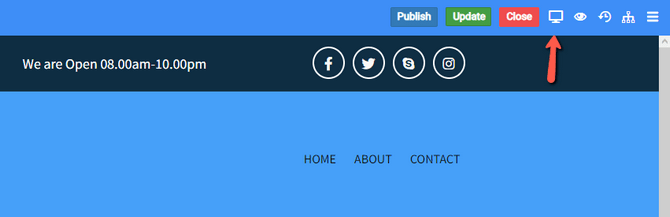
- Choose Preview Option - Opens a small tab to the left, and you can choose between a desktop, tablet, or phone. That will change the aspect ratio of the builder and show you how the post would look on any of those devices.
- Preview Changes - Opens a new tab in your browser and shows you how the changes you’ve made look in real time;
- See History and Revisions - Shows a history of the changes that have been done to the post;
- Enable Navigator - Opens a bar on the left which will show you a cascading menu of all the widgets currently being used on the post;
- Edit SEO Settings - This one is self-explanatory as well. Allows you to change the SEO data for the current post.
Additionally, similar to adding new pages, you have Settings, Options, and Advanced tabs. Let’s go over them.
Post Settings
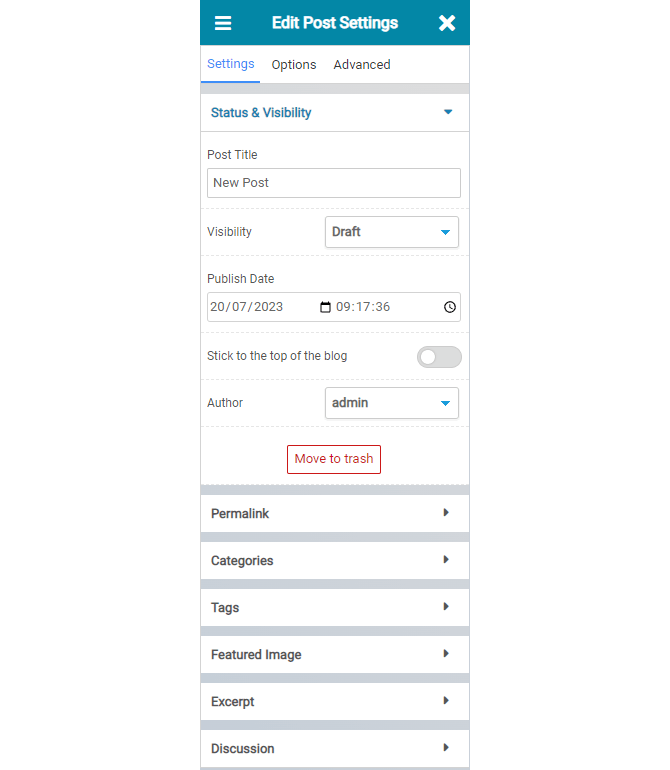
This tab allows you to edit the general settings of your post.
- Status & Visibility - You can edit the Post Title. You can also choose visibility options. They are Draft, Published, Scheduled, Private, and Password Protected. Furthermore, you can select the publish date, the post author, and whether it sticks to the top of your blog. You can even move your post to the trash from this tab;
- Permalink - This lets you edit the URL slug of the post;
- Categories - Choose the categories you want your current post to be associated with;
- Tags - Add tags to your post, separating them with a comma or the enter key;
- Featured Image - Choose a featured image for your post;
- Excerpt - Write an excerpt for your post;
- Discussion - Allow or restrict comments on this post;
Post Options
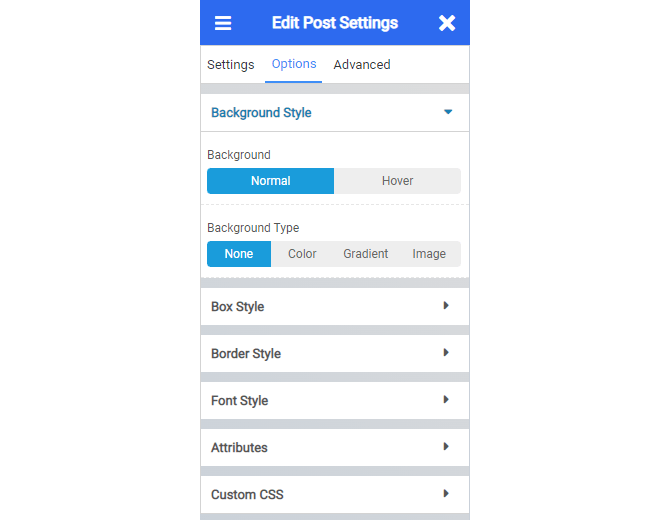
The Options tab lets you edit your post in terms of style.
- Background Style - Choose a background for your post. You can opt for no background, just a specific color, a gradient combination of colors, or even an image of your choosing;
- Box Style - Modify the size of any box that is currently selected, as well as stylize it the way you prefer;
- Border Style - Modify the border type and border radius of a presently selected box;
- Font Style - Modify the post’s Font Family, Font Size, Font Style, Font Weight, etc;
- Attributes - Set custom attributes for wrapper elements;
- Custom CSS - Include custom CSS in any part of your post.
Post Advanced
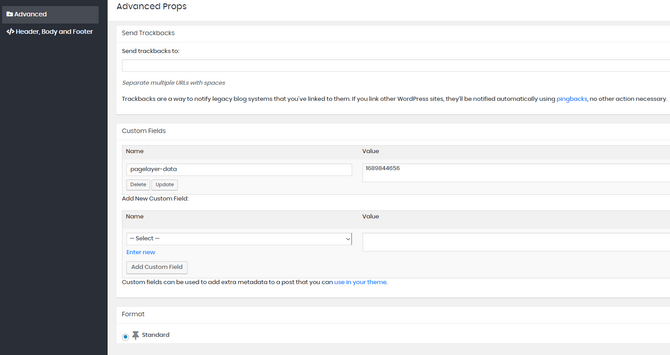
The Advanced tab lets you do several different things to your post, but we suggest you only work in this tab if you are someone familiar with adding custom metadata or code to the posts. Some of the available editing options are:
- Sending Trackbacks to other posts (if available);
- Adding custom fields with specific values;
- Select a specific format;
- Editing the Header and Footer, with the option to include HTML, JavaScript, CSS, etc.
Categories
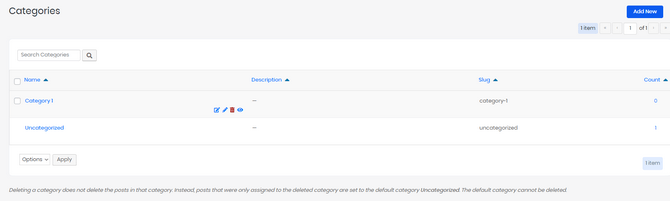
Managing categories is a straightforward procedure. All you have to do is go to the Categories subsection in your website’s main dashboard. You will see a list of categories on the page, and hovering over any of them will show several buttons. We will go over everything you can do on this page below.
- Add New - Add a new category;
- Quick Edit - Hovering over a category and selecting this button will let you change its name and slug;
- Edit - Another hover key, and this one will allow you to edit not only the category’s name and slug but also assign a parent category and write a description about it;
- Delete - Hover over a category and click this to remove the category in question;
- View - The final hover key opens a new page that will show you all posts belonging to that category.
Manage Tags
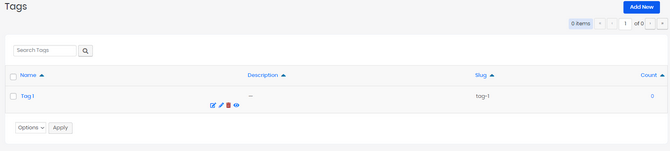
Managing tags gives you similar options to managing categories.
- Add New - Add a new tag;
- Quick Edit - Hover button that lets you edit a tag’s name and slug;
- Edit - Like Quick Edit but also lets you write a description;
- Delete - Hover button to remove a tag from the list;
- View - The last hover button shows all posts with this tag.

Website Builder Hosting
- Drag and Drop
- 24/7 Website Builder Support
- Free Domain Transfer
- Hack-free Protection
- Fast SSD Storage
- Free Cloudflare CDN
- Free Website Templates